Banner
K and Company
Maya Road
My Mind's Eye
Pro 31 Designs


blue Rose and Sequin Trim and Fabri-Tac.
Let me know if you have any questions about this project.
I know that photos can be a little deceiving about dimension and those
little details...I'll be happy to share.
Glad to see you today...I appreciate you coming by!
Banner of Love
I just love banners.
I'm so glad that someone decided to
bring them into the forefront of crafting! I have made
banners for myself and to sell...can't get enough of 'em!
When I received my box of goodies for designing with
PRO 31 DESIGNS
I quickly jotted down the idea for a sweet banner
for Sydnee's room!
After painting the Maya Road scalloped banners in a
bright candy pink, I distressed the chipboard with a bit of
walnut ink. The triangle portion of the banner was covered in
patterned papers by My Mind's Eye and then embellished with all sorts
of yummy goodies!

I love these scalloped dies by Lifestyle Crafts...they work with
all sorts of die-cutting machines...and who doesn't love doilies?!?
One of my very favorite aspects of crafting is digging waaay back in your
stash and coming up with some gems that you'd forgotten about...like the glitter
alphas by K & CO :)

Fun little 3-D Stickers by K&CO and puffy
dimensional stickers by Martha Stewart, matched the papers perfectly.
Each panel was outlined in a shabby silver tinsel trim!

You must get some of these! I'm in love with these 3-D Acrylic Flowers
from PRO 31...they have tons of colors and an
assortment of shapes on hand.

And while you're at it, you must have some of the
beautiful Wheat Sprays...and what's not to love about
a dear white dove? They offer small and large sizes. Did you know
that you can alter the color by adding alcohol inks? That's a pretty cool fact :)

For hanging, I used the ring that came with the chipboard album
and decorated them with satin and grosgrain ribbons from PRO 31 DESIGNS
Open a standard paper clip and hook one end through the ring and attach
the other end to whatever you'd like to hang it from.To attach all of the banners together, I used a length ofblue Rose and Sequin Trim and Fabri-Tac.
Let me know if you have any questions about this project.
I know that photos can be a little deceiving about dimension and those
little details...I'll be happy to share.
Glad to see you today...I appreciate you coming by!
EAD Designs
Monday Blog Hop and Giveaway
My Mind's Eye Lime Twist


 Michelle said...
Hey Cupcake
Monday, already?
Yes, yes it is and time for the
EAD BLOG HOP & GIVEAWAY
AND
THE PAPERED COTTAGE GIVEAWAY
(see below for winner!)
You should be arriving here from Rose's Happy Place
It's very seldom that I make a card without a sentiment on the front,
but this design fit my need perfectly!

I've used the sweet cupcake motif from the
and My Mind's Eye Lime Twist papers. I applied
the Stickerz to a piece of kraft paper (to match my card base)
and trimmed out. A little bit of machine stitching, ribbon and
small flat pearls finish up my notecard :)
**STICKERZ & RUBONS SHIP FREE WITH EAD!**
Time to head over to see what the talented Amy has for us today!
And now to announce the winner of the
TOIL & TROUBLE
Handmade Mini Album

THE
WINNER
IS
.
.
.
 Michelle said...
I stumbled across your blog last week and I have to say it is my MUST SEE
blog every day. You are one very talented woman! Love your stuff! :)
blog every day. You are one very talented woman! Love your stuff! :)
Congratulations, Michelle! Just send me an email with
your mailing address and I'll have this right out to you!!!
Thank you all for the sweet, sweet comments...I enjoy them
more than you know!
cards challenge
My Minds Eye Indie Chic Ginger
my scrapbook nook
simple stories summer fresh


Have a greaaat weekend, friends!
Round-And-Round
Aren't you so glad that it's Friday?
Can I get a little
T*G*I*F
The craziest thing...we watched the weather before going
to bed last night. We were hoping that we'd get some rain, but the
weatherman told us that it wouldn't happen. At 2 AM we awoke to
the loudest thunder and the brightest lightening that I've ever seen. A loud
pop struck at the front of the house and this morning we find out that one of
our large oak trees was hit by lightening...about 20 yards from the boys'
bedroom! It rained all night; it's still raining :)
Sometimes you love it when the weatherman is wrong...this is one of
those times. We greatly needed the rain!
Wanted to share my last card for this month's
CARDS CHALLENGE
at My Scrapbook Nook
The challenge is: Round-And-Round
I asked that everyone use at least FIVE circles on their card.
Here's mine:


I chose to use nothing but the red/pinkish tones from the
My Mind's Eye Indie Chic Collection and coupled it with the bright green
and pale yellow from the Jillibean labels (also in July's Kit).
Also, we're having a
These are challenges that have been posted and will be posted all
Summer long at the Nook.
My challenge is a PINSPO Challenge
(Pinspo= Pinterest+ Inspiration)
I've asked everyone to use this subway art as inspiration for
their card

Here's my card...using the JUNE Nook Kit
by Simple Stories

Have a greaaat weekend, friends!
crepe paper fringe
Dot and Whimsy
On The Fringe


Use ON THE FRINGE to decorate party hats, baskets,
cards, altered art, collage...just about anything your heart desires.
I also take custom orders!
Happy Thursday to you!
New Colors
I had a bit of spare time the other day, so I made up
some new colors of
ON THE FRINGE
handmade crepe paper fringe for Dot & Whimsy at Etsy!
FLEA MARKET FIND
Combination of aqua, light pink and cream

GRAPE FIZZ
Combination of lavender, grape and white

COTTON CANDY
Combination of turquoise, hot pink and cream

OOOOH BABY
Combination of light blue, light pink and white

Use ON THE FRINGE to decorate party hats, baskets,
cards, altered art, collage...just about anything your heart desires.
I also take custom orders!
Happy Thursday to you!
Altered Frame
Christmas Cheer
Christmas in July
imaginisce
Layout


Of course, one of my pieces wouldn't be complete without
Christmas Cheer is Here
Nothing lifts my mood quicker than
a little Christmas music and crafting...thank goodness for
CHRISTMAS in JULY
I know, I know...some scoff that we're rushing the
season, but I want to experience that Christmas Magic for
more than just 25 days out of a month! I guess that's why for years I've
always started preparing for Christmas in the month of July.
It's the anticipation of that very special and exciting time of year
that I cherish the most :)
It's the anticipation of that very special and exciting time of year
that I cherish the most :)
So with that, let's have a look at the brand new Christmas collection from
IMAGINISCE
called
CHRISTMAS CHEER

There are so many fun paper crafting projects, as well as layouts
and cards, that can be done with a Christmas Collection, but honestly, I didn't know
where to start! I wanted to do it all with CHRISTMAS CHEER!
I finally decided on a layout and altered frame to share this week.
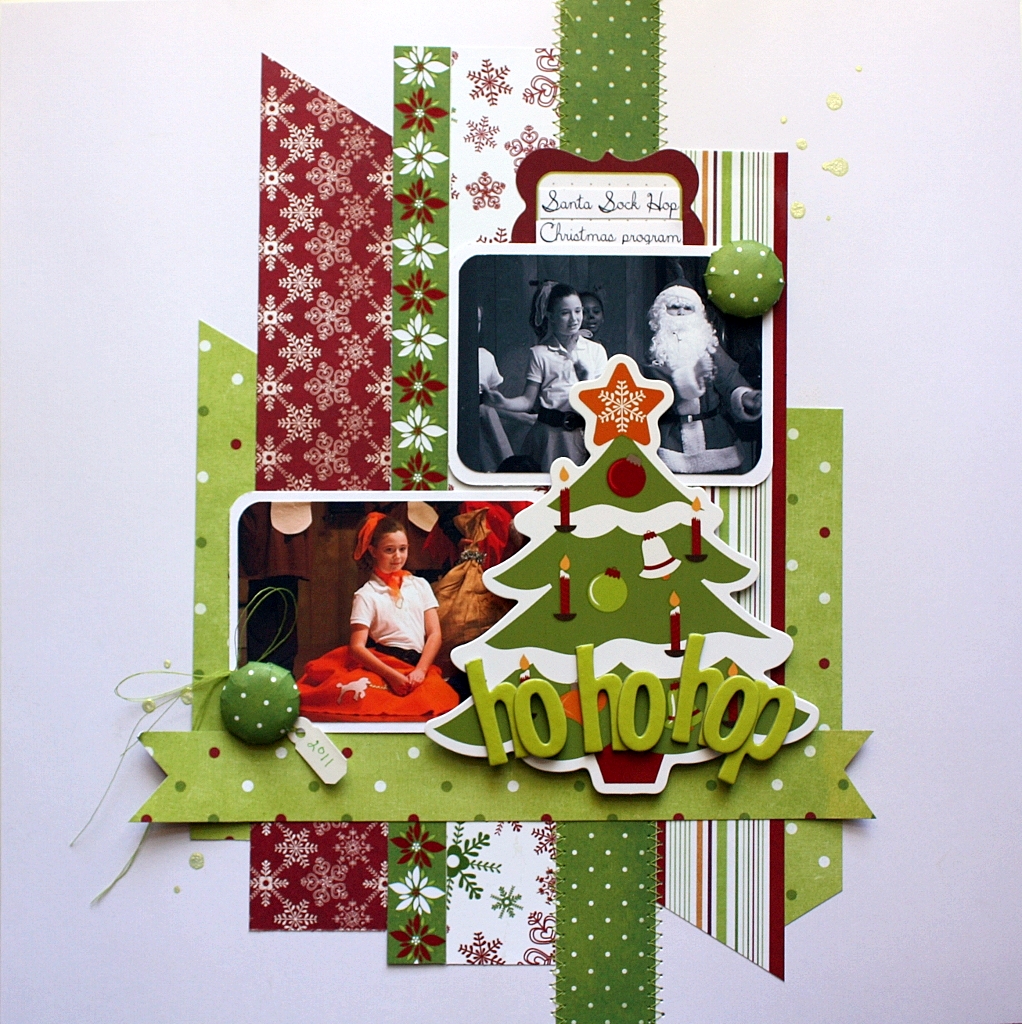
.::HO HO HOP::.
I wanted to showcase several different patterns of paper on this layout, so
I chose to use various lengths of strips as a mat for my photos.

You will notice that one strip goes completely from the top to the bottom of the page
and has been machine-stitched; I made this my vertical focal point
and accentuated it with the placement of the tree die-cut.
I cut down one of the scrolled journal Sticker Stcakers and tucked it
behind the top photo. After adding a couple of I Top Brads, the layout was complete! I purchased this cute baroque frame at Kirklands, removed the glass and added my
own altered photo using CHRISTMAS CHEER! I have a special place in my
kitchen where I hang a little something for each holiday or season

The large die-cuts from Imaginisce are wonderful for projects
like this one; they're a piece of art-work in themselves!
I used the snowflake stamp from the collection
and just cut out each flake after stamping. I added them to
the project with foam dots.

With the I Rock Tool, I added a few red Glam Rocks...
perfect for holly berries! I also added clear Glam Rocks to the
centers of the snowflakes.

Of course, one of my pieces wouldn't be complete without
a nice big, colorful bow on top! The Imagi-Cut is just the right tool
for cutting AND sealing those ribbon ends.
And I have wonderful news: you can WIN your very own
CHRISTMAS CHEER COLLECTION!
Just cruise on over to the Imaginisce Blog and comment
on each day's Christmas in July posts (we're on Day #3 today)
There will be several winners...best of luck to you!
As always, I thank you much for stopping by to see me today!
bella blvd
EAD Designs
Halloween
mini album
Monday Blog Hop and Giveaway


2-BE A FOLLOWER ON MY BLOG
AND
3-LIKE MY FACEBOOK PAGE
WINNER WILL BE ANNOUNCED DURING NEXT WEEK'S
EAD DESIGNS BLOG HOP
8-30-12
Making this album over the weekend has made
Toil & Trouble
Welcome to the
EAD DESIGNS MONDAY BLOG HOP
&
GIVEAWAY
GIVEAWAY
&
PAPERED COTTAGE GIVEAWAY
(see below)
PAPERED COTTAGE GIVEAWAY
(see below)
You should be arriving here from the amazing Rose's Blog!
As usual, don't forget that EAD Designs will be giving away
some cool vinyl from today's blog hop :)
I picked up some Bella Blvd papers
"Too Cute to Spook"
with an 8-page mini album in mind. When planning the cover, I
just had to add the adorable cauldron from the


I added the Stickerz to a scrap piece of cardstock
and carefully cut-out around the image.

***I WILL BE GIVING AWAY THIS ALBUM***
1-LEAVE A COMMENT HERE2-BE A FOLLOWER ON MY BLOG
AND
3-LIKE MY FACEBOOK PAGE
WINNER WILL BE ANNOUNCED DURING NEXT WEEK'S
EAD DESIGNS BLOG HOP
8-30-12
Making this album over the weekend has made
me so ready for Fall weather and Halloween decorations!
But, I' guess I'll have to settle for crafting Halloween creations
right now...at least until mid-September LOL
Now it's off to see what Ms. Amy is sharing with us today.
Have a wonderful week!
Lighthouse
stamp of the week
Unity


love in a lighthouse
Sharing the newest
UNITY STAMP CO
Stamp of the Week!

I know so many people who love
lighthouses...this set would be perfect for them (or you),
so be sure to let your lighthouse-lovin'-friends
know about this week's SOTW!
For $5.79 per week (includes shipping to US/Canada)
you will receive a high-quality and totally unique
red rubber stamp in the mail.

Find out more about Unity's Stamp of the Week program
and this stamp at:
See you tomorrow!
Cakewalk
Dot and Whimsy
Etsy
mini album
October Afternoon


The colors are cotton-candy sweet...if I had a cottage, it would be all
decked out in these lovely vintage colors :)
I felt like a kid again while putting the album together...such fun!
Thanks for looking!
It's A Cakewalk!
Hello!
Hope you're having a nice Saturday.
I put the finishing touches on a new little mini album
today and got it loaded to Etsy before the hubs and I ran a
few errands. Although it sold while I was out, I still wanted to share it :)
.::IT'S MY PARTY::.
CAKEWALK MINI SCRAPBOOK ALBUM
Below are close-up photos of each page.
I used October Afternoon's sweet and whimsical CAKEWALK Collection.
I used October Afternoon's sweet and whimsical CAKEWALK Collection.


The colors are cotton-candy sweet...if I had a cottage, it would be all
decked out in these lovely vintage colors :)
I felt like a kid again while putting the album together...such fun!
Thanks for looking!
Altered Jell-O Tin
Pro 31 Designs
Snowmen


Snowmen in July
The temperature is supposed to reach 104 degrees
here in Northeast Texas today...I hope my snow-people don't melt!
(gosh that sounds silly, but I have no other introduction handy at this early hour)
I have another PRO 31 DESIGNS project to share
and yes, it has to do with a snowman and woman :)

Aren't they cute?
A few years back I bought several (well, a lot) of old tin Jell-O molds
from an antique store and my vision was to create little scenes on the tops or
insides of them.

I first applied a coat of iridescent glitter over the tin.
(Martha Stewart's Glittering Glue works really well)
After allowing the glue to completely dry, I began adding my fun
trims from PRO 31 DESGINS:


To the top I added a silk flower, glittered snowflake ornaments,
chipboard snowpeople and a banner from my stash. Then I stuck in
these cool Crystal Wheat Sprays from Pro 31...I love these!
My daughter has a sweet collection of snow angles that sit out
year-around on a shelf in her room...I've added this to it!
Check out all of the beautiful products offered by Pro 31
www.pro31designs.com
Happy weekend!
Everyday Inspiration
hello cupcake
imaginisce
Makin' Waves
Monster Mash


Everyday Inspo...AND A Sneak!
Thursday afternoon greetings!
**If you're here for the Unity Blog Hop, please click here**
I'm up today with
EVERYDAY INSPIRATION
This week's worth of ideas from the other Design Team
members have been tremendous...isn't it amazing to realize
what we're inspired by in our day-to-day environment?
I created this 8.5x11 layout using the canvas print (below)
as my inspiration piece. I love the look of collage art, so I took
that portion and adapted it to my layout.

I used the reverse patterns from Imaginisce's HELLO CUPCAKE and
MAKIN' WAVES papers. To keep in proportion with the inspo piece,
I went with a 5x7 photo and various printed fonts from my computer for
the journal strips.

And while we're at it, Imaginisce is previewing their newest
Halloween line called
MONSTER MASH


Isn't MONSTER MASH totally adorable?!? See it ALL right here!
We'll start sharing projects with you soon.
Up next week...CHRISTMAS in JULY with
CHRISTMAS CHEER!
Thanks for droppin' by to see me!


