fern and forest boy
little yellow bicycle
mini album
tutorial


4- Decorate each page before adhering pages together with a high-tac adhesive
5- From left to right, the first flap adheres to the next flap; these are pages 1 and 2. 


Mini Album Madness: 2 Papers= 1 Album
Hello! I'm sharing a sweet mini album today at
LITTLE YELLOW BICYCLE
with just two of their double-sided 12X12 papers and fun embellishments from the
FERN & FOREST BOY COLLECTION

Here's a quick and easy little tutorial to get you going:
(I've also created this same-styled mini album using only one paper)
1- Select two matching 12X12 double-sided patterned papers.
For each paper you will score down the middle at 6"; turn paper and score at 4" and at 8".
2- Next, cut along the 6" score mark up to the 4" score line only; repeat for the second sheet of paper.
3- Fold paper accordion style (see photo 1 or 2)
4- Decorate each page before adhering pages together with a high-tac adhesive
(I used Sookwang 1/2" tape) (see photo 4)
5- From left to right, the first flap adheres to the next flap; these are pages 1 and 2.
The next set of pages will contain the section that has the intact fold at the top; adhere.
The final two flaps will be joined to the first two flaps of the second sheet of paper.
The last two flaps on the second sheet will adhere together. This will give you a 10 page album.
Little Yellow Bicycle's double-sided papers are the perfect thickness for such a mini album.
Try changing up the score marks to create different-sized mini albums!
For the inner pages I used the "5 Things Pocket" that are available for most-all
Little Yellow Bicycle Collections.
Right now you can SAVE 20% on the newest collection, Poppy.
Just enter POPPY2013 in the checkout at Little Yellow Bicycle's online store!
Visit the LYB Blog for all sorts of fun project ideas!
Let me know if you have any questions about this mini album :)
Thanks for coming by!
12x12 Layout
Cap and Gown
card
Doodlebug Design
Fruit Stand Collection


Graduates & Summertime
We're celebrating Graduates and Summertime at
DOODLEBUG DESIGNS
If you're not familiar with Doodlebug's newest collection, Cap & Gown,
it is captured in black, grey and white so it's easy to customize to a school's colors!

A dear friend went back to college this past year and finally reached his goal of
attaining his Bachelor's Degree. The school's colors are purple and gray, so this worked
out perfectly! I kept with the circle theme from the 4X6 Simply Put journal card and punched
and layered two circles of cardstock as a backdrop for the owl.
And here is a simple layout that actually started out as a card!
I wrapped Washi Tape around the edge of a Simply Put card and then embellished
with pieces from the Fruit Stand Mini Banners Craft Kit.
I dressed up the banner with stickers from the This & That Sticker Sheet.
I love the colors...it just says S-U-M-M-E-R!
There are loads of fun projects to see on the Doodlebug Design's Blog...come on by!
card
Dear Lizzy
Heidi Swapp
May KOTM
petaloo
Unity Inspiration Hop


Unity {Inspiration}
Happy Thursday...it's time for some
UNITY INSPIRATION
along with fabulously fun flowers by PETALOO

**You should be arriving here from Renee Aslette's Blog**
Remember to comment as you go!
Three lucky commentors will each receive a $20 Unity Gift Certificate
This month's focus at Petaloo is their Color Me Crazy Flowers.
These come to you in white and can easily be transformed with whatever color you
like by spritzing, stamping, inking, coloring, etc...or just leave them in their natural state :)
For today's card I wanted to use some papers from Dear Lizzy, so I went with
Georgia Peach ColorShine spritz by Heidi Swapp.
I stamped the sentiment from the May Kit-of-the-Month onto a frame found on one
of the patterned papers...it worked out just great! I embossed the mint green paper
behind it with one of my new folders by Brenda Walton.
The "celebrate today" sentiment is also a part of the May KOTM.
This particular Shabby Cut Canvas Flower came in two layers.
I wanted a certain 'fit' so I removed the back layer and then layered the flower
onto a green mulberry paper flower (also from Petaloo) to act as the leaves.
I think it turned out to be a very nice and elegant card for the new couple :)
**Time now to head over to Shilo Miles' Blog**
Enjoy hoppin', my Unity friends!
12x12 Layout
Altered Art Frame
bella blvd
Hampton Art


Bella Blvd + Hampton Art
We're doin' some more stampin' this week with
BELLA BLVD & HAMPTON ART STAMPS

Here's the blurb from the Bella Blog:
For the next few days, Bella Blvd is teaming up with
Hampton Art Stamps to provide you with some stamping inspiration.
Our newest cling stamps (Love and Marriage, Sand & Surf, and Kiss Me)
are licensed and manufactured thru Hampton Art Stamps. We thought it was only fitting for a
handful of our designers to team up with a handful of their designers, and see what they
could all create using Bella’s products and the Bella/Hampton Art stamps.
**GIVEAWAY GIVEAWAY GIVEAWAY**
Visit the Bella Blvd Blog to find out more!
I've always loved the endearing images that Stephanie creates for Bella Blvd
and now you can find many of them in stamp form!
Today (yesterday on the Bella Blog) I have a sweet layout and binder photo frame to share:

To begin my layout I started with strips of various Designer Tapes to create a background/photo mat.
I then thought that the Ice Stripe Designer Tapewould make a cute set of clouds.
I applied the tape to paper and then stamped with black Staz On ink.

When you're stamping onto a slick surface, be sure not to wiggle or walk the stamp back and forth
as you may get a smudged look; instead stamp directly down and then back up.
 For the border of hearts, I only stamped the image a quarter, a third or half-way to create a staggered look.
I used Color Box's Squash ink for this and it matches the Orange Crochet Hearts perfectly!
Supplies:Love & Marriage: Smokeys in Love; Kiss Me: Alpha+Bits Stickers, Just Write Journaling Stickers; Sienna Chipboard Alphas: Frosting; Ciao Chip Elements: Borders; Designer Tape: Ice Stripe, Piggy Pink Stripe, Pickle Juice Stripe, Navy Dot, Pony Dot; Crochet Hearts: Orange; Hampton Art Stamps: Kiss Me
 (Photo Courtesy of Aleksandra Gadji)
I recently ran across a cute idea using binder clips to hold place-setting cards...
I wondered how well it would work as a photo display!
 I set out by adhering three large binder clips together by wrapping with a piece of patterned paper.
Next, I made a 4x6 photo mat and backed it with a thin chipboard for extra sturdiness.
After decorating the photo mat, just insert the frame into the binder clip prongs and it's ready for displaying.


For the stamped clouds, I used Bordering Blue ink by Stampin' Up! and plain white cardstock by American Crafts. After stamping the image three times, I used a blue watercolor pencil by Faber Castell.

 To make the banner, I took a length of Designer Tape and applied it to a scratch piece of paper and then cut out. I then stamped the sentiment onto it with a black Staz-On ink; this works well and doesn't smudge!
Supplies:Baby Boy: Momma's Boy, Wild About You, Cute Cuts; Ciao Chip Elements: Clouds; Designer Tape: Yellow Chevron; Hampton Art Stamps: Kiss Me, Sand & Surf
Now, don't forget to visit the blog and leave a comment each day so that you'll have
a great chance of winning the "Love & Marriage Collection" Giveaway! Good Luck!
Hope all of my American friends have a wonderful and safe Memorial Weekend.
I then thought that the Ice Stripe Designer Tapewould make a cute set of clouds.
I applied the tape to paper and then stamped with black Staz On ink.

When you're stamping onto a slick surface, be sure not to wiggle or walk the stamp back and forth
as you may get a smudged look; instead stamp directly down and then back up.

I used Color Box's Squash ink for this and it matches the Orange Crochet Hearts perfectly!
Supplies:Love & Marriage: Smokeys in Love; Kiss Me: Alpha+Bits Stickers, Just Write Journaling Stickers; Sienna Chipboard Alphas: Frosting; Ciao Chip Elements: Borders; Designer Tape: Ice Stripe, Piggy Pink Stripe, Pickle Juice Stripe, Navy Dot, Pony Dot; Crochet Hearts: Orange; Hampton Art Stamps: Kiss Me
I recently ran across a cute idea using binder clips to hold place-setting cards...
I wondered how well it would work as a photo display!

Next, I made a 4x6 photo mat and backed it with a thin chipboard for extra sturdiness.
After decorating the photo mat, just insert the frame into the binder clip prongs and it's ready for displaying.


For the stamped clouds, I used Bordering Blue ink by Stampin' Up! and plain white cardstock by American Crafts. After stamping the image three times, I used a blue watercolor pencil by Faber Castell.


Supplies:Baby Boy: Momma's Boy, Wild About You, Cute Cuts; Ciao Chip Elements: Clouds; Designer Tape: Yellow Chevron; Hampton Art Stamps: Kiss Me, Sand & Surf
Now, don't forget to visit the blog and leave a comment each day so that you'll have
a great chance of winning the "Love & Marriage Collection" Giveaway! Good Luck!
Hope all of my American friends have a wonderful and safe Memorial Weekend.
Altered Art
faber castell
May Arts Ribbon
Maya Road
photo frames
pink paislee


Layers of Frames
Hello!
Today I'm bringing my latest design for
PINK PAISLEE
featuring the fabulous Photo Frames that can be found in most Pink Paislee collections.
Today I’ve chosen the cool, crisp colors and patterns from the Portfolio Collection and
have picked out not one, not two, but all four of the Photo Frames included in the pack!
I started out with the idea to layer the frames all together and then place on a layout…
but after a little Pinterest research, I came up with an altered Photo Display using
three large binder clips, a sheet of scalloped chipboard and some Pink Paislee goodies.
Here is a look at the completed project…I’ll get into all of the details following:
All righty, to begin I started with a plain 4.25″ X 8″ scalloped chipboard page (Maya Road) that
I painted a warm yellow (and yes I cheated…just paint the areas that will show).
Next, I spritzed on a light coating of Black Velvet Color Shine.
After all was dry, I machine-stitched on a 4″ X 7.75″ piece of Black LUXE Chevron Paper.
This next photo will show placement of the three binder clips. I added these to the chipboard
before I attached the black photo mat holding the layered frames. Note that you will need to make
sure that each clip is even at the bottom and in line with the other clips; once that is done
your frame with stand just beautifully!
For the layered Photo Frames, I began by arranging them so that each would overlap without the
‘window’ below it showing through. Then I applied small square foam adhesives between each layer. Attach the bottom frame to a black cardstock mat with foam dots.
A sweet doily border accents the top Photo Frame. I added Gold Gelato by Faber-Castell to the Artisan butterfly and colored the star with a permanent black marker.
To the top, I added a couple of the photo tabs, along with my daughter’s nickname spelled out
with Heidi Swapp’s Clear Mint Letters. Meh, it was lacking that ‘something’ so I decided to
type out her full name in a New Courier Font (Bold 24 pt) and then printed it out onto a 6×6 Portfolio page. I used a 1/2″ circle punch to cut out each letter and added to the top with foam dots.
You could also try incorporating this idea into recipe, note or place-card holders.
Now wasn’t that F*U*N!!! I hope you get the chance to try it…would make a wonderful
Teacher’s Gift or try something masculine for Father’s Day.
Glad you've come by today!
I'm gradually adding to the giveaway pile...I'll be sharing soon :)
Authentique Paper
faber castell
Hampton Art
Imagine Crafts
mini album
Retro Album
Want2Scrap


Want2Scrap A Retro Mini?
Authentique Paper and Want2Scrap are teaming up this week to bring you
tons of inspiration using Authentique Paper and Want2Scrap products!

After you check out the projects on the Authentique Paper blog
(and leave a comment so that you're eligible for the prize drawing!)
be sure to head on over to the Want2Scrap blog to find out what the talented members of
their Design Team have in store for you today!
This was my first experience working withWANT 2 SCRAPproducts and wow, did I have fun!
I received the "Retro Album" and had a tough time deciding on whether to do a traditional album,
I received the "Retro Album" and had a tough time deciding on whether to do a traditional album,
a banner or home decor. In the end, I was really wanting to use the "Renew Collection"
by Authentique Paper as I hadn't had the chance to play with all of the cute file folders and punch-outs...
I thought these would best represented in an album.
The "Retro Album" comes with five different panels of various shaped corrugated chipboard.
One side is flat and the other side has the fun ridges. In prepping the album, I inked around the edges of the flat sides with Memento's Tuxedo Black. On the corrugated sides, I used Color Shine Black Velvet Spritz. To the fancy ends (flat side only) I painted the areas with a white PITT pen by Faber-Castell.
To the front cover, I layered a Renew patterned paper with one of the file folders and then
embellished with a puzzle piece and flowers from Petaloo. Wanting to hide the area where the
white pen marking met the corrugated board, I added a strip of gingham ribbon and then topped with Mother of Pearl Rhinestones by Want2Scrap. The sweet little paper bow is from the Etsy
Shop of Curtsey Boutique.
The next two pages feature Authentique's new Hampton Art Stamps and the beautiful flourish of adhesive pearls by Want2Scrap. I stitched the file folder together so that tags could be tucked inside.
As you may can tell, I switched the pages around so that two flat sides would be together,
as well as two corrugated sides...I thought it added even more interest :)
Again, I used the different punch-out elements for the majority of my embellishments...
when you layer them together with foam you have a whole new look!
I removed the original centers from the Petaloo flowers and added the large
Mother of Pearl Rhinestones instead. The Tear Drop Pearls look perfect as the
center for the punched butterfly!
That's the end of my "Retro Album"...I hope you have the chance to try some of the wonderful
That's the end of my "Retro Album"...I hope you have the chance to try some of the wonderful
Want2Scrap products and see how well they work together with Authentique Paper!
Authentique Product: Renew Collection: Collection Kit; Puzzle Pieces; Mini Notes;
Block Numbers; Petite Folders; Frames & Corners; Titles & Phrases;
Hinges & Tabs; Circles & Scallops
Want2Scrap Product: Retro Album; Say it with Pearls Tear Drop; Swirl Pearls-White;
Want2Scrap Product: Retro Album; Say it with Pearls Tear Drop; Swirl Pearls-White;
Mother of Pearl Rhinestones
Again, to enter your name into the prize-pack-giveway from Authentique, just head over to
the blog and leave a comment on today's post, as well as the following posts for the week :)
+++++++++++++++++++++++++++++++++++++++
I have family and friends in and around the Moore, Oklahoma area and I pray especially
for their community today as they continue to search for loved ones and begin clean-up efforts.
In 1999, one day after the other horrific Moore tornado, De Kalb was hit by an EF3 tornado
that damaged the high school, elementary school and historical buildings of downtown.
As it was 14 years ago, we are on watch for a severe outbreak of storms today.
We would really appreciate your thoughts and prayers...there are never too many!
THANK YOU
Authentique Paper
Cherish Collection
mini album
tutorial


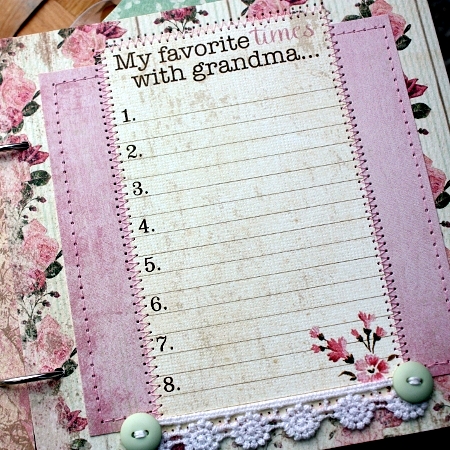


Braggin' on Grandma
I was asked to create a mini album tutorial this month for
AUTHENTIQUE PAPER
The high-quality of Authentique's patterned papers allows for such an album as I bring today.
It's quick, it's easy and it's fun to put together for any theme! For this particular 6x6 mini album,
we'll be using the endearing Cherish Collection that is doubled in design for
both Grandfathers and Grandmothers.
To begin, cut any 12x12 sheet of paper to a 6x12 size; score in the middle and fold.
Decorate each page accordingly and then apply a strong adhesive tape to the bottom
and (opened) side to create a pocket.
With this pattern you can insert all sorts of tags and extra photos inside!
Here are a few more photos of the pages of my album:
The 6x6 Bundles come in so handy for this type and size of album.
The print is to scale for such a mini; you don't lose all of the beautiful artwork in the process.
Just trim the 'mats' from a 6x6 size to whatever size you'd like to use...
these are cut to a 5x5 and then machine-stitched into place.
The Enhancement Sheets do so much of the design work for you!
Just layer with Components Stickers, fabric brads, buttons and other cute embellishments to match.
Once all of the pages have been assembled, bind at the side with rings, ribbon or use a binding system.
For my album, I measured in 2.5" from the top and bottom and punched holes at those marks.
Tie on pretty trims and ribbons or leave plain.
Now for the tags! These were as simple as trace, cut and...that's it!
I used templates from Kiwi Lane Design to create these particular tags.
Thanks so much for letting me share this with you today...I hope you'll give it a try :)
Authenitque Paper Product:
Cherish Collection: Cherish One Paper; Cherish Two Paper; Cherish Three Paper;
6x6 Bundle; Enhancements 12x12 Cut Apart Sheet; 6x12 Components Stickers
Other Supplies:
Kiwi Lane Template; Ribbons-May Arts; Lace Trim- Recollections; Brads- Doodlebug Design;
Canvas Butterfly and Felt Rolled Roses- Curtsey Boutique; Buttons- American Crafts;
Flocked Leaves- Petaloo; Square Lace Die Cut (Cover)- Cheery Lynn Designs


