Showing posts with label Maya Road. Show all posts
Showing posts with label Maya Road. Show all posts
card
christmas gift
Maya Road
xyron


Maya Road & Xyron Christmas In July
Well, I've made it to July 24th and have not shared a
single "Christmas in July" project up until now!
That's almost unheard of...for me anyway :)
But today is the day.
But today is the day.
XYRON and MAYA ROAD
have teamed up this week to bring you some inspiration
from both of the companies!
Be sure to visit the Xyron Blog to see all of the projects!
My first project uses a recycled glass jar with a 4" opening at the top.
I embellished the top of a 4" Jumbo Bottle Cap from Maya Road with some
patterned paper by Doodlebug Design. After cutting the circle, I placed the paper
through the Creative Station to add a nice, even coating of permanent adhesive.
The metal flower bottle top was colored with a red alcohol marker,
topped with paper and then attached with Xyron 3/16" Adhesive Dots.
A wooden knob was painted lime green and attached with Xyron Adhesive Dots.
I added some ribbon to the jar by running a length of ribbon through
the Xyron 1.5" Sticker Maker. A matching bow was added to the tag on front.
Two of the Raspberry Berry Beads were adhered to the side of the tag
with Xyron 3/16" Adhesive Dots
And lastly I have a quick, quick card that I made up with some of
the Paper Twist Ribbon from Maya Road and papers/stickers by 3 Birds Designs.
I slightly unwound the paper and then rolled it into a flower shape.
A 1" circle was covered in adhesive with the 1.5" Xyron Sticker Maker and
then the rolled flower was attached to it.
That's all from me today!
Banner
Easter
May Arts Ribbon
Maya Road
Retro Craft Challenge
Wreath


Carrot Banner Wreath
It's challenge time again at May Arts Ribbon!
As the banner says...they give you the ribbon...you create.
You must be one of the first 20 people to sign up, so go --here-- for more info.
Here is a look at the Inspiration Board and Retro Themed Ribbons:
Seriously yummy, right?
For my take on the challenge, I was able to use all but the bottom right green
ribbon in my design. I came up with this cheerful Spring Banner that now
graces one of my larger grapevine wreaths:
To begin, I started with six sheets of scalloped rectangle chipboard by Maya Road.
I cut each piece down into a triangular shape as shown above.
Next, I painted the very top with a lime green acrylic paint.
I used the orange scallop grosgrain ribbon as the base of the carrot. After cutting
the desired lengths for each chipboard piece, I ran the ribbon through a 3" Xyron Sticker Maker.
Just apply the strips of ribbon to the triangle and wrap the excess around to the back.
Where the grosgrain ribbons met, I accented those areas with the yellow loop trim.
I accented the top of each carrot with pink pom trim and the new gorgeous
sequined elastic trim. I tied all of the panels together with the turquoise sheer
ribbon and then attached it to the wreath with a heavy gauged wire.
May Arts Ribbon:
There is a ton of cute inspiration up today on the May Arts Blog;
come on by and check things out :)
Altered Art
Authentique Paper
Halloween
May Arts Ribbon
Maya Road
petaloo
Thrilling Collection

A House of Thrills
It's not too haunted nor too spooky, but this cutely
decorated Thrilling house just says HAPPY HALLOWEEN!
My little house is premiering at Authentique Paper Blog today...have a look:
decorated Thrilling house just says HAPPY HALLOWEEN!
My little house is premiering at Authentique Paper Blog today...have a look:
When I received this Maya Road paper mâché house, it started
speaking "make me into a haunted house!"...and so, I did.
I started by painting the piece with an acrylic black paint.

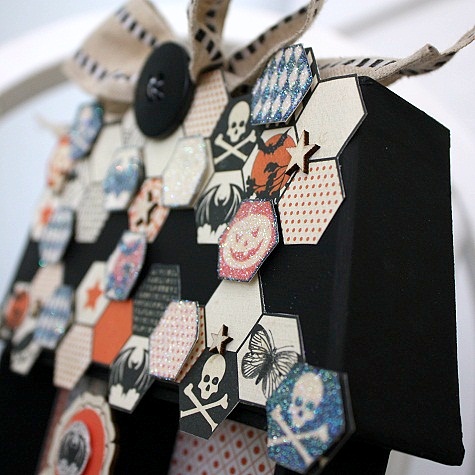 For the roof, I cut apart various patterns from the hexagon
printed paper, Frenzy,and glued it to the form.
Next, I cut individual hexagons and attached to sections
of the roof with foam dots. A sprinkling of iridescent glitter (from Art Glitter)
gives them a bit of extra POP!
 After cutting squares of paper from the 6X6 Bundle, I added them to the walls of the 'rooms'.
I used a large wood veneer doily shape as the background and base for the clustered embellishment. A small postcard print was cut from the 6X6 bundle sheets (a larger, matching design can be found on the Mystic 12X12 paper). A couple of stickers from the Details Sticker Sheet were included, as well as two black blooms and leaves from Petaloo!
 A canvas wired bow (from May Arts ribbon) sits perched on top and finishes off the design!
Authentique Products: Thrilling Collection- Frenzy Paper; 6X6 Bundle; Details Sticker Sheet
Other Products: Maya Road- House; Petaloo- Flowers & Leaves; May Arts- Ribbon; Art Glitter- Glitter and Designer Adhesive Glue
I love this house. I'm not even sure where he resides now.
After the Summer CHA show, he was taken home with someone new...I hope they're enjoying :)
See ya'll later!
speaking "make me into a haunted house!"...and so, I did.
I started by painting the piece with an acrylic black paint.
printed paper, Frenzy,and glued it to the form.
Next, I cut individual hexagons and attached to sections
of the roof with foam dots. A sprinkling of iridescent glitter (from Art Glitter)
gives them a bit of extra POP!
I used a large wood veneer doily shape as the background and base for the clustered embellishment. A small postcard print was cut from the 6X6 bundle sheets (a larger, matching design can be found on the Mystic 12X12 paper). A couple of stickers from the Details Sticker Sheet were included, as well as two black blooms and leaves from Petaloo!
Authentique Products: Thrilling Collection- Frenzy Paper; 6X6 Bundle; Details Sticker Sheet
Other Products: Maya Road- House; Petaloo- Flowers & Leaves; May Arts- Ribbon; Art Glitter- Glitter and Designer Adhesive Glue
I love this house. I'm not even sure where he resides now.
After the Summer CHA show, he was taken home with someone new...I hope they're enjoying :)
See ya'll later!
Altered Art
faber castell
May Arts Ribbon
Maya Road
photo frames
pink paislee


Layers of Frames
Hello!
Today I'm bringing my latest design for
PINK PAISLEE
featuring the fabulous Photo Frames that can be found in most Pink Paislee collections.
Today I’ve chosen the cool, crisp colors and patterns from the Portfolio Collection and
have picked out not one, not two, but all four of the Photo Frames included in the pack!
I started out with the idea to layer the frames all together and then place on a layout…
but after a little Pinterest research, I came up with an altered Photo Display using
three large binder clips, a sheet of scalloped chipboard and some Pink Paislee goodies.
Here is a look at the completed project…I’ll get into all of the details following:
All righty, to begin I started with a plain 4.25″ X 8″ scalloped chipboard page (Maya Road) that
I painted a warm yellow (and yes I cheated…just paint the areas that will show).
Next, I spritzed on a light coating of Black Velvet Color Shine.
After all was dry, I machine-stitched on a 4″ X 7.75″ piece of Black LUXE Chevron Paper.
This next photo will show placement of the three binder clips. I added these to the chipboard
before I attached the black photo mat holding the layered frames. Note that you will need to make
sure that each clip is even at the bottom and in line with the other clips; once that is done
your frame with stand just beautifully!
For the layered Photo Frames, I began by arranging them so that each would overlap without the
‘window’ below it showing through. Then I applied small square foam adhesives between each layer. Attach the bottom frame to a black cardstock mat with foam dots.
A sweet doily border accents the top Photo Frame. I added Gold Gelato by Faber-Castell to the Artisan butterfly and colored the star with a permanent black marker.
To the top, I added a couple of the photo tabs, along with my daughter’s nickname spelled out
with Heidi Swapp’s Clear Mint Letters. Meh, it was lacking that ‘something’ so I decided to
type out her full name in a New Courier Font (Bold 24 pt) and then printed it out onto a 6×6 Portfolio page. I used a 1/2″ circle punch to cut out each letter and added to the top with foam dots.
You could also try incorporating this idea into recipe, note or place-card holders.
Now wasn’t that F*U*N!!! I hope you get the chance to try it…would make a wonderful
Teacher’s Gift or try something masculine for Father’s Day.
Glad you've come by today!
I'm gradually adding to the giveaway pile...I'll be sharing soon :)
Authentique Paper
Heart Box
Lovely Collection
Maya Road
My Favorite Things


A Box of Lovely
There is no doubt that love is in the air!
Time to share a fun and functional heart-shaped treat box covered in loveliness.
It all begins with a paper mache heart box from Maya Road and gorgeously crafted
papers and accents from Authentique's Lovely Collection.
Can't you just imagine receiving this sweetly decorated box filled to the brim
with delicious handmade goodies or a variety of chocolate candies...oh yeah!
To begin, I traced the box shapes onto the"Adore" 12x12 Paper and cut out.
As you can see, the lid comes with an acrylic 'window'; I carefully removed this so that
I was able to trace the inner aspect of the heart. After attaching the paper to the lid,
I reattached the window with adhesive.
I fashioned a small heart from the "Crush" 12x12 Paper by using a quilter's template.
Next I layered on a small paper doily from my stash and topped that with the sweet
girl and greetings motif cut from the "Greetings" 12x12 Paper. To the bottom
I gathered a cluster of blooms from Petaloo, as well as some that I die-cut and
rolled myself from the "Crush" paper.
I used a scruffy walnut ink pad to gently distress the edges of the paper.
A band of "Crush" paper covered the top's edge along with some pretty pearl,
lace trim that I got in a bundle from Hobby Lobby.
And nothing says "Valentine" like a red/cream gingham bow, which completed my sweetheart box.
And nothing says "Valentine" like a red/cream gingham bow, which completed my sweetheart box.
Supplies:
Authentique Paper- Lovely: Adore Paper; Crush Paper; Greetings Paper; Details 12x12 Sticker Sheet
Maya Road- Heart Box
Petaloo-Pink Dahlias
Authentique Paper- Lovely: Adore Paper; Crush Paper; Greetings Paper; Details 12x12 Sticker Sheet
Maya Road- Heart Box
Petaloo-Pink Dahlias
My Favorite Things- Flower Die
Authentique will be showcasing the newest collections: Winter, Renew, Spring & Hope
at the blog throughout the month...collections sell out quickly, so don't miss out!
EAD Designs
Maya Road
Monday Blog Hop and Giveaway
My Minds Eye
Plaque
Witch


It's Great to be Queen
Queen of the Witches!
For today's blog hop with
EAD DESIGNS
I've concocted yet another Halloween goodie to
hang in my scrap room :)
First, you should be arriving at my blog from Rose's Happy Place!
Next, please excuse the photo...it was rainy when I took the photo
(so glad for the rain though!) and hard to find adequate natural light.

I used two parts EAD for this little plaque:
I traced a design (using an album shape from Maya Road) onto chipboard
and then one a little larger for the backing. I then traced mirror images onto
patterned papers by My Mind's Eye. And you know me, I had to trim the edges
in baker's twine! I then layered the two pieces together with foam dots, which
allowed enough room to be able to slide the ends of the pipe cleaner down into.
For the owl, I applied it to a piece of kraft paper and then trimmed out.
Super quick and easy project
Now it's time to head over to Amy Tsurata's Blog!
Thanks for hopping with us!
Banner
K and Company
Maya Road
My Mind's Eye
Pro 31 Designs


blue Rose and Sequin Trim and Fabri-Tac.
Let me know if you have any questions about this project.
I know that photos can be a little deceiving about dimension and those
little details...I'll be happy to share.
Glad to see you today...I appreciate you coming by!
Banner of Love
I just love banners.
I'm so glad that someone decided to
bring them into the forefront of crafting! I have made
banners for myself and to sell...can't get enough of 'em!
When I received my box of goodies for designing with
PRO 31 DESIGNS
I quickly jotted down the idea for a sweet banner
for Sydnee's room!
After painting the Maya Road scalloped banners in a
bright candy pink, I distressed the chipboard with a bit of
walnut ink. The triangle portion of the banner was covered in
patterned papers by My Mind's Eye and then embellished with all sorts
of yummy goodies!

I love these scalloped dies by Lifestyle Crafts...they work with
all sorts of die-cutting machines...and who doesn't love doilies?!?
One of my very favorite aspects of crafting is digging waaay back in your
stash and coming up with some gems that you'd forgotten about...like the glitter
alphas by K & CO :)

Fun little 3-D Stickers by K&CO and puffy
dimensional stickers by Martha Stewart, matched the papers perfectly.
Each panel was outlined in a shabby silver tinsel trim!

You must get some of these! I'm in love with these 3-D Acrylic Flowers
from PRO 31...they have tons of colors and an
assortment of shapes on hand.

And while you're at it, you must have some of the
beautiful Wheat Sprays...and what's not to love about
a dear white dove? They offer small and large sizes. Did you know
that you can alter the color by adding alcohol inks? That's a pretty cool fact :)

For hanging, I used the ring that came with the chipboard album
and decorated them with satin and grosgrain ribbons from PRO 31 DESIGNS
Open a standard paper clip and hook one end through the ring and attach
the other end to whatever you'd like to hang it from.To attach all of the banners together, I used a length ofblue Rose and Sequin Trim and Fabri-Tac.
Let me know if you have any questions about this project.
I know that photos can be a little deceiving about dimension and those
little details...I'll be happy to share.
Glad to see you today...I appreciate you coming by!
crate paper story teller
imaginisce
Maya Road
mister huey
movie madness crop
my scrapbook nook

Oh Those BIG Hair Days
Ahhh, to be a child of the 80's
Guess jeans, Swatch watches,OP t-shirts, penny loafers and
BIG HAIR!
My kids found this picture of me, taken when I was 18.

Now, was that some hair, or was THAT some hair? I have riotous curly hair
and this particular day it happened to fix just perfectly :) Julia Roberts had nothing on me hahaha!
I did this layout for my sponsored challenge over at the My Scrapbook Nook
MOVIE MADNESS CROP.
The challenge is entitled "The Red Carpet"
and the only instructions are to use shades of red on a layout or card.
I used the April Nook Kit featuring STORYTELLER by Crate Paper.
The Maya Road chip frame also came in the kit, and I spritzed it with Mister Huey's
REAL RED...perfectly matches these papers. For the flowers I used the
I Top Punch from Imaginisce and the Trio flower punch from EK Success.
I used the April Nook Kit featuring STORYTELLER by Crate Paper.
The Maya Road chip frame also came in the kit, and I spritzed it with Mister Huey's
REAL RED...perfectly matches these papers. For the flowers I used the
I Top Punch from Imaginisce and the Trio flower punch from EK Success.
You still have plenty of time to come over and play along with us!
--------------------------------------------------
Tomorrow I'm up at Imaginisce for our Canvas Corp. Blog Hop.
I have some really fun stuff to share with you.
Also tomorrow is the Monday EAD Blog Hop.
Lots to do...lots to see!
Have a blessed Sunday
crate paper story teller
echo park this and that
I Heart Ippity
Maya Road
mister huey
my scrapbook nook
Studio Calico
totally terrific thursday


Thursday & Nook News!
It's the countdown to the weekend...happy Thursday!
First up, I want to make mention of the truly sweet and adorable
May Kit from My Scrapbook Nook
I have it
.
.
.
oh wow!

It features the This & That Graceful by Echo Park
El-to-the-yumm-o
Grab yours today...new members receive a fabulous GRAB BAG
plus you receive your 13th month FREE!
If you sign up, please tell them that Shellye sent you :)
plus you receive your 13th month FREE!
If you sign up, please tell them that Shellye sent you :)
I would also like to welcome the newest
My Scrapbook Nook Design Team members:
My Scrapbook Nook Design Team members:
Erika Gasser
Aleksandra Gadji
Patricia Roebuck
Bente Fagerberger
Aleksandra Gadji
Patricia Roebuck
Bente Fagerberger
Remaining members are:
Leah Killian
Stacey Michaud
Carol Monson
Danni Reid
Jessy Christopher
Katarina Damm-Blomberg
Hilde Aaslund
Anna Sigga
Marinette Lefevre
Lilith Eckles
Shellye McDaniel
Pamella Brown
Gina Rodgers
Deanna Misner
Nicole Nowosad
Stacey Michaud
Carol Monson
Danni Reid
Jessy Christopher
Katarina Damm-Blomberg
Hilde Aaslund
Anna Sigga
Marinette Lefevre
Lilith Eckles
Shellye McDaniel
Pamella Brown
Gina Rodgers
Deanna Misner
Nicole Nowosad
Congratulations to our new team members...
they are truly amazing...really, truly :)
I invite you to our wonderfully inspiring Message Board...
drama free and fun LOL
Come on by and see what we're cookin' up for you!
they are truly amazing...really, truly :)
I invite you to our wonderfully inspiring Message Board...
drama free and fun LOL
Come on by and see what we're cookin' up for you!
------------------------------------------------------------------
I HEART IPPITY
If you love designing cards or other paper/craft projects with stamps and
would love the opportunity to design with Ippity brand stamps,
then give Heather a holler! She's hosting a Guest Design Team Call and
will accept applications until the end of this month.
IHI was my very first Design Team and
I love how much it has evolved in the past year.
So if you're thinking that you would like to give a Design Team
a go, this would be the perfect place to get your start :)
would love the opportunity to design with Ippity brand stamps,
then give Heather a holler! She's hosting a Guest Design Team Call and
will accept applications until the end of this month.
IHI was my very first Design Team and
I love how much it has evolved in the past year.
So if you're thinking that you would like to give a Design Team
a go, this would be the perfect place to get your start :)
And being that it's Thursday and all....
I have a Totally Terrific Thursday card to share today.
Again, I have pulled out the {Storyteller} Collection by Crate Paper
and the {How You Doin'} Ippity Stamp Set
and the {How You Doin'} Ippity Stamp Set


I'm so in love with Mister Huey by Studio Calico...in my
personal opinion, it's the best spray mist that I've used to color
plain chipboard. The {Real Red} is simply a perfect match
to the Storyteller papers.For the butterfly centers?
I really wanted to bring out the green in the leaves of the paper,
so I took three decorative stick pins from Maya Road and snipped
off the pin part...voila!
That's all for today...I should have a brand new blog look within a day or two,
so don't be shocked if you don't recognize it the next time you stop by.
See you soon!
Shellye
personal opinion, it's the best spray mist that I've used to color
plain chipboard. The {Real Red} is simply a perfect match
to the Storyteller papers.For the butterfly centers?
I really wanted to bring out the green in the leaves of the paper,
so I took three decorative stick pins from Maya Road and snipped
off the pin part...voila!
That's all for today...I should have a brand new blog look within a day or two,
so don't be shocked if you don't recognize it the next time you stop by.
See you soon!
Shellye
EAD Designs
elephant
Maya Road
Monday Blog Hop and Giveaway


Monday Blog Hop & Give-A-Way
Welcome to the EAD
Monday Blog Hop & Give-A-Way
You should be here from Rose's Blog
Sometimes I feel like Uncle Billy from It's A Wonderful Life.
You know Uncle Billy always sported the string tied onto several fingers so-as-not-to
forget something important. I may wear a coat to work, but not need it in the morning and then leave it at work! Or my half-eaten lunch that gets left at work for four days. In the past I have
stapled a sticky note to my keys simply saying "don't forget"...I know immediately with
the reminder that I have a box to carry home or need to stop somewhere before I leave.
With that concept in mind, I came up with this super-cute
reminder fob! I can tuck it into the safety of a large pocket in my bag and then pull it out
and attach it to my keys when I need to remember that all-important-thing!


I used a Maya Road sheer journal card and rubonz from EAD.
You could also create personalized backpack tags, luggage tags, etc.
Quick and fun!
I'm the caboose this week...hope you've enjoyed this week's blog hop :)
Shellye
I Heart Ippity
little yellow bicycle
Maya Road
My Minds Eye
my scrapbook nook


Getting Done
Yes, it is November 15th and I have the majority of my Christmas buying done. I'm in the midst of compiling photos for my mother's annual calendar. When I mentioned that I might not have time to pull a calendar out of the hat this year, I swear that I saw a tear...well, and the whining pretty much gave away her dislike of that idea LOL. You know, she's my dear mom and she doesn't ask much of me at all...so one way or the other, I will have her gift done by December 25th (in years past some of the pages are still wet with glue...nothing like a little procrastination).
Tyler will be 18 shortly after Christmas. I think this is the first year that he's only asked for ONE video game. *sniff* he actually requested 'grown up' gifts this year like a Fossil watch, Oakley sunglasses, cologne, a pair of blue jeans, lounge pants, socks and underwear :)
Zachry; not much on his list either. The generic blanket term "clothes", two XBOX games, one PSP game, socks, underwear and a Kindle. Oh and Axe...he's gotta smell good too!
Sydnee...well, she's nine and of course her list keeps growing. Luckily everything she's asked for is fairly inexpensive and of course she won't get all of it anyway hehehe
I had a FIT when I saw this cute coverlet from JCPenney.
She's been begging for a hot pink and zebra room and yes, I've been warding her off. Anyway, she'll get her wish in a much more palatable tone than screamin' hot pink and big honkin' zebra strips @@

For my project this week at I Heart Ippity, I decided to design a cute door hanger to go along with Syd's NEW bedroom color scheme :)
I dressed the Maya Road frame in My Mind's Eye Fine & Dandy, used a computer font for the name plate and then stamped the cute girl image.
And YES, it will be wrapped and given with the coverlet and pillows!
LITTLE YELLOW BICYCLE
It's up, it's up!
My HELLO FALL project is up at LYB Blog today.
I will share a few photos here, but be sure to stop by their blog to see the full tutorial, more photos and leave a little much-appreciated L♥O♥V♥E ☺
My project is two-fold...a Fall Family Tree Display that partly doubles as a place setting name plate/accent
I will share a few photos here, but be sure to stop by their blog to see the full tutorial, more photos and leave a little much-appreciated L♥O♥V♥E ☺
My project is two-fold...a Fall Family Tree Display that partly doubles as a place setting name plate/accent
 |
| --the Fall Family Tree-- |
 |
| --one of the 'apples' from my tree...used at a place setting-- |
 |
| --i used a lot of the chipboard embellishments such as birds, owls and leaves-- |
 |
| --each apple was layered with tons of goodies from the HELLO FALL collection-- |
MY SCRAPBOOK NOOK
I will be posting my latest CARDS Challenge tomorrow...a little prize in store for one lucky winner.
Congratulations to Michelle Price for winning my challenge from last week, "GIVE THANKS"
www.myscrapbooknook.com
The Message Board is back up and running, so stop by and check out the super challenges and wonderful inspiration.
There is a section that I'm quite excited about: December Daily. Yep, I'm taking the plunge this year. I've already started on the base pages and look to have them all sewn up by the weekend. If you're not familiar with December Daily, there is a great write-up of tried and true methods and ideas found at The Nook Forum! I'll show off my album just as soon as I'm done.
--------------------------------------------------------------
WISH US LUCK!
My oldest son, Tyler and his fellow De Kalb Bears Varsity football team will be playing for an Area win in our district this Friday night. To say we're excited is truly an understatement. Driving around our small town, you will see that most every business has their windows painted up and flying a DeKalb Bears sign outside their door. We're hosting a city-wide Pep Rally Thursday night and selling car flags, pom poms, hamburgers and hoodies LOL! Community pride is something that I hold very dear. Small towns have their moments, but it's times like these that I'm glad to say that I'm a small town-girl :)
GO BEARS!
Be back soon enough! Be blessed!
Shellye


