12x12 Layout
Color Wash
pink paislee


On The Diagonal: Paper Strips
I'm sharing over at the PINK PAISLEE Blog today where it's "diagonal" week!
www.pinkpaislee.com
www.pinkpaislee.com
One of my favorite trends to-date: diagonal stripes.
I love them way more than chevron, way more than plain stripes and almost as much as swiss dots!
For my layout, I’ve chosen the “Color Wash” Collection and a few recent photos of my daughter
caught while waiting to perform a dance number; they’re fun and silly, and I love the pop
of black and white photos against the pastels.
I created a swatch of a diagonal pattern by cutting 1/2″ strips from one of the patterned papers
and then attaching them to a base paper.
After the rectangle of paper was covered in strips, the excess was trimmed off.
The word “silly” was hand-cut from one of the Color Wash papers and then glued to the “hello” tag.
A trio of butterflies were punched from the 6X6 paper pad, embellished with canvas dots,
a jewel and then added with foam adhesive. I placed pieces of the vellum banner, so tha
t it would appear as if the butterflies were carrying the strands.
The diagonal panel was finished off with a single-stitch around the edge and then added to the layout with foam adhesive. A pretty hand-tied bow completes the page while giving some softness and whimsy!
I think that I'll try this concept out on a card or two also!
3D Altered Art
bella blvd
Halloween
trick or treat collection


The Witch Is In...
...and she's made herself right at home.
She left her hat on Sydnee's chair, kicked off her boots by the door
and parked her broom next to the sofa.
She's a veritable slob; leaving her stuff laying about...and I have PROOF!
Okay, I will lighten up on our guest a little bit.
She did commission me to fix up her pointy hat for a challenge at the
BELLA BLVD BLOG
And there were some rules: use the "Trick or Treat" Collection, crochet hearts & feathers.
Anything coned shaped can be a little intimidating to decorate,
especially if you are planning on doing it with paper!
For this witch's hat, I started with a malleable template
(I used two sheets of notebook paper taped together; a heavy tissue paper would also work).
After getting the correct pattern for the top of the hat, I traced it onto a 12 X 13 sheet of paper.
I wanted the brim of the hat to blend in well with the design, so I added about a half of an inch
to the bottom of the cone design and then snipped the paper so that it would fold neatly
around the cone-shape. A band of colorful crochet hearts was added,
along with two black feathers and a cute layered embellishment.
I trimmed out the edge of the hat in baker's twine and then topped with a glittered styrofoam ball.
Here is a list of the supplies that I used to make Witch's dream of a fabulous hat come true!
Trick or Treat: All Webbed Up, Paper Pieces, Alpha+Bits;
Crochet Hearts: Orange, Gulf, Pickle Juice; Feathers: Oreo
She stopped by to visit a few others from the Bella Blvd Design Team...
check out the blog to see what they've done for her!
Off to make some popcorn balls, just in case she comes back by
for the wart remover she left on the windowsill...
Altered Art
Authentique Paper
Halloween
May Arts Ribbon
Maya Road
petaloo
Thrilling Collection

A House of Thrills
It's not too haunted nor too spooky, but this cutely
decorated Thrilling house just says HAPPY HALLOWEEN!
My little house is premiering at Authentique Paper Blog today...have a look:
decorated Thrilling house just says HAPPY HALLOWEEN!
My little house is premiering at Authentique Paper Blog today...have a look:
When I received this Maya Road paper mâché house, it started
speaking "make me into a haunted house!"...and so, I did.
I started by painting the piece with an acrylic black paint.

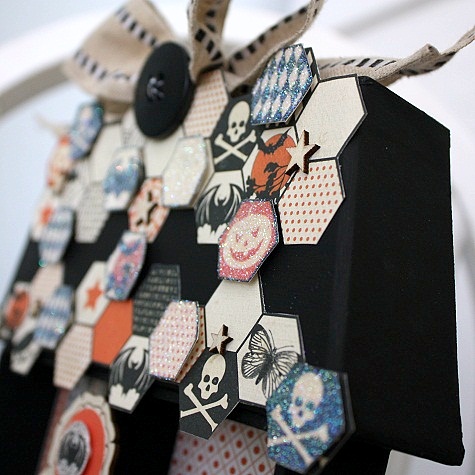 For the roof, I cut apart various patterns from the hexagon
printed paper, Frenzy,and glued it to the form.
Next, I cut individual hexagons and attached to sections
of the roof with foam dots. A sprinkling of iridescent glitter (from Art Glitter)
gives them a bit of extra POP!
 After cutting squares of paper from the 6X6 Bundle, I added them to the walls of the 'rooms'.
I used a large wood veneer doily shape as the background and base for the clustered embellishment. A small postcard print was cut from the 6X6 bundle sheets (a larger, matching design can be found on the Mystic 12X12 paper). A couple of stickers from the Details Sticker Sheet were included, as well as two black blooms and leaves from Petaloo!
 A canvas wired bow (from May Arts ribbon) sits perched on top and finishes off the design!
Authentique Products: Thrilling Collection- Frenzy Paper; 6X6 Bundle; Details Sticker Sheet
Other Products: Maya Road- House; Petaloo- Flowers & Leaves; May Arts- Ribbon; Art Glitter- Glitter and Designer Adhesive Glue
I love this house. I'm not even sure where he resides now.
After the Summer CHA show, he was taken home with someone new...I hope they're enjoying :)
See ya'll later!
speaking "make me into a haunted house!"...and so, I did.
I started by painting the piece with an acrylic black paint.
printed paper, Frenzy,and glued it to the form.
Next, I cut individual hexagons and attached to sections
of the roof with foam dots. A sprinkling of iridescent glitter (from Art Glitter)
gives them a bit of extra POP!
I used a large wood veneer doily shape as the background and base for the clustered embellishment. A small postcard print was cut from the 6X6 bundle sheets (a larger, matching design can be found on the Mystic 12X12 paper). A couple of stickers from the Details Sticker Sheet were included, as well as two black blooms and leaves from Petaloo!
Authentique Products: Thrilling Collection- Frenzy Paper; 6X6 Bundle; Details Sticker Sheet
Other Products: Maya Road- House; Petaloo- Flowers & Leaves; May Arts- Ribbon; Art Glitter- Glitter and Designer Adhesive Glue
I love this house. I'm not even sure where he resides now.
After the Summer CHA show, he was taken home with someone new...I hope they're enjoying :)
See ya'll later!
Altered Box
Berry Basket
Curtsey Boutique
May Arts Ribbon
Treat Box

Along Came A Spider...
...and sat down beside her, and frightened Ms. Shellye away!
Quite ironic that I'm arachnophobic and live amongst a gazillion spiders.
I guess it's the price we pay to live in the peaceful and (otherwise) tranquil country-setting :)
For today's post at May Arts Ribbon, I've created this
rather sweet little spidy-character....

See more photos and how I put him all-together at the May Arts' Blog!
He has now taken up permanent residence in my daughter's room...
maybe, just maybe, he'll scare the smaller guys away LOL
Thanks for visiting!
becky fleck
bella blvd
Card Sketch


Friday Sketch

I love this sketch by Becky Fleck, so I was quite happy when it
was our assignment for this past Friday's card project at Bella Blvd!

I stuck with the original foundation of this sketch by adding the two panels with a border
across the center. Next, I chose the focal point/sentiment and built around it in a way to keep
with the general idea of the sketch. I wanted to add a little color to the center of the scalloped
die cut so that I would have a nice backdrop for the white fluffy cloud.
Supplies:Play Date: Daily Details, Park Play, Catching Bugs, Today is Beautiful, Alpha+Bits;
Trick or Treat: Paper Pieces; Flags: All American Flag Icons
Lots of cute takes on this sketch over at the Bella Blog...check it out!
Bunting
Halloween Hop
May Arts Ribbon
tutorial
.jpg)


May Arts Halloween Hop!
.jpg)
Welcome to the May Arts Ribbonista Halloween Blog Hop!
I've been amazed by the projects so far...today will wrap things up, so if you
missed Monday through Thursday, visit the May Arts' blog...
**3 ROLLS OF HALLOWEEN RIBBON**
will be given away to a really-lucky commentor!
Today's hop includes the following designers (in order):
I wanted to do something a little different for my design today.
I love holiday bunting...I have a couple of different things for 4th of July and
Christmas, but I really wanted a piece that would go along with my Halloween decor.
From lengths of wired ribbon, I fashioned my own unique bunting!
This is how I went about making the bunting:
5- 18" lengths of 1.5" Solid/Pom Pom Edged Wired Ribbon
6 Yards of 1.5" Solid Checkered Wired Ribbon
Sewing machine and/or fabric glue
First, cut your pom pom ribbon into the 18" lengths.
Gently pull one of the wires from either side; leave the other wire in place.
Form each piece into a "U" shape as shown above
Next, decide how wide you would like for the piece to be.
Taking 3 yards (more/less if desired) of the check ribbon, begin gluing the loops to the
front of the check ribbon. Make sure that you leave about 24" of check ribbon at each end
so that it can be tied into a large bow.
Once all of the loops have been glued to the front of the check ribbon, attach
the second section (3 yards) on top by matching up the two pieces.
You may use fabric glue for this or machine stitch the two checkered ribbons together:
Add a small piece of wire to each side (behind the bow) so that it can be attached to
a railing or hung from a hanger.
The cute pom pom ribbon also comes in a black ribbon with orange pom poms...and
a huge variety of other colors, especially if you're thinking ahead to Christmas :)
May Arts Products Used:
KB38- 1.5" Solid Checkered Ribbon
XA38- 1.5" Solid/Pom Pom Wired Edged Ribbon
**************************************
Thanks for hopping along with us at May Arts Ribbon!
I hope that you've found a couple of projects that you'd like to give a try...there are
several cute wreaths and countdown calendars that I'd like to try myself :)
Whatever it is...have fun!
bella blvd
Cards
Christmas Countdown

"Just Be Merry" A2 Card
What's New Wednesday

Every Wednesday the newest products are featured at Bella Blvd!
My two cards feature the new collection, "Christmas Countdown",
and a few trusty accessories from the Button Market and Designer Tape aisle :)
"Just Be Merry" A2 Card

I drew inspiration from the snowflakes on the Christmas Cuties paper.
I started with a snowflake embossed card and layered on snowflakes that I die cut from
various sections of patterned paper (the white/red stripe paper is actually a part of a journal card).
After threading each button with white crochet thread, I attached them to the center of each
snowflake with a thin glue dot.
 Supplies:
Christmas Countdown: Borders, Christmas Cuties, Daily Details, Alpha+Bits;
Trick or Treat: Spooky Town; Button Market: Red Flowers
"Oh Christmas Tree" A2 Card
 For this card, I wanted to bring the cute tree on the journal card more into focus.
To do so, I used a tree die (or a triangle would work too) and cut the shape from the
red chevron pattern of the Christmas Paper. I always forget about this technique,
but it's one that I love the effect of: with a piercing tool and mat, I outlined the shape
of the die cut tree. I think it fits in nicely with the blanket stitching and gingham patterned paper!
 Supplies:
Christmas Countdown: Daily Details, Christmas, O Tannenbaum, Alpha+Bits,
Captions; Designer Tape: Combo; Button Market: Neutral Mix
-------------------------------------------------------------------------------------
I've added these two cards to my growing stack of handmades that I plan on sending
out this Christmas. For extra-bulky cards, such as these, I like to keep them close to home
so that postage doesn't become too costly. We have a 'mailbox' system at our church where
members can place their cards in alphabetized slots. At the end of services, there is always
a huge crowd going through the mail to collect their cards...a lot of my church family will
be getting handmade this year LOL!
See you tomorrow!
I started with a snowflake embossed card and layered on snowflakes that I die cut from
various sections of patterned paper (the white/red stripe paper is actually a part of a journal card).
After threading each button with white crochet thread, I attached them to the center of each
snowflake with a thin glue dot.

Christmas Countdown: Borders, Christmas Cuties, Daily Details, Alpha+Bits;
Trick or Treat: Spooky Town; Button Market: Red Flowers
"Oh Christmas Tree" A2 Card

To do so, I used a tree die (or a triangle would work too) and cut the shape from the
red chevron pattern of the Christmas Paper. I always forget about this technique,
but it's one that I love the effect of: with a piercing tool and mat, I outlined the shape
of the die cut tree. I think it fits in nicely with the blanket stitching and gingham patterned paper!

Christmas Countdown: Daily Details, Christmas, O Tannenbaum, Alpha+Bits,
Captions; Designer Tape: Combo; Button Market: Neutral Mix
-------------------------------------------------------------------------------------
I've added these two cards to my growing stack of handmades that I plan on sending
out this Christmas. For extra-bulky cards, such as these, I like to keep them close to home
so that postage doesn't become too costly. We have a 'mailbox' system at our church where
members can place their cards in alphabetized slots. At the end of services, there is always
a huge crowd going through the mail to collect their cards...a lot of my church family will
be getting handmade this year LOL!
See you tomorrow!
12x12 Layout
Authentique Paper
core'dinations
Lifestyle Crafts
petaloo
 I must say that I always enjoy working with Core'dinations' products!


A Christmas Spectacular
Authentique Paper is teaming up Core'dinations this week to
bring you tons of inspiration using Authentique Paper & Core'dinations products!


Not only do they coordinate well with any Authentique collection, the quality and ability to sand, tear
and distress makes it a top-notch cardstock to reach for.
and distress makes it a top-notch cardstock to reach for.
For my layout today, I've pulled two of the Core'dinations Neutral 6 X 6 sheets and trimmed
them down to 4.25" X 5.5"...why this size? I was thinking of cascading snowflakes embossed
onto the cardstock and of course, my embossing folder just happened to be this size.
Next, I cut matching pieces from the "Classic" Joyous paper and adhered them all onto a
9.5" X 12" piece of black Core'dinations cardstock that was mounted onto a single
sheet of 12 X 12 Confection paper.
After some machine-stitching to the panels of paper, I'm ready to being layering!
I went with my trusty doily dies and cut out three different shapes from the black cardstock
found in the Neutral 6 X 6 pack. I added a smaller disc of patterned paper to the center of each
(and I used the 6 X 6 paper bundle for this). I determined placement of the doilies,
along with my photos and set them in place.
found in the Neutral 6 X 6 pack. I added a smaller disc of patterned paper to the center of each
(and I used the 6 X 6 paper bundle for this). I determined placement of the doilies,
along with my photos and set them in place.
Finally, the embellishments! I added some pretty Petaloo poinsettias, gold buttons and a few
punch-out pieces from the Joyous Collection.
punch-out pieces from the Joyous Collection.
I really love the homespun feel of this design and how the juxtaposed panels of snowflakes truly give motion to the page. If you decide to use a Core'dinations cardstock with a core, you could easily transform the look of your embossed design by lightly sanding over the raised areas!
Authentique Products: Joyous Collection- Classic Paper; Confection Paper; 6 X 6 Bundle;
Details Stickers; Statements Accent Sheet; Thrilling Collection- Elements Stickers
Details Stickers; Statements Accent Sheet; Thrilling Collection- Elements Stickers
Core'dinations Products: 6 X 6 Neutrals Cardstock Pack; 12 X 12 Ebony & Ivory Paper Pad
Other Products: Beacon Fabri-Tac; Petaloo Flowers; Die-Lifestyle Crafts
********************
All week long there will be projects featured with Core'dinations on the Authentique Blog...there will also be a giveaway, so stop by and comment each day :)
Altered Wall Art
Authentique Paper
Cards
Doodlebug Design
May Arts Ribbon
mini album
October Afternoon Holiday Style
Top Dog Dies
We R Memory Keepers


To Die For!
As I posted last week, there is a new place in town and it's all about dies:
TOP DOG DIES
by Accucut
Come on by and check out all of the amazing and must-have steel-rule & wafer thin dies!

And here are the projects that I created for the launch!
(click on each to enlarge)

"Ho Ho Ho!" Hanger was made using the Reflection Album #1 Die
This die is one of their steel-rule dies; there are several other designs available too!
Patterned papers and stickers by October Afternoon; Ribbon and trim by May Arts


"Country Livin'" mini album was made using the Mason Jar Album Die and Finishers Die Set.
Again, the album die is steel rule and the Finishers set are the wafer thin dies.
On the inner page, I used one of the wafer thin Cherish Doilies & Tag Set...if you
love paper doilies, then you will love this little collection!
Patterned papers and stickers by We R Memory Keepers; Ribbon by May Arts

I've always wanted a die like this Onesie Card (A2) Die!
This is another of the steel rule dies...just make sure you have a crease pad on
hand before setting out to make this type of card.

All of the cute accents can be found in the Onesie Card Finishers Die Set, which
is a wafer-thin die set. You will also see another one of the dies from the Cherish Doilies!
Patterned papers by Doodlebug Design; Ribbon by May Arts

And I love ornament dies...you can do so many things with them:
package tags, ornaments, garlands and of course cards!
There are a couple of different sets available...this card uses the
Patterned paper and sticker by Authentique Paper
Top Dog Dies offers a "Rewards Points Program" and through October 20th,
you can earn **DOUBLE** Rewards Points :)
Find out more --here--
Happy Saturday, everyone!
Cards
Doodlebug Design
Halloween Parade
Home for the Holidays
Pixies


Pixie Tricks
DOODLEBUG DESIGN
has teamed up with Xyron all week long in bringing cute ideas and giveaways!
Our focus this week has been on one of the newest products: Pixies

For my first card I used the Pixies in a couple of ways: as the sprinkles on top of the
cupcake and as an outline to the pattern on the cupcake liner.
Because the Pixies are hollow in the center, it's easy to hand-stitch them with a needle and thread
just as you would a bugle bead! To the cupcake 'liner' I outlined the chevron pattern with pieces of Pixies.
And don't forget...you can add your own banners to the sticks or use the assortment packs,
which are available in the newest themes.
Up next is a quick and easy idea for using the Pixies, while still creating a punch.
I used three different colors and attached them as a border. To make things even easier, I made
sure that the height of the patterned paper was the same as the Pixies...no trimming needed!
I chose to use white sequins for the snow, but you could replace these with small snips of white Pixies.
I'm looking forward to finding even more creative ways to incorporate these fun embellishments!
Stop by the Doodlebug Blog and find out how you can WIN some amazing prizes!
Have a great Columbus weekend and Happy Thanksgiving to my Canadian friends!
DIY
Halloween
Luxe Collection
pink paislee
treat bags
tutorial


Luxurious Treat Bag Duo
It's a Halloween Week of sorts at
PINK PAISLEE
We were asked to use the Luxe Bronze and Black papers and accents in creating our projects.
I've used a blend of the colors to make these two totally different treat bags!
To get started, you will need a 6″ X 12″ strip of your favorite Luxe paper.
Place the piece face-down onto a score board (or use a paper trimmer); turning the
piece vertically (lengthwise), score at 1″ and 5″. Turn the paper horizontally and score at 5.5″ and 6.5″. Fold the paper in on all of the scored marks. Cut the paper at the 5.5″ and 6.5″ marks just up to
the vertical score lines; you will have two small flaps on each side. Fold in and glue to one of
the longer flaps. Use a quick dry glue or strong double-sided adhesive to secure the flaps together.

For the sweet and prim Luxe jack ‘o lantern, I used a 4.25″ scalloped doily die and a 4″ round die.
I layered the two pieces together with foam adhesive and secured to the front of the striped bag.
His nose is simply a bronze chipboard heart that I cut into a triangle. His little grin is one of the
black Luxe brackets from the alphabet stickers.
The tag on the handle was made by die-cutting a 2″ circle from the Luxe black star paper
and then adding bronze sticker letters.

Mr. Batty can be dressed up in so many ways! For the wings, I cut a design from the black
chevron paper that measures approximately 3.5″. Next, I scored the wings at each of the points
of the chevron pattern. The outer parts were scored up and the two inner sections were scored
down to create a fan-folded effect. Add the wings to a paper doily with foam adhesive.
For the body, I used a 1.5″ oval punch and a 1″ circle punch and layered them as shown.
For the eyes, I applied two small black Luxe rubons to adhesive pearls. His nose is one of the
punctuation symbols from the bronze letter stickers. I wanted to give him a little extra whimsy,
so I attached a small chipboard heart to the top for his ears.
To each bag, I glued in a white chenille stem for the handle. You can also punch small holes at each
side and string through wire, ribbon, etc. Tie on coordinating ribbon and your unique and
one-of-a-kind treat bags are ready to go! You’ll surely be the most remembered stop in the neighborhood!


