Altered Art
Altered Wall Art
Authentique Paper
Radiant Collection
Repurpose
Trash to Treasure


Radiant Trash to Treasure
Don't trash it, treasure it!
I'm up today at
AUTHENTIQUE PAPER
with an altered ceiling medallion that once hung around a light fixture.
My sweet hubby brought this home to me all dirty and bright yellow...
but I was excited at the challenge to alter it nonetheless :)
blog.authentiquepaper.com
AUTHENTIQUE PAPER
with an altered ceiling medallion that once hung around a light fixture.
My sweet hubby brought this home to me all dirty and bright yellow...
but I was excited at the challenge to alter it nonetheless :)
blog.authentiquepaper.com
After washing away the grime, I decided to give it a coat of turquoise paint.
Because it was painted bright yellow, I gave it a covering with gesso (or use any primer)
first and then painted with a sponge brush and plain 'ole Plaid paint.
Because it was painted bright yellow, I gave it a covering with gesso (or use any primer)
first and then painted with a sponge brush and plain 'ole Plaid paint.
The opening at the center is roughly 6" in diameter and I knew that I wanted to
add some sort of sentiment to it with a cluster of flowers around the opening.
A 6" piece of chipboard fits perfectly inside, so I used it as the base for adding
the patterned paper and journal card to.
add some sort of sentiment to it with a cluster of flowers around the opening.
A 6" piece of chipboard fits perfectly inside, so I used it as the base for adding
the patterned paper and journal card to.
Before securing the chipboard center into place, I machine stitched around the
edge and also trimmed it in an off-white pom pom trim.
edge and also trimmed it in an off-white pom pom trim.
The blooms of flowers were simply a compilation of Radiant's 6X6 paper
and flower punch by McGill. I punched several patterns of the same flower shape
and gave them shape by using a stylus and molding pad.
and flower punch by McGill. I punched several patterns of the same flower shape
and gave them shape by using a stylus and molding pad.
Some of the flowers' petals are rolled downward (yellow) and the blue flowers
were molded at the center so that the petals lifted upward. I stacked various pieces
together with foam adhesive and then secured around the opening of the ceiling tile.
were molded at the center so that the petals lifted upward. I stacked various pieces
together with foam adhesive and then secured around the opening of the ceiling tile.
I used the basic butterfly shape found in my electronic die-cutting files and cut a large
and small piece from 6X6 sheets of Radiant paper. Before layering together, I
embossed the smaller shapes with a polka dot pattern.
And every flower needs a petal! I found these in my stash from Petaloo...they
look awesome tucked in amongst the blooms and gave the project a totally different look!
Authenitque Products: Radiant Collection- Whimsical Paper; Details
12X12 Cardstock Stickers; 6X6 Paper Bundle; Life Cards
12X12 Cardstock Stickers; 6X6 Paper Bundle; Life Cards
Other: May Arts- Pom Pom Trim; Petaloo- Leaves
Happy to see you today!
Happy to see you today!
gift card holder
Party Drinks Die Set
Top Dog Dies


Cantina Time!
Whether you have plans to embellish invitations
for a drinks-by-the-pool party or a girl's night out,
this brand new die set, "Party Drinks" from
TOP DOG DIES
can be used in so many clever ways!
I die cut the margarita glass from turquoise and then a light yellow cardstock.
I kept the 'drink' portion of the yellow cardstock and shaded around the edge with
a darker yellow watercolor pencil. I glued the glass pieces in place on
top of a die-cut Vintage Frame.
Next, I added a thin bead of glue to the rim of the glass and applied some
chunky clear glitter to resemble the salt. I chose the little umbrella for
my drink and adhered it in place.
For the gift card: Cut a piece of cardstock to measure 5"W X 7"H.
Place the cardstock onto a score board and score at 1.75" and at 4.5";
fold along the scores.
Decorate the front flap and inner flap with a smaller measure
of colored cardstock or patterned paper.
Adhere the sides of the gift card holder portion with a strong adhesive tape.
You could also use the dies for drink markers, place cards, a gift
card around a bottle of wine, etc.
See more ideas and shop for Top Dog Dies at
Beach
faber castell
interactive card
Karen Burniston
Newton's Nook Designs
stamping
summer


And don't miss the "Inky Paws Challenge" that's happening now!
 The challenge winner will receive $10 in store credit...
so get ready, get set and GO to Newton's Nook Blog to find out more :)
Newton Has Popped Up
Newton is popping up everywhere these days!
I'm sharing this fun, inter-active card over at
NEWTON'S NOOK DESIGNS
So, looking at the front you're thinking "sweet little clean-and-simple card"
Until you open it up and........
...Hellooooo...there's Newton all popped up on the inside!
The interactive die is by Karen Burniston with Elizabeth Craft Designs.
After die-cutting the paper and layering on the label pieces, I stamped
Newton onto white textured cardstock and then colored him in with
Aquarelle watercolor pencils by Faber Castell.
I trimmed Newton and his beach paraphernalia out and added him
to the fold with foam adhesive. Next, the sentiment was stamped and then
die-cut with the speech bubble found in the die-set.
For the sun, I punched a layer with an I Top Punch from Imaginisce
and a 1" circle punch. I shaded around the edges of both pieces with
one of the Faber Castell Aquarelles.
You can find this version of Newton and many more designs in the
Newton's Summer Vacation stamp set.
And don't miss the "Inky Paws Challenge" that's happening now!
so get ready, get set and GO to Newton's Nook Blog to find out more :)
Thanks for visiting today!
Art Prints
Authentique Paper
Doodlebug Design
Harmony Collection
Home Decor
Shadowbox
Wall Hanging

I shared an easy home decor idea that can be made in almost an instant!
I've used the new Art Prints by Authentique


Harmony Shadowbox
This past week Authentique Paper shared one of their BRAND NEW products....
the Authentic Art Prints! These 8x10 prints come in 3 of their new collections
- "Favorite," "Radiant," and "Harmony." Art Prints are ready to add to any
scrapbook page or simply put in a frame to add flair to any bare wall
, and perfect for home decor projects!
I shared an easy home decor idea that can be made in almost an instant!
I've used the new Art Prints by Authentique
and an 8X8 Wooden Shadowbox.
The hardest part of this project: deciding which print to use. I went with
this one mainly because the art work could be centered in the frame.
this one mainly because the art work could be centered in the frame.
I cut the print down to an 8X8 size and then added sections of the border sticker
to the top and bottom of the design. I capped off the ends with some
mustard colored adhesive pearls.
to the top and bottom of the design. I capped off the ends with some
mustard colored adhesive pearls.
With shadowboxes, you can use as much foam adhesive as you'd like!
I layered together some hand-cut butterflies and banner punch-outs
from the Harmony Collection.
I layered together some hand-cut butterflies and banner punch-outs
from the Harmony Collection.
While the Art Prints look beautiful on their own in a standard frame,
I thought it would be fun to show how much you could change the look with the
addition of a few embellishments! It makes a unique gift for those who tend
to have everything :) Add your own personal touch and they're sure to love it!
I thought it would be fun to show how much you could change the look with the
addition of a few embellishments! It makes a unique gift for those who tend
to have everything :) Add your own personal touch and they're sure to love it!
Authentique Products: Harmony Collection- 8X10 Art Prints; Details 12X12 Stickers; Components 6X12 Die Cut Pieces; Abundance 12X12 Paper (butterfly motif)
Doodlebug Design: Brown 8X8 Shadowbox Frame; Adhesive Pearls
See all of this past week's projects at blog.authentiquepaper.com!
Doodlebug Design: Brown 8X8 Shadowbox Frame; Adhesive Pearls
See all of this past week's projects at blog.authentiquepaper.com!
Authentique Paper
card
Harmony Collection
July Releases
Top Dog Dies

The design team has done an amazing job with the new dies!
Top Dog Dies: July Releases
A happy Friday, everyone!
I have a card to share today along with July Release dies from
TOP DOG DIES
I know I use this term a lot, but here is a QUICK card
using three of the new dies:
I've used patterned papers and sticker from Authentique's Harmony Collection.
I especially love the dotted hole border around the frame and banner die!
When using the Flower Lace Mat Die, I did use the metal shim, which
helped to deeply cut all of the design.
Here are the dies that I've used:
 | ||
| Flower Lace A2 Mat Die |
 |
| Vintage Frame Die TC058 |
 | ||
| Banners #1 Die Set TC064 |
July also includes these other fun sets:
 | ||
| Party Drinks Die Set TC055 |
 |
| Dog Days #1 Die Set (Lab) TC056 |
 |
| Corset Die TC057 |
The design team has done an amazing job with the new dies!
Follow the Top Dog Dies Blog to see all of the upcoming creations :)
Have a good weekend!
card
christmas gift
Maya Road
xyron


Maya Road & Xyron Christmas In July
Well, I've made it to July 24th and have not shared a
single "Christmas in July" project up until now!
That's almost unheard of...for me anyway :)
But today is the day.
But today is the day.
XYRON and MAYA ROAD
have teamed up this week to bring you some inspiration
from both of the companies!
Be sure to visit the Xyron Blog to see all of the projects!
My first project uses a recycled glass jar with a 4" opening at the top.
I embellished the top of a 4" Jumbo Bottle Cap from Maya Road with some
patterned paper by Doodlebug Design. After cutting the circle, I placed the paper
through the Creative Station to add a nice, even coating of permanent adhesive.
The metal flower bottle top was colored with a red alcohol marker,
topped with paper and then attached with Xyron 3/16" Adhesive Dots.
A wooden knob was painted lime green and attached with Xyron Adhesive Dots.
I added some ribbon to the jar by running a length of ribbon through
the Xyron 1.5" Sticker Maker. A matching bow was added to the tag on front.
Two of the Raspberry Berry Beads were adhered to the side of the tag
with Xyron 3/16" Adhesive Dots
And lastly I have a quick, quick card that I made up with some of
the Paper Twist Ribbon from Maya Road and papers/stickers by 3 Birds Designs.
I slightly unwound the paper and then rolled it into a flower shape.
A 1" circle was covered in adhesive with the 1.5" Xyron Sticker Maker and
then the rolled flower was attached to it.
That's all from me today!
12x12 Layout
pink paislee
Solstice Collection
summer


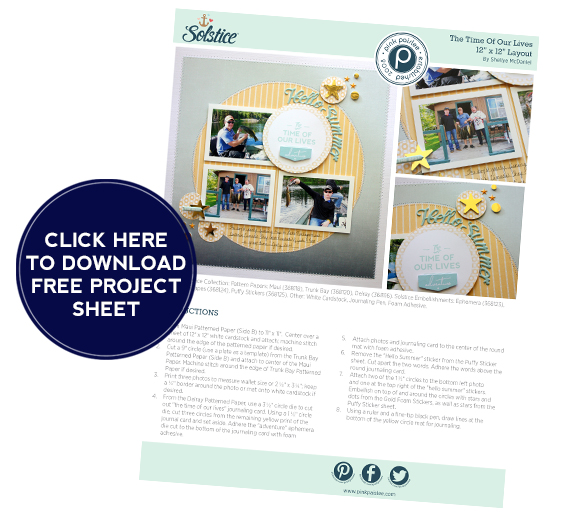
Solstice Summer: Time of Our Lives
My husband and boys recently returned from their annual fishing trip to Canada;
quite the jaunt for some guys from Texas, but they literally catch hundreds
of fish and look forward to the trip months in advance. I sent my old point & shoot
camera with them as was thrilled at some of the
scrapbook-page-worthy photos that they captured!
While thumbing through the 12 x 12 papers, the ombre side B of the
Maui Patterned Paper caught my eye and reminded me of water as it gets deeper.
I cut the paper down to 11 x 11 and centered it onto a sheet of white cardstock
before machine stitching around the edge. Next, I decided on the journal card,
“The time of our lives”, and used a 3.5″ circle die to cut it out.
I stayed with the circle theme and proceeded to cut a large, yellow mat from the
Trunk Bay Patterned Paper; I used a 9″ plate as the template. Next,
I used the remainder of the journal card pattern to cut out smaller 1.5″ circles.
For the title, I cut apart the “Hello Summer” Puffy Sticker and attached
it around the contour of the round journal card.
I placed the smaller circles in a fashion to resemble bubbles and accented
with several shapes from the Gold Foam Shapes. Finally, I used a ruler and
thin-tipped black pen to draw on lines for journaling at the bottom. I love the
versatility of the “Solstice” Collection and how you can fashion it around any
Summer activities whether it be a trip to the beach, camping or a fishing trip to Canada :)
To download the complete step by step instruction sheet, click the image below!
chickaniddy crafts
summer
Top Dog Dies
treat bags


Swimming Party Treats
Happy Summertime!
I have a sweet treat idea for your little pool goers this Summer.
It all starts with a simple bag die (I've used this Box W/ Handle Die by Top Dog Dies)
and a collection of assorted "Date Night" Papers and "Twirly Girl" Stickers from
CHICKANIDDY CRAFTS
The little bags can be filled with goldfish crackers or other small treats!
See how I put it all together on today's blog post at
And be sure to take a look at the upcoming collections for Fall & Winter:
One of my favorite pieces...the 12X12 Sticker Sheet:
Click on the link above to see the entire collection!
One of my favorite papers from the collection:
Click on the link above to see the entire collection!
And while we're talking about all-things Chickaniddy...
don't forget about their Craft Team Call!
It's happening between now and August 17th.
Good luck if you apply...it's a wonderful team to be on
and I'll really miss my time with Chickaniddy!
12x12 Layout
3 Birds Design
Blog Hop
HSN
xyron


A Happy 3 Birds Layout
Happy Tuesday!
I'm excited to be sharing in a little blog hop today with
XYRON & 3 BIRDS DESIGN
I have a layout using some 3 Birds' products:
patterned papers, 3-D stickers, glitter paper, stickers and plain tags.
The fabric flowers are from Maya Road.
From Xyron I have incorporated the Mega Runner for
all of the paper and photo attachment. For the flowers I used
several of the 3/8" Adhesive Dots for attachment.
Xyron and 3 Birds will both appear on
HSN's 24 Hour Craft Day tomorrow, July 23rd!
Thanks for stopping by!
12x12 Layout
Doodlebug Design
glitter chevron
Sugar Shoppe collection

Swims Like, Looks Like A Fish
It's all about Glittered Chevron Cardstock at
DOODLEBUG DESIGN
You will find cards, layouts, cutting file projects
and more on the blog until the end of this month!
I've created this fun layout of my daughter:
See close-up photos and learn how I put it all together on
last Thursday's blog post at Doodlebug!
Have a terrific week!
Authentique Paper
Cards
Doodlebug Design
Radiant Collection
scrapbook and cards today
sequins


Say It With Sequins!
It's always an honor to be invited as Guest Blogger for
SCRAPBOOK & CARDS TODAY MAGAZINE
This past week I shared a little tutorial on
a couple of ways to add sequins to your cards!
Come on by the blog to learn more :)
Anniversary Blog Hop
core'dinations
Le Plume
Newton's Nook Designs
stamping


Newton's Nook Anniversary Blog Hop!
Welcome to Newton's Nook Designs Anniversary Blog Hop!
Newton’s Nook Designs is so excited to be celebrating their
One Year Anniversary - one whole year of getting our paws inky!
To celebrate we have an AMAZING blog hop featuring with our
brand new design team and some AWESOME Special Guests!
You are going to love all the fun inspiration they're sharing using
Newton’s Nook Designs Stamps!
Celebrate with us and enter to win!
Would you like to win a $10 coupon for Newton's Nook Designs online shop?
We will be choosing TWO lucky winners!
Here’s how to win:Comment on the Design Team Member and Guest blogs (see list below)!
TWO winners will be chosen at random from the collective blogs in the blog hop.
Make sure to check out each of their blogs and comment for your chance to win.
You will not know which blog has been chosen so the more you comment
on the better your chances are of winning!
You have until Sunday, July 20th at 9 pm CDT to comment
-- winners will be announced on the blog post on Monday, July 21st.
We are running a giveaway on our Facebook page too so make sure
to enter here for another chance to win!!
Special Guests
Design Team:
If you get lost along the way, you can always pop back to the
Newton's Nook Designs blog for the whole blog hop list!
I did a really quick and simple card for this anniversary hop:
I chose the small flower from the Beach Party Stamp Set and
stamped it in a random pattern with Memento Tuxedo Black ink.
I colored in the flowers with Le Plume alcohol markers
and blending pen.
Next, I embossed the cardstock with a polka dot folder and then layered it
on top of a pre-embossed cardstock from Core'dinations.
The sentiment is from Newton's Daydream Stamp Set.
**Your next stop on the hop is JESS MOYER's BLOG**
Enjoy and good luck on winning a fabulous prize!


