Showing posts with label pink paislee. Show all posts
Showing posts with label pink paislee. Show all posts
Door Hanger
pink paislee
Top Dog Dies


See more ideas on the Pink Paislee Blog!
Paper Play: Bella Rouge Door Hanger
Yesterday I was up on the
PINK PAISLEE BLOG
with a little "Paper Play" fun incorporating various dies
along with the new Bella Rouge Collection.
If you have a princess in your life, then this collection of papers and embellishments
will be perfect for creating room decor or a sweet sign/door hanger such as this:
of the same size. The dies that I've used are from Top Dog Dies with the exception
of the oval shape. You may also find a pre-cut chipboard shape and just trace
the design onto the patterned paper.
I used an oval shaped die to cut out the sentiment from the 4X4 journaling card.
(or use a heart punch) along the crease of the paper as shown above.
Be sure overhang the point of the heart off of the paper so that the entire
Two holes were punched through the top sides of the chipboard and a length of
ribbon knotted through for the hanger. Next I tied a boutique-style bow and
Dies make projects such as these quick and easy.
This would also make a fun project for a girl's party...just pre-cut the pieces
and have them assemble and embellish with Bella Rouge!
Pink Paislee Product: Bella Rouge Collection
See more ideas on the Pink Paislee Blog!
Thanks for stopping by!
12x12 Layout
bella rouge collection
pink paislee


Four or More: Best Buddy
Happy Sunday! I was recently up at
PINK PAISLEE
with a "Four or More" photo project that I was really excited to take on.
I'm generally a three-photo-or-less type of scrapper, but I found a
way to stick with three larger photos and then added a smaller photo as an embellishment!
I started out by cutting the Shine Patterned Paper (diagonal stripe) apart along
one of the lines and then layered it on top of the Beautiful Patterned Paper (yellow dot).
Then I had a thought to create a intersection by adding the reverse side of the cut
Shine paper...it was the perfect juncture for the beginning of the title.
The photos were printed at wallet size and then trimmed down to leave just a
small white border around each. I took the photo of Bear and used a 1.75" circle
die to cut out his face. A 2" scalloped punch was used to create a black
background for the photo; the two were layered together with foam adhesive.
By embellishing and adding a bow, it made an eye-catching focal point.
I accented the photos with various chipboard hearts and washi tape stickers.
I adhered the washi tape to cardstock and then trimmed out...this allowed me to
add them to the layout with foam adhesive.
I typed out the journaling and then trimmed into strips.
The Transparent Alphas were adhered with a micro adhesive dot, but you can
also run through through a Xyron Sticker Maker, machine stitch or attach them with brads!
Collection used: Bella Rouge
See more Bella Rouge projects on the Pink Paislee Blog!
Have a great week!
12x12 Layout
photo editing app
pink paislee
tutorial


What's App?
This past week I shared a "What's App?" segment at
These segments focus on a variety of different applications that are available
to make your life easier and more fun! Whether you are using your smart phone
or computer, many of the apps out there are of little cost or even better, they’re FREE!
For my layout project today I decided to focus on one of my very favorite
online places called PicMonkey. PicMonkey is an online photo editor that
offers all sorts of themes, overlays, primo effects, textures and more!
For a small monthly fee, you can upgrade to a Royale account where
you have total access to all of the features, fonts, etc.
I took these sweet photos of our coach’s little boy, Easton. I’m really liking the
look of several photos in a grid, but on the same photo sheet, so I went with
that idea in mind. To begin:
Once you are at the PicMonkey website, select “collage”.
This brings up a selection to the left: Ducks in a Row, Cards, Square Deals,
Biggie Smalls, etc. I almost always choose “Biggie Smalls” because it will
give you one larger grid and two or more smaller grids. “Square Deal” is
also a nice feature if you’re wanting equally-sized photos in a grid
When you click on the option that you’re wanting, you will see a drop-down menu
where you can select the design that you wish to use.
Next, begin uploading your photos by selecting the “mountain” icon at the top left.
You can also rotate the grid by using the arrows at the bottom of the photo template.
When you have your photos in place (by dragging and dropping each photo
to its placement) click on ‘save’ at the top.
After you have saved your collage you can move on to ‘edit’ the template with
texture, fonts, banners, overlays, etc.
When I was ready to print the photo, I selected the “shrink to fit” option instead of the
“crop to fit” option so that it kept my photo square. I printed the photo on a standard
4X6 paper and then trimmed down…it matches perfectly with the 4X4 journal card.
In keeping with the sun motif, I cut a semi-circle from the Daytona paper found in the
Solstice Collection and stitched it to the top half of the page. I added the gold
geo foam shaped stickers to the top to mimic the sun’s rays.
I love having these user-friendly photo-editing apps at the fingertips or at the keyboard!
You can give a entirely different look to a cluster of similar pictures by placing them
in a grid and take it one-step further with some of the cool effects and templates.
Give it a try!
Visit the Pink Paislee blog for more ideas using their products :)
See you soon!
DIY
Halloween
Home Decor
pink paislee
Trivets


DIY: Spooky Trivets
Today I'm up at
PINK PAISLEE
with a pair of DIY Halloween Trivets!
These are super simple to put together, make an economical gift
and can be created with any theme in mind. I found several different ideas
on Pinterest where crafters used old greeting cards,
photos, gift wrap, etc…many possibilities!
First, you will need a 6″X6″ ceramic tile for each trivet (or any size), Mod Podge,
sponge applicator and cork or felt for the backing. I also used Beacon’s “Fast
Finish Decoupage” for my final coat, which gave the trivets an extra shiny luster.
I’ve used an array of papers and embellishments from the Switchboard and
Hello Sunshine Collections. To begin, cut each base paper to 5.75″ X 5.75″.
se a shaped die, cutting file or template to create your basic design for each trivet.
Adhere the design to the base paper and machine-stitch around the perimeter if you’d like.
Hello Sunshine Collections. To begin, cut each base paper to 5.75″ X 5.75″.
se a shaped die, cutting file or template to create your basic design for each trivet.
Adhere the design to the base paper and machine-stitch around the perimeter if you’d like.
Adhere any flat details to the design before you attach to the tile. Using the sponge
applicator, apply a generous coating to the tile. Also, if you have machine-stitched
on the paper, be sure to add a layer of mod-podge around the nooks and crannies
of the stitching so that the paper doesn’t bubble around it once applied. Place the
paper onto the tile and press into place; be sure to press out any air bubbles as well.
Next, apply a coating of Mod Podge over the top of the paper, making sure to keep
your brush strokes going in the same direction. Allow that coating to completely dry.
If you have the Beacon Decoupage or another high gloss sealer, add a coating
of it and allow to dry next.
Finally, embellish with fun notions like buttons, fabric flowers, ribbon and of course
Pink Paislee embellishments! Although the finished trivets are purely decorative,
they can be displayed on plate hangers, easels or just laying flat on a side table.
Let the little ones help or make their own for their rooms!
Thanks for letting me share with you today!
12x12 Layout
instagram
pink paislee
printing photos
Solstice Collection

Insta-Memories
Hi everyone! I'm sharing today over at
PINK PAISLEE
with a layout featuring Instagram photos!
I don't take a lot of pictures with my camera, but
my kids do...I have an easy way to copy those photos
to my computer and print from home...come by and see :)
Let me know if you have another way to go about
printing your Instagram pictures :)
12x12 Layout
pink paislee
Solstice Collection
summer


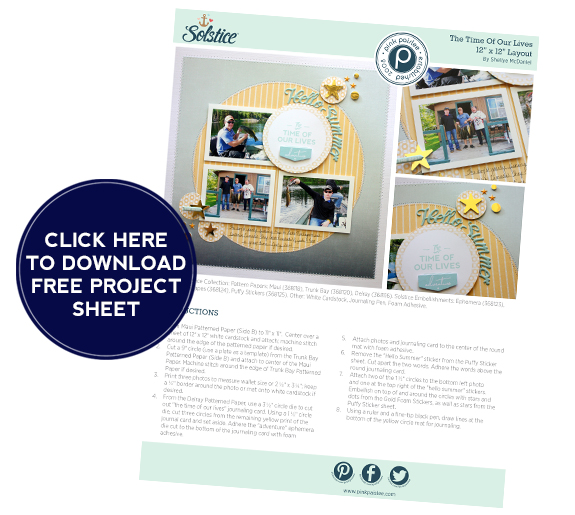
Solstice Summer: Time of Our Lives
My husband and boys recently returned from their annual fishing trip to Canada;
quite the jaunt for some guys from Texas, but they literally catch hundreds
of fish and look forward to the trip months in advance. I sent my old point & shoot
camera with them as was thrilled at some of the
scrapbook-page-worthy photos that they captured!
While thumbing through the 12 x 12 papers, the ombre side B of the
Maui Patterned Paper caught my eye and reminded me of water as it gets deeper.
I cut the paper down to 11 x 11 and centered it onto a sheet of white cardstock
before machine stitching around the edge. Next, I decided on the journal card,
“The time of our lives”, and used a 3.5″ circle die to cut it out.
I stayed with the circle theme and proceeded to cut a large, yellow mat from the
Trunk Bay Patterned Paper; I used a 9″ plate as the template. Next,
I used the remainder of the journal card pattern to cut out smaller 1.5″ circles.
For the title, I cut apart the “Hello Summer” Puffy Sticker and attached
it around the contour of the round journal card.
I placed the smaller circles in a fashion to resemble bubbles and accented
with several shapes from the Gold Foam Shapes. Finally, I used a ruler and
thin-tipped black pen to draw on lines for journaling at the bottom. I love the
versatility of the “Solstice” Collection and how you can fashion it around any
Summer activities whether it be a trip to the beach, camping or a fishing trip to Canada :)
To download the complete step by step instruction sheet, click the image below!
12x12 Layout
pink paislee
Solstice Collection


Spring Break Solstice
All month long we're featuring layouts with
PINK PAISLEE's
new "Solstice" Collection
See close-up photos and tips on how I put it together on the Pink Paislee Blog!
Bucket List
pink paislee
Pinterest
Pocket Scrapbooking
Project Life
Switchboard collection
tutorial


Pinterest Bucket List Pocket Pages Pink Paislee Style
Phew, that blog title is a mouth-full :)
Today I'm sharing a bit about how I've started my
PINTEREST BUCKET LIST POCKET PAGES
with the Switchboard Collection by
PINK PAISLEE
I have several tips on how to print photos from your
computer screen and how to add journaling to scrapbook paper...
without using a typewriter :)
Come on by and see how I put it all together!
Have a really GREATTTT week!
12x12 Layout
craftwell
Embossing
Pen Pals
pink paislee
xyron


Xyron + Craftwell Blog Hop
Welcome to Day #3 of the
XYRON & CRAFTWELL BLOG HOP
I was very anxious to try out the 8.5 X 11 Embossing Folders (Letter) by
Craftwell. With this size, you can create amazing flyers, invitations or give
texture to printables! For my project, I've chosen the Dotted Chevron (UNI)
PASSPORT PHOTOS...NOT MUG SHOTS
I cut a sheet of 12X12 cardstock down to 8.5 X 11 and embossed.
I centered the cardstock over a sheet of patterned paper (by Pink Paislee)
and machine stitched around the edges.
Four rectangular pieces of 6X6 paper were cut and adhesive applied with the 3" Sticker Maker.
I used the Photo Tape and applied a strip to the center (back) of each photo.
I like for the edges of my pictures to have a little 'lift' from the page, so just a
small amount of tape works fine for me!
And I LOVE the look of an old typewriter font for my journaling.
First, I typed out what I wanted to say and then printed onto a regular
sheet of copy paper. Next, I cut down one of the journal cards and made
sure that it was large enough to cover the journaling.
Using the Glue Stick, I dabbed a small amount onto the top corners of the journal
card and attached it over the printed area of the paper. I placed the paper back into
my printer and then reprinted the same journaling.
I wanted to leave as much of the embossed design showing as possible, so I
chose to cluster my photos and embellishments in one area.
High Tack Adhesive Dots are the perfect attachment solution for pieces such as
vellum, acetate or vinyl.
I had a lot of fun putting this layout together and implementing my brand new embossing tool!
Check out all of the fun designs at www.craftwellusa.com
And please visit the Xyron Blog and "like" them on Facebook.
Enjoy the hop!
mini album
Pen Pals
pink paislee

Pen Pals Mini Album
Yesterday was so busy blog-wise that I didn't
have a chance to share a new mini album that I made for
PINK PAISLEE
The task was to focus on their amazing Ephemera Packs, which I love!
I chose the "Pen Pals Collection" and a few manila coin envelopes:
See all of the pages and how I put it together at the Pink Paislee Blog :)
Enjoy your weekend!
CardMaps4
Class
pink paislee
scrapbook and cards today
Scrapbooker's Emporium


Local Peeps: CardMaps4 Card Class!
Not sure how many of my followers are local to the
Texarkana, U.S.A. area, but I will be teaching a class on
how to use Card Maps next month at Scrapbooker's Emporium!
We will make four cards based on
different 'sketches' (or maps) from the new
CARD MAPS 4 MAGAZINE
One of the seven cards that I created for the magazine is featured on the cover :)
We will be doing a card that is very similar to this and working with
product from the new Pink Paislee colleciton, "Hello Sunshine"
The magazines are now available for purchase via the S&CT link above or locally
at Scrapbooker's Emporium in Nash, TX.
**Class participants will receive their very own copy of the magazine**
Saturday, June 7th
9:00 AM-Noon or 1:00 PM- 4:00 PM
Classes maybe reserved by calling 903-831-5632
Let me know if you have any questions!
Happy weekend!


