Doodlebug Design
Happy Harvest
PaperHaus Magazine
Pumpkin
Wall Hanging


Happy Harvest
This past week has been all things
HAPPY HARVEST
at Doodlebug Designs
This is their newest 'fall, autumn, thanksgiving' collection with an
array of cute little critters like squirrels, owls, scarecrows, foxes and more!
And they're having a fun giveaway that involves pinning to Pinterest...check out the details:
I love little hangers made from wood and other sturdy objects, but
how about a stuffed paper ornament? This one comes in just under 12 X 12
so it's a great size for hanging on a door or cabinet front!
To start out, I took a piece of 12 X 12 cardstock and folded it in half.
Next I sketched out half of a pumpkin shape
(basically just rounding the edges and then creating a valley at the top)

After cutting out the design, open up the template and place it on top of desired
patterned paper (you will need two sheets for the front and back).

Trace the design onto the two patterned papers and cut out.
The great thing about pumpkins is that they come in all shapes and sizes...you can't go wrong :)
You can also find templates online or use a svg file or other die-cutting file.
Match the two patterned papers up and begin machine stitching around the
perimeter or use a quick drying craft glue. Be sure to leave about a 2"-3"opening
at the top so that you can stuff the shape with cotton filler, paper shreds
or tissue paper. Use a ruler or long knitting needle to pack the filling.
After filling, glue or machine stitch the top closed.

I used a 1" circle die to create a fun folk-artsy polka dot pattern.
The lace circle was made with a Lace Nesting Die (by Lifestyle Crafts)
and then I die cut the center with a circle die. And I LOVE the new Sprinkles!

I hand-cut a few pumpkin leaves from an old template that I had...there
are many online by simply doing a search for "pumpkin leaves".
After cutting out, I sanded around the edges just to give a more finished look.
I also cut the stem from one of the Happy Harvest papers and then attached it to a
piece of chipboard before gluing to the top of the pumpkin.
Two small holes were punched at the top and then strung with wire for the hanger.
A cheery bow (ribbon from May Arts) completed the look and now it's ready
to greet our Autumn guests!

And y'all get ready...tomorrow we will begin our PaperHaus Fall Splendor Hop
along with the reveal of the newest issue...I've seen it and it's loaded with beautiful things!
Altered Box
apple
Authentique Paper
Seasons Autumn


An Apple A Day
Autumn greetings in August! Today I have an altered paper
mache apple box that I dressed in SEASONS: AUTUMN
I traced the box's bottom and top part of the lid onto the desired paper and cut out.
Use a thin layer of glue to attach the papers to the box.
A bone folder helps to form the paper when you come to the leaves and stem.
I found that it was easier to cover the side of the lid with trims rather than trying to attach paper.
I kept the design on the front simple by layering on frame stickers and sentiment.
Looking for flowers? These paprika colored mulberry flowers by Petaloo match perfectly. I tied on a corduroy button with jute string and also added a bow of the same
string to the cluster of flowers.
Authentique Product: Seasons:Autumn- Components 6X12 Sticker Sheet;
Autumn Two Paper; Autumn Three Paper
Makes me ready for Fall and fresh apple pie! Hope you've enjoyed!
Color Shine
mini album
pink paislee
tutorial


Mini Album: Ombre Style
It's "Mini Album Week" at PINK PAISLEE
I have an ombre mini album tutorial up today... easy as 1,2, 3 and the best part is that
it's so fun to put together. And being that it's a mini album there are lots and lots of photos to share!
I had the pleasure of working the Pink Paislee booth at Create 'N Connect trade show this
past July and I was able to peer over Heidi Swapp's shoulder as she demonstrated a
make 'n take with her signature Color Shine sprays; this got my wheels turning and
I couldn't wait to get home and experiment.
To create this ombre effect (or color gradient effect) you will need three of your favorite
Color Shine sprays, Artisan 8 X 8 Papers and any type of binding system
(or use a plain hole punch and loose leaf rings). I've used a Bind-It-All.
Oh and paper towels...lots of paper towels!
The colors that I chose closely match pieces from the Cottage Farms Collection:
Mustard, Georgia Peach and Tinsel.
Place the Artisan paper onto a protective mat and holding the color shine bottle about 6" from paper
begin spritzing. I found that using a sweeping motion from left to right gave the best coverage.
Add the next two colors and then lay a full paper towel over the paper; gently rub
over towel to remove the excess ink.
After the pages have completely dried, fold them in half to create 4" X 8" pages.
Because I machine stitched mats onto the pages, I waited until the very last to punch the binding.
You may choose to do differently, but I put the binding on the open-end side of the pages.
Now it's time to start decorating your pages!
The cover consists of pieces from the Paper Goods pack and Heidi Swapp's grey clear pop letters.
And I'm not opposed to cutting up a Portfolio label sticker to serve my needs :)
After I have all of my main items in place, I begin layering on embellishments such
as buttons, stick pins, adhesive pearls, ribbon bows, etc.
Silver Luxe elements tied in well with the grey portion of the color scheme.
And keep those bottles of Color Shine handy as you may want to use them to
color-up some Artisan chipboard!
Yep! These are the dots for the I's and J's in the Clear Pop letter set...just attach them with
a small glue dot...and of course, I had to do a little stitching too :)
When designing your pages, keep in mind the sizes of photos that you'll be using and then place your embellishments...or add your photos first and then layer on the embellishments afterwards.
Once you're ready to bind the album, you may want to add a strong adhesive to the inside bottom
of the pages...this will make a nice sized pocket for adding tags or extra photos to.
As I mentioned before, I used the Bind-It-All system and a 1" metal comb for binding the pages together
(at the open end side). I then tied on several different patterns of ribbons from
May Arts and the "Us" album is ready for photos!
Again, it's Mini Album Week at Pink Paislee, so stop by and have a look!
Feels Like Home
little yellow bicycle
mini album


Feels Like Home
This month we've been sharing the newest collection at
LITTLE YELLOW BICYCLE
The collection is Feels Like Home and it's now available at retailers and online
Simple house-shaped chipboard pieces were the perfect backdrop for this mini album.
For the cover, I drew inspiration from the On A Limb paper (from the 6x6 Paper Pack).
I die-cut a tree and layered it on top of the branch pattern found on the paper.
I added a couple of sentiments and shapes and the cover was complete.
When planning out the following pages, I like to alternate the colors so that I don't have
two blue pages together, etc.
Because I'm mostly a card and mini-album maker the 6 X 6 Paper Packs are a must have
because the designs are true to scale and are perfect for paper piecing and die-cutting.
And as with most of the mini albums that I create, I add a trim of twine or jute to the
edge of the chipboard; use fabric glue and a toothpick to spread a thin bead of the adhesive
along the edge and press the jute in place.
FLH-304 6X6 Paper Pack
FLH-279 Chipboard Shapes
FLH-201 Canvas Stickers
FLH-222 Burlap Stickers
FLH-135 Favorite Pieces-Stickers
FLH-140 Fresh Verse-Stickers
FLH-278 Wood Shapes
FLH-134 Journaling Cards
FLH-277 Stick Pins
NA-WB20 Wood Buttons - Etched
NA-JT10 Jute Pack - Light (4 colors, 72" each)
FLH-279 Chipboard Shapes
FLH-201 Canvas Stickers
FLH-222 Burlap Stickers
FLH-135 Favorite Pieces-Stickers
FLH-140 Fresh Verse-Stickers
FLH-278 Wood Shapes
FLH-134 Journaling Cards
FLH-277 Stick Pins
NA-WB20 Wood Buttons - Etched
NA-JT10 Jute Pack - Light (4 colors, 72" each)
There are a few additional close-up photos of this album on the
Little Yellow Bicycle Blog...also many other great projects made with this collection!
Have a great week ahead!
Doodlebug Design
Halloween Parade
mini album
Pumpkin
Sewing Tutorial
HALLOWEEN 2013 MINI ALBUM
(lots and lots of photos)

Halloween Parade
Just when you think Doodlebug Designs couldn't make
anything any cuter than they all ready have, they go and do it with Halloween Parade!
I should preface that by saying I love anything Halloween.
Not necessarily the actual 'day' but I love all of the fun colors,
jack 'o lanterns, spiders, bats and the season of Fall...it's just a happy time of year!
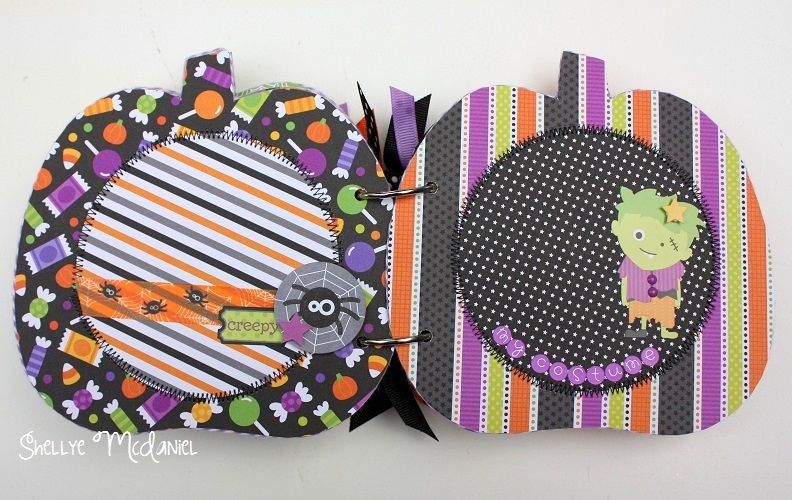
So, putting together this little pumpkin mini album was a treat from beginning to end :)
HALLOWEEN 2013 MINI ALBUM
(lots and lots of photos)
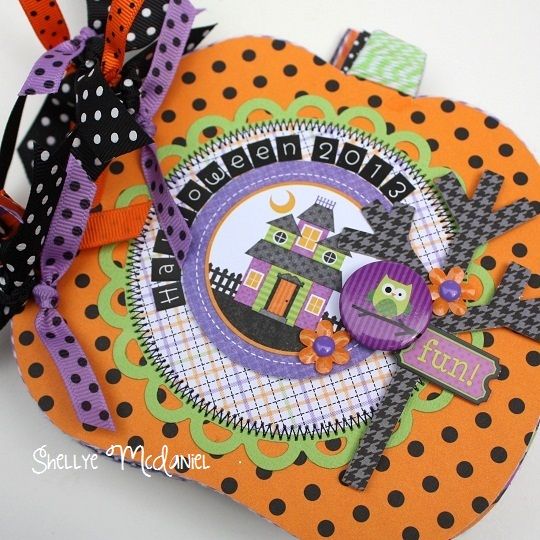
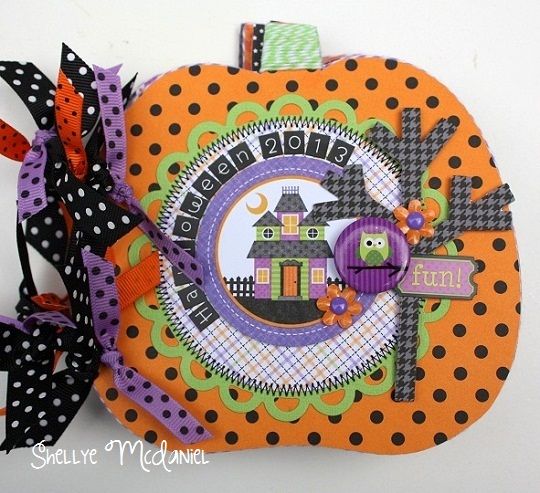
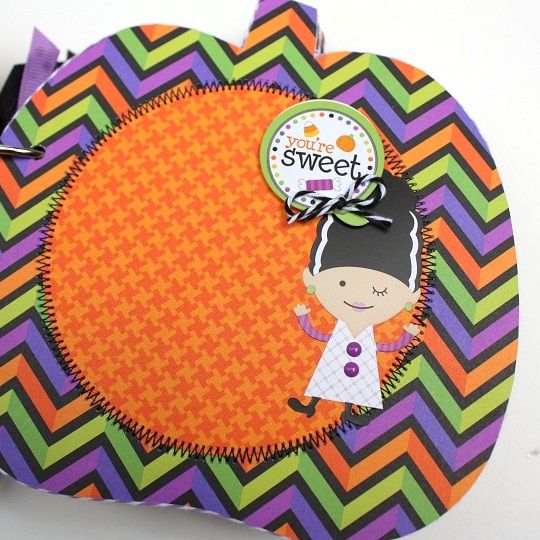
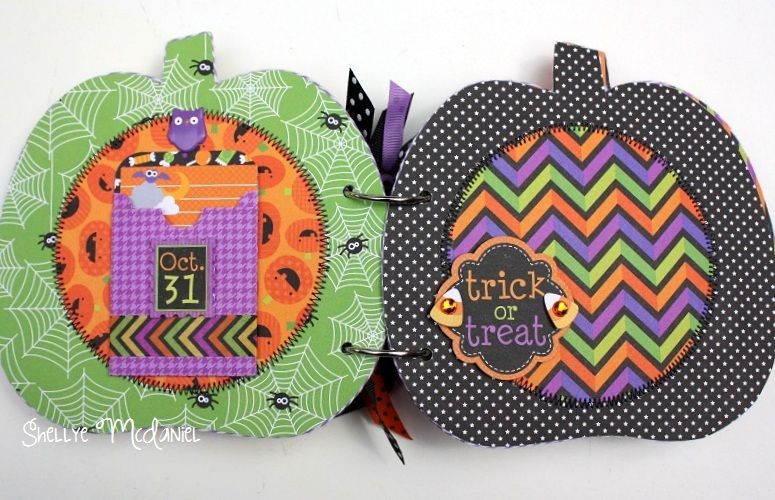
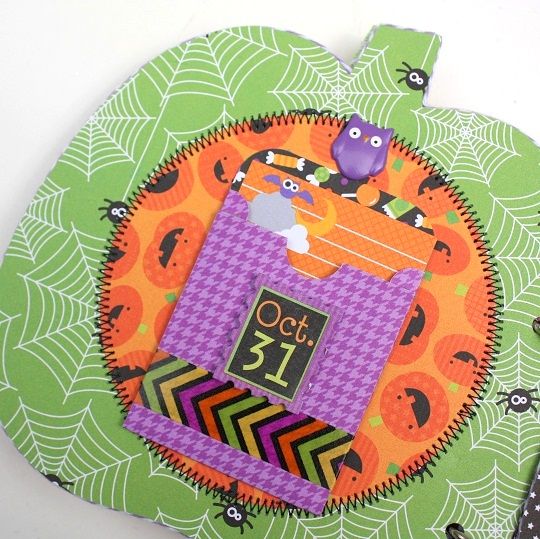
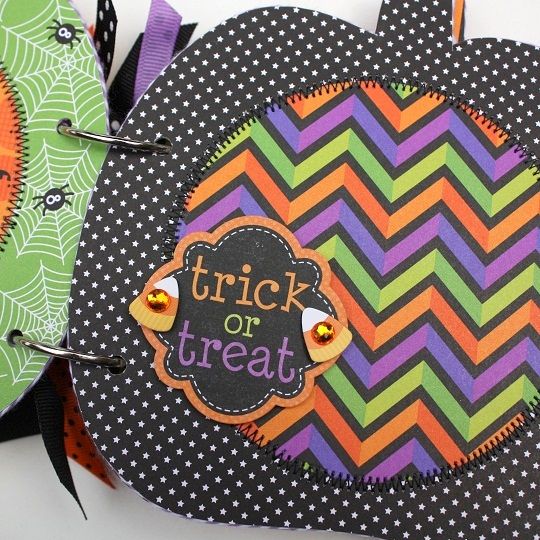
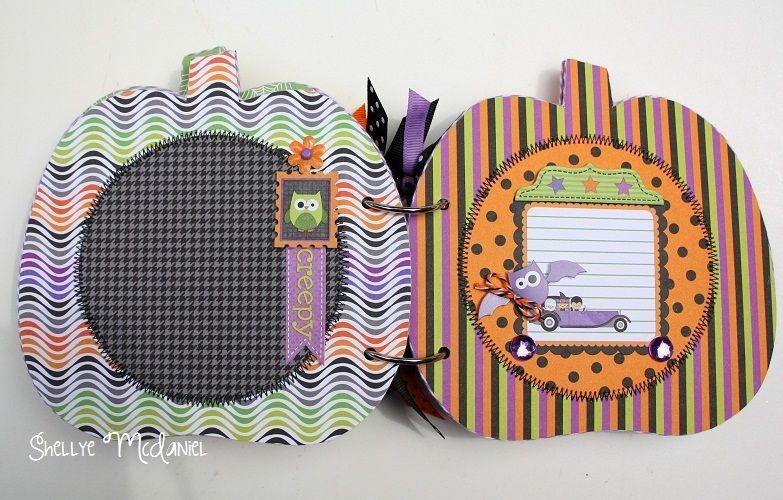
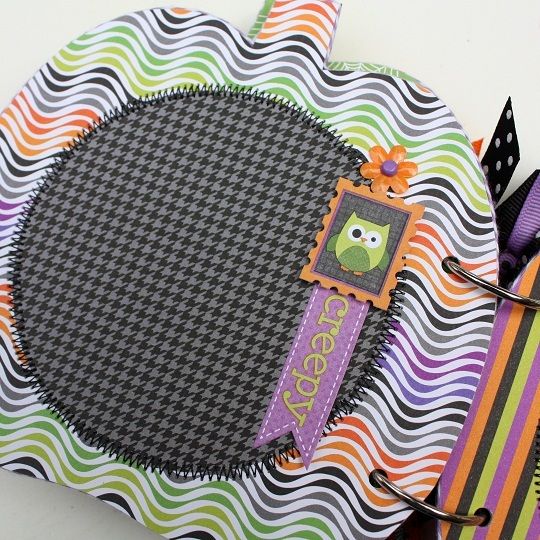
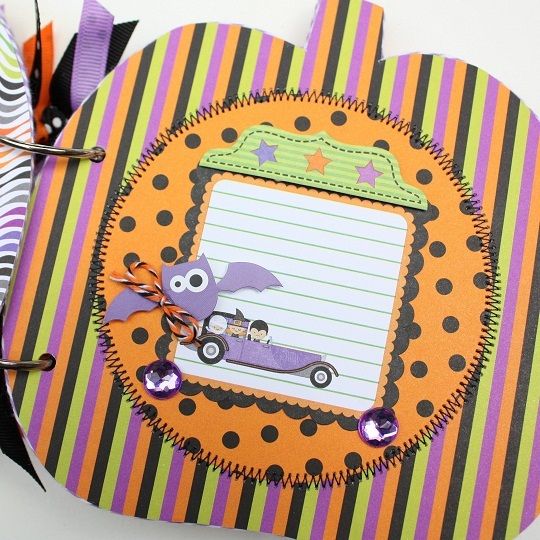
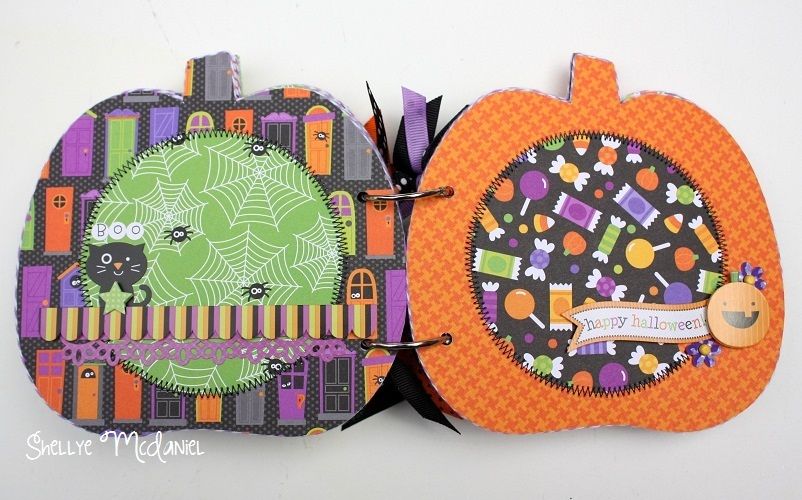
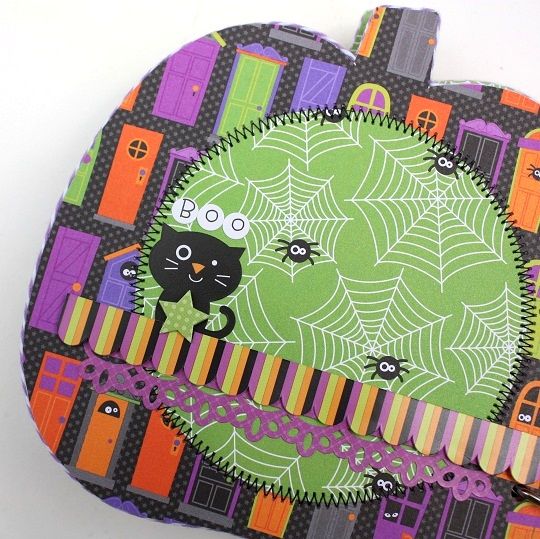
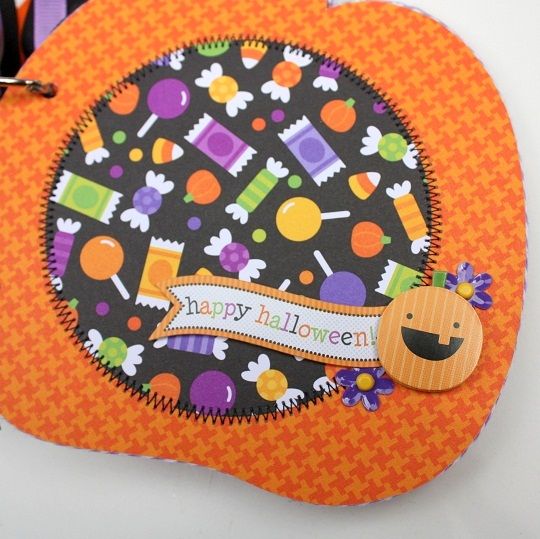
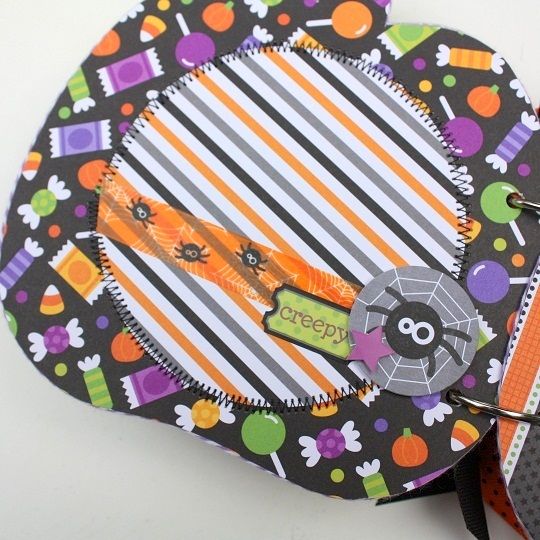
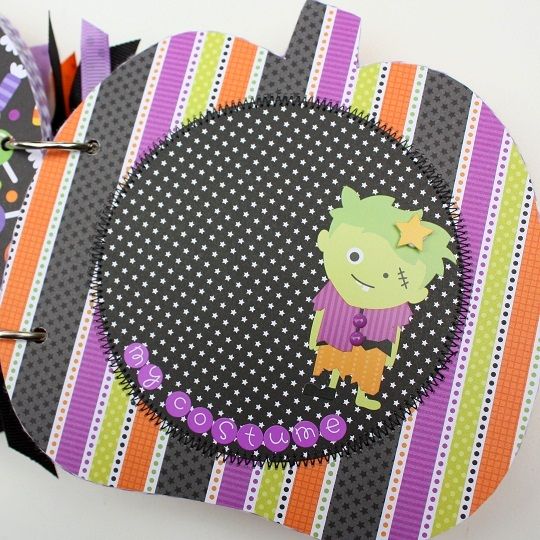
I love using inexpensive pre-cut shapes for mini albums. I found this pumpkin shape in
a set of 12 at Michael's. Alone the pieces aren't sturdy enough for an album,
so I combined two sheets together to form one page...works great!


After tracing the pumpkin shape and cutting out, I used a 4" circle die to cut out the mats.


 Be sure to do any machine stitching or brad adding before adhering the two chipboard pages together.


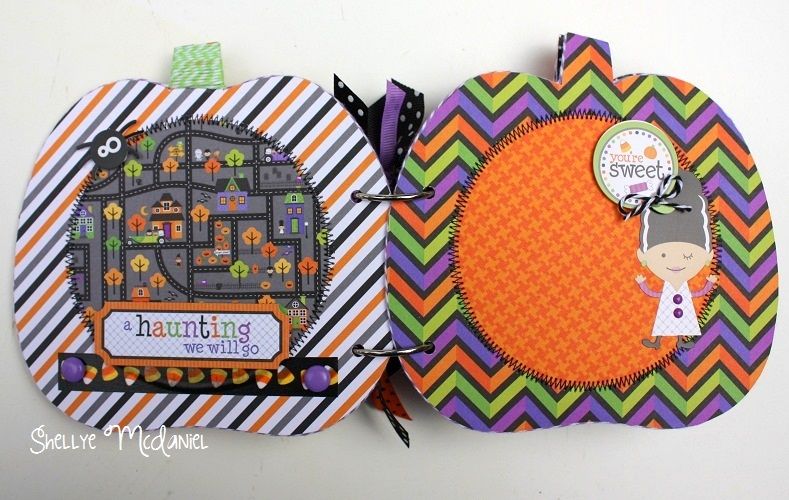
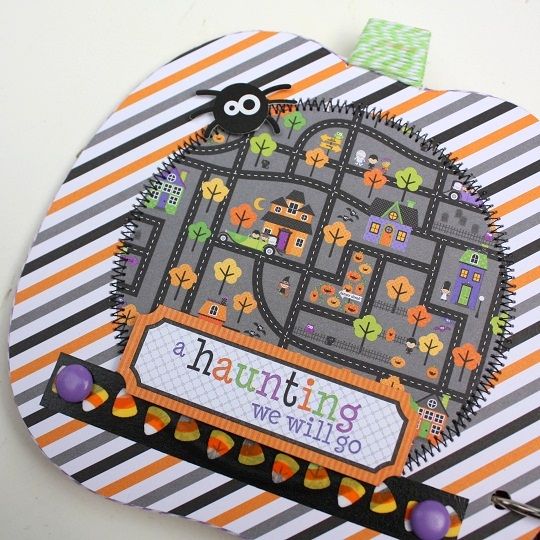
 They've brought them back! Cutely shaped sequins to match all of the collections!
I like attaching mine with brads or adding with a small glue dot and then topping
with one of the new Sprinkles.


To give a clean edge to the pages, I like to add border of twine; a fine point glue pen
works perfectly for this.


 I think this is my favorite inner page...I just love the Frank!
I'm often asked how I stitch a zig-zag around a circle; it is actually easier than it would seem.
First, I leave my stitching size to the default provided by my machine
(which is 1.4 length X 3.5 width...and I'm not a sewing machine expert, so this may not
be the proper terms as far as length and width LOL).
Next, I begin stitching where I know that I will place an element such as a sticker, etc.
This is not necessary, but does help to hide the joining stitch marks in case they're uneven.
When I start stitching I more or less allow centripetal force to take over!
Just gauge as you go along, making sure that the center point of the foot is still
lined up with the edge of the paper that you're stitching.
I would definitely practice first with this so you can get a feel for how much pressure
you need to apply on the paper as you're stitching and also to see how fast you
need to press on the pedal. I hope this helps!
And Doodlebug Designs is having a little contest for winning some of this
adorable collection, Halloween Parade...so head on over and check out the details.
www.doodlebugblog.com
a set of 12 at Michael's. Alone the pieces aren't sturdy enough for an album,
so I combined two sheets together to form one page...works great!
After tracing the pumpkin shape and cutting out, I used a 4" circle die to cut out the mats.
I like attaching mine with brads or adding with a small glue dot and then topping
with one of the new Sprinkles.
To give a clean edge to the pages, I like to add border of twine; a fine point glue pen
works perfectly for this.
I'm often asked how I stitch a zig-zag around a circle; it is actually easier than it would seem.
First, I leave my stitching size to the default provided by my machine
(which is 1.4 length X 3.5 width...and I'm not a sewing machine expert, so this may not
be the proper terms as far as length and width LOL).
Next, I begin stitching where I know that I will place an element such as a sticker, etc.
This is not necessary, but does help to hide the joining stitch marks in case they're uneven.
When I start stitching I more or less allow centripetal force to take over!
Just gauge as you go along, making sure that the center point of the foot is still
lined up with the edge of the paper that you're stitching.
I would definitely practice first with this so you can get a feel for how much pressure
you need to apply on the paper as you're stitching and also to see how fast you
need to press on the pedal. I hope this helps!
And Doodlebug Designs is having a little contest for winning some of this
adorable collection, Halloween Parade...so head on over and check out the details.
www.doodlebugblog.com


