Showing posts with label Layout. Show all posts
Showing posts with label Layout. Show all posts
12x12 Layout
Bokeh
Echo Park Paper
Layout
Selfie Mini Theme


Bokeh-On-Bokeh Layout
The “Selfie” Mini Theme by
ECHO PARK PAPER
ECHO PARK PAPER
is on point for anything preteen or teen related…
even if it’s not pertaining to a selfie!
I have used the mini theme to showcase a photo strip taken of my
son and his date at their Junior Prom. The on trend colors and design of
“Selfie” captured the moment perfectly!
I started with a 12x12 base paper from “Side B” of the “Cameras” paper.
Next, I cut a black cardstock down to 8.5” square and machine stitched it to the
center of the base paper.
For the focal point paper (which was cut to 8” square) I wanted to expound
on the bokeh look of the “Words” paper (side B), so I used a ¾” and 1” circle die to
die-cut holes randomly throughout. Next, I used strips of thin foam adhesive tape to
attach the bokeh paper to the top center of the black cardstock. This gave just
the right amount of depth to the die-cut areas.
Medium sized enamel dots were placed inside of the larger, 1” circles.
These take on their own shine and lend to the bokeh feel of the layout!
I used one of the 4X4 journal cards found on the “Journaling Cards” paper and
embellished it with various stickers before adding the photo strip to the side.
Three blooms from the back of the “Journaling Cards” paper were trimmed out
and colored with Prisma Colored Pencils. For a smoother finish, I used Gamsol
(odorless mineral spirits) and a blending stump to create beautiful watercolor-like flowers.
Use this bokeh-on-bokeh trick on your cards or other crafting projects too!
Products:
Selfie Mini Theme- SW6201 Selfie Sticker
SW6202 Journaling Cards
SW6203 Cameras
SW6204 WordsBundle of Joy- BJBT78028 Enamel Dots
Selfie Mini Theme- SW6201 Selfie Sticker
SW6202 Journaling Cards
SW6203 Cameras
SW6204 WordsBundle of Joy- BJBT78028 Enamel Dots
See more product and ideas at www.echoparkpaper.com
January Paper Bakery Kit
Layout
Snowmen
Studio Calico


Handsome Snow Men
Happy Wednesday!
Today I have the first layout that I made with the January Add-On Kit from
PAPER BAKERY KITS
We experienced a 9" snowfall on Christmas night-into the day after Christmas this
past year. In all of my 40+ years I don't remember a white Christmas where we
live, so this was an extra special treat for us!
Of course, I grabbed the camera and got a lot of cute pictures of the boys at play:
HANDSOME SNOWMEN
I love that the spirograph looking paper from Studio Calico in a way resembles snowflakes.
I cut out several different sizes and added some with and without foam dots over
the top of the layout...tell me that they do look somewhat like snow falling from the sky LOL
The kit also includes the adorable clouds paper, which is new from American Crafts.
The clusters of clouds cut apart perfectly and I think they look perfect mixed in
amongst the snowflakes!

I cut the large title "Snowmen" with a personal cutting machine and then subtitled it with
the neat wood-grain alphabet stickers by October Afternoon (I'm addicted to these babies!)
A few wooden snowflakes from my stash ties in nicely with the masculine look of
the burlap paper by Simple Stories and the three handsome fellas in the photos ;)
The Paper Bakery offers Mixed Media, Scrapbook and Projects Kits!
January's kits are now available and won't last long...
Back in a little bit with an oh-so-sweetttt altered canvas that I made for Authentique
AND one of the very new collections that will debut today :)
December Kit
Layout
paper bakery
Sneak Peek


A Couple of Masked Bandits
Happy Hump Day!
Wednesdays are my days to blog over at
THE PAPER BAKERY
and I have a sweet layout up using the December Add-On Kit

I ran across this picture of my kids…it was actually one that my mom took several years ago.
I love how Sydnee’s mask is crooked and you can only see ONE eye hehehe!
I started with a piece of cardstock and began selecting the patterned papers
from the December Paper Bakery Kit that I wanted to use.
I knew that I wanted lots of black elements to bring out the black masks…
and doesn’t the black/white striped paper remind you of the old prison outfits?
LOL So I tucked a bit of it in as I began layering.

After punching out a few different sized stars, I covered them in
paper and then stitched around the edge. I cut the sentiment portion from the tag
(included in the December Add-On Kit) and corner rounded the edges for a nice effect.

I used my personal cutting machine to create the “bandits” part of the title
…for the “masked” part I just cut the letters from one of the Studio Calico papers from the kit!
I ended up with lots of lovely layers by using a couple of the journal cards and
by heavily matting the photo.
Finally…a photo that had been sitting in a box for years at last found a home :)
We’ll be sharing fun with the January Paper Bakery Kit SOON!
Here’s a little bitty peek at something that I came up with:

In the hunt for an original kit club?
Come and check out The Paper Bakery!
Kits go on sale around the 15th of each month
5th and Frolic
Layout
paper bakery

Now, onto my latest layout for
My Pappy & Me
Wednesday Greetings!
First up let me mention the newest collection on tap for
I.love.this.

They've changed things up for the new year!
I just received my design team box of this new release and I was
tickled PINK to see adorable sticker sheets, washi and BUTTONS...
you know I love some buttons!
Be on the look-out for this collection of LOVE coming to your
favorite scrap stores soon :)
Now, onto my latest layout for
THE PAPER BAKERY

This page features products from the October Scrapbook Kit
by The Paper Bakery! Sarah also offers Mixed Media and Altered Project Kits
Tomorrow is CARDS day at Bella Blvd, so I'll be seeing you then :)
Altered Art Frame
imaginisce
Layout
Monster Mash


A Graveyard Smash...
...the MONSTER MASH...
creeeeek
(creepy door opening)
.
.
.
.
It's Monster Mash Release Week at Imaginisce

and I'm super excited to be sharing the projects that I
crafted with it. If you haven't seen the full collection of Monster Mash,
just stroll on over to Imaginsice! I love that they've stuck with the traditional
Halloween colors and added in a bit of dusty teal blue and green.
As with all Imaginisce collections, cuteness abounds :)
BOO WALL HANGING
For this I started with a plain 'ole inexpensive 3-paned wooden plaque.
After painting the wood black, I added a square of patterned paper in
place of a photograph and began embellishing.

Imaginisce Die Cuts are so generous in size and can easily be layered
with other matching elements such as pieces from the Sticker Stackers or
Canvas Stickers. Don't be afraid to remove (gently) the witch's shoes from the
sticker and try it out somewhere else...I just add a little dab of glue to the
foam dot and you're good to go!

And you know how much I love my leaf punch...I used it here along with
a few Brad Daddies and die-cuts.

I glittered BOO chipboard letters in a purple/silver mixture.
Wanting a soft touch, I tied on chevron ribbon bows to the eye-hooks between
each panel and also at the top for the hanger.

This HUGE bat die-cut is all you need at the top!
He's utter perfection...who couldn't LOVE a face like that?
FACE PAINTING LAYOUT
For my layout I followed the gallon-quart-ounce theory.
In design it it good to remember to keep things in proportion, whether it's color,
photos or embellishments. The dominate color is purple (gallon), followed by
the blue (quart) and then the green (ounce).

The main focus of embellishments is in the bottom 1/3 of the page,
as well as at the right vertical 1/3 of the page.
Proportion helps the flow of a layout, gives rest to the eye and
keeps things pleasing to the viewer :)

Aren't they the cutest parade of characters?
With the exception of the sticker letters and Thickers, everything that
I've used can be found at Imaginisce!
So glad you've stopped by to see my contribution to
MONSTER MASH...
I'm sure that there will be many other projects to follow as I
won't be getting enough of this collection any time soon :)
HAVE A WONDERFUL WEEK!
Back to School
imaginisce
Layout
Pro 31 Designs
Treat Cards


One + Two= Three
Time for a little
BACK TO SCHOOL FUN
As you can see by the title of my post, I
easily passed the first grade by accomplishing that one LOL
They do so much more these days...now kids are learning
things we did in the 4th grade in the 1st grade!
It's astounding.
First up, is a treat pocket tutorial that I created for
IMAGINISCE BACK TO SCHOOL WEEK
This is very similar to the one that I created for Authentique just
a few days ago, but this one is smaller and of course shows a
different way to go about decorating. The same design
principal still applies though :)

For SIX Pockets: You will need a 12x12 sheet of paper; cut paper into 2x12" strips.
Next, cut 1.75" x 11.75" strips from a patterned paper (I used Chit Chat); center and attach
to the 2x12 strips of paper. Score the 12" strip at 4.5"; fold in half. Machine stitch
(or glue) the folded area to create a pocket.
Corner round the top edges if desired.


For the apple: punch a 1" circle from red dot paper. Cut a small stem
from any brown paper and attach to the center of the apple. I freehand-cut
the leaf, but a punch or all-ready-made leaf could be used. Tie a little ribbon to
the top and your done!
Supply List:
Sole Sisters Chit Chat 12x12 Paper and Scallop Frame Snag 'em Stamp;
Hello Cupcake Wish Big 12x12 Paper and Celebrate You 12x2 Paper.
Tools: CutBright LED Rotary Cutter, CutRight Acrylic Ruler and i-mat 14x14
Misc: Core'dinations Double-Sided Cardstock, Ribbon, computer generated
journal strips, 1" circle punch and corner rounder punch.
-----------------------------------------------------------
Next up, I have a couple of layouts. One that I created for
PRO 31 DESIGNS
and another that my daughter, Sydnee made!
I promised her that I would share it with you all.
For 10 years old, she does a pretty good job at scrapbooking :)


As you can see, I used rows of beautiful trims, all from PRO 31 Designs!
The little turquoise flowers are also from their online shop :)
I took three die-cut mats from K&CO and layered them together
to form a nice background for my photo and embellishments.
And here it is...Miss Syd's Layout

She's heard me talk about having 'vertical and horizontal' elements
and she pointed out to me that her page included both LOL
That's all I have to share today!
We're having our first football scrimmage tomorrow.
I honestly can't believe that it's all ready that time of year...but I'm happy :)
See y'all soon!
See y'all soon!
Layout
Simple Stories Harvest Lane
Take a Hike
Wood Frame


Fun & Fall
I'm always excited to share
Simple Stories
projects...the enthusiasm over their products is definitely contagious
and makes designing for them that much more fun :)
For today's Simple Stories blog post, I have a layout featuring
-Take A Hike- and a quick and easy Fall frame using -Harvest Lane-
I adore this picture of my middle son.
I've had it in my stack of photos marked: I-really-want-to-scrap-this
for quite some time now. After seeing Take a Hike, I knew it would
be the perfect palette for this beloved photo

I cut three 1.5" wide strips from Brown Wood/Map #2516
and framed it around the photo. In keeping with the 'wood' motif,
I added a few brads to resemble nailheads. The bottom was decorated
with a 2x12 Border Strip #2514, various stickers from the
Fundamentals Cardstock Stickers #2502 and punched leaves.

Here I added just a couple of clouds from the Fundamentals Stickers.
When adding dimension, think about using different thicknesses
such as thin and thick foam dots...just right when you're
layering two dimensional pieces side-by-side.

I cut the F-U-N pennants from one of the Take A Hike Flashcards #2509
and strung up a banner using baker's twine and a few punched circles (folded in half)
that I punched from the back of the Flashcards paper.
By applying foam dots to the backs of each piece, I was able to easily
position the banner across my layout.
TAKE A HIKE SUPPLIES:
-Yellow Chevron/Grid Simple Basics Patterned Paper #2519
-Brown Wood/Map Patterned Paper #2516
-2x12 Border Strip #2514
-Fundamentals Cardstock Stickers #2502
It's a thrill for me to rummage through any dollar bin. Any dollar bin!
If I didn't love it, I would not have found this really cute wooden scalloped frame.
This was just your standard, craft store-style wood item:
plain blond wood with a few rough edges. After sanding, I took a pad of Tim Holtz
"Walnut Stain" Distress Ink, a cosmetic sponge and applied the ink to the frame.
Of course, you may use any acrylic paint or actual wood stain,
but this worked out just fine for this project.

For the inset of the frame, I cut various sizes of paper from the Harvest Lane Collection,
layered and then machine stitched them together.
To create the pumpkin, I used the 2.5" and 2" lace nesting dies from Lifestyle Crafts.
Foam dots were added between the two layers. After embellishing with a "Give Thanks"
banner and leaves stickers, I attached it to the center of the piecing.
A hand-sewn button was added, as well as a stick (for the stem) from my yard :)

In keeping with the homespun feel of Harvest Lane,
I outlined the frame in jute twine and a chenille ric-rac for the inset.
You could make up several of these little pumpkins and use them as place setting markers
(just attach to napkin-covered silverware), tie them to goodie bags
or hang from a harvest tree!
HARVEST LANE SUPPLIES:
-Expression Cardstock Stickers #2603
-Fundamentals Cardstock Stickers #2602
-Harvest Blessing Patterned Paper #2605
-Homemade Happies Patterned Paper #2607
-Made With Love Patterned Paper #2608
-Green Stitched/Grid Simple Basics Patterned Paper #2620
Like to see even more ideas using these two collections?
Just hop on over to the Simple Stories Blog and take a gander
at some of the amazing stuff created by the Design Team!
I'm so glad you dropped by!
Altered Frame
Christmas Cheer
Christmas in July
imaginisce
Layout


Of course, one of my pieces wouldn't be complete without
Christmas Cheer is Here
Nothing lifts my mood quicker than
a little Christmas music and crafting...thank goodness for
CHRISTMAS in JULY
I know, I know...some scoff that we're rushing the
season, but I want to experience that Christmas Magic for
more than just 25 days out of a month! I guess that's why for years I've
always started preparing for Christmas in the month of July.
It's the anticipation of that very special and exciting time of year
that I cherish the most :)
It's the anticipation of that very special and exciting time of year
that I cherish the most :)
So with that, let's have a look at the brand new Christmas collection from
IMAGINISCE
called
CHRISTMAS CHEER

There are so many fun paper crafting projects, as well as layouts
and cards, that can be done with a Christmas Collection, but honestly, I didn't know
where to start! I wanted to do it all with CHRISTMAS CHEER!
I finally decided on a layout and altered frame to share this week.
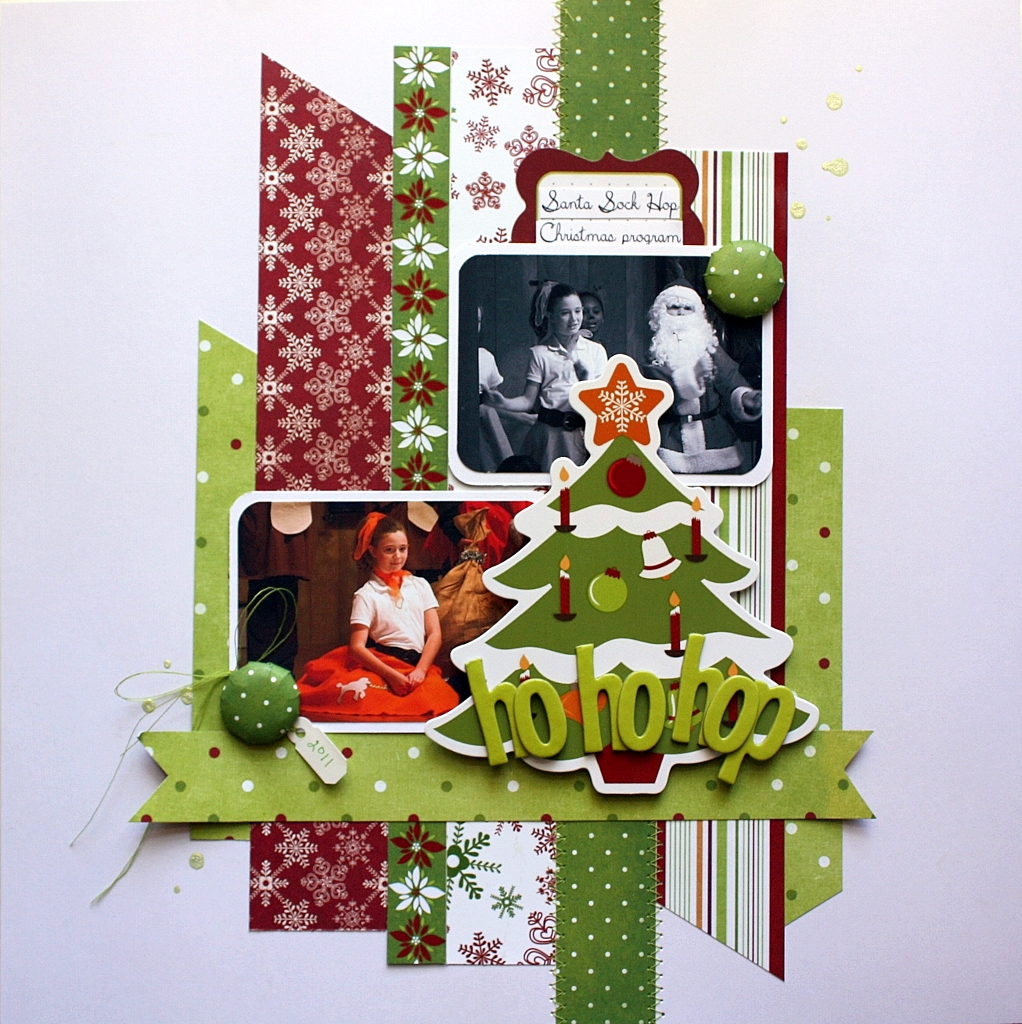
.::HO HO HOP::.
I wanted to showcase several different patterns of paper on this layout, so
I chose to use various lengths of strips as a mat for my photos.

You will notice that one strip goes completely from the top to the bottom of the page
and has been machine-stitched; I made this my vertical focal point
and accentuated it with the placement of the tree die-cut.
I cut down one of the scrolled journal Sticker Stcakers and tucked it
behind the top photo. After adding a couple of I Top Brads, the layout was complete! I purchased this cute baroque frame at Kirklands, removed the glass and added my
own altered photo using CHRISTMAS CHEER! I have a special place in my
kitchen where I hang a little something for each holiday or season

The large die-cuts from Imaginisce are wonderful for projects
like this one; they're a piece of art-work in themselves!
I used the snowflake stamp from the collection
and just cut out each flake after stamping. I added them to
the project with foam dots.

With the I Rock Tool, I added a few red Glam Rocks...
perfect for holly berries! I also added clear Glam Rocks to the
centers of the snowflakes.

Of course, one of my pieces wouldn't be complete without
a nice big, colorful bow on top! The Imagi-Cut is just the right tool
for cutting AND sealing those ribbon ends.
And I have wonderful news: you can WIN your very own
CHRISTMAS CHEER COLLECTION!
Just cruise on over to the Imaginisce Blog and comment
on each day's Christmas in July posts (we're on Day #3 today)
There will be several winners...best of luck to you!
As always, I thank you much for stopping by to see me today!