Showing posts with label Graphic 45. Show all posts
Showing posts with label Graphic 45. Show all posts
3L Scrapbook Adhesives
Christmas Decor
Christmas Magic Collection
diorama
Graphic 45
Shadowbox
tutorial


Christmas Diorama Shadowbox
Christmas Greetings and Welcome
For today's hop, I'm using the precious new collection,
"Christmas Magic" and their Deep Square Matchbook Box
to create this sweet "Diorama Shadowbox"...it even lights up!

Here is a peek at a few of the supplies that I've used:

To begin, I've used a battery-operated LED tea-light that actually
has a timer included. The timer is perfect for switching on in
the evening and it automatically turns off after 6 hours.

I wanted to add the light inside the top of the box, so I first traced
around the tea-light onto the inner box.

Next I carefully cut the traced circle out using an Xacto knife.
Before attaching the light, I made sure that it fit nice and flush
inside of the hole.


I used a strip of the Extreme 1/4" Double Sided Tape and wrapped
it around the base of the tea light and then placed it inside the opening.

From the Christmas Magic Collection are these fun journal cards.
The package comes with two of each design, so it's perfect for
layering! I chose a couple of the cards and then trimmed around
smaller details of one card to layer onto the full rendition.


After making a triangular base from a piece of patterned paper,
I used foam squares to layer the cut-out pieces onto the fuller pieces.

After covering the inside with some of the patterned paper, I
attached the journal card of choice and then layered on the
matching cut-outs with foam. In the fore-front I added the
little triangular accent that was made above.

With the box closed and the light on you can see how beautifully
3D everything looks! I attached some bottle-brush style trees
with 3D Adhesive Dots, as well as a sentiment to hide the
triangle base.

A bow and large sentiment sticker were attached to the front
along with a jingle bell.

Perfect addition for a little one's room or an end table and
certainly a fun conversation piece :)
Thank you for joining me today and be sure to stop by
the Scrapbook Adhesives Blog to take a look at all of
the beautiful holiday projects!
MERRY CHRISTMAS!
A Christmas Carol
Graphic 45
mini album
petaloo
Top Dog Dies


 This is a 12 page album, so come by the Petaloo Blog --HERE-- to see more,
as well as a list of products that I've used to make it.
AND you could **WIN** some terrific goodies...--CLICK HERE-- for details :)
“I will honour Christmas in my heart, and try to keep it all the year.
I will live in the Past, the Present, and the Future.
The Spirits of all Three shall strive within me.
I will not shut out the lessons that they teach!”
― Charles Dickens, A Christmas Carol
A Petaloo Christmas Carol
One of my all-time-favorite holiday movies is now in paper form:
" A CHRISTMAS CAROL"
Graphic 45 has designed the most lovely and nostalgic artwork that
captures the spirit of Bob Cratchit, Tiny Time and Scrooge perfectly!
And of course, Petaloo's vintage finds like velvet dogwoods and festive
berry picks really help to bring the collection to life!
Here are just a few photos of the mini album that I created:
Here are just a few photos of the mini album that I created:


as well as a list of products that I've used to make it.
AND you could **WIN** some terrific goodies...--CLICK HERE-- for details :)
“I will honour Christmas in my heart, and try to keep it all the year.
I will live in the Past, the Present, and the Future.
The Spirits of all Three shall strive within me.
I will not shut out the lessons that they teach!”
― Charles Dickens, A Christmas Carol
Authentique Paper
Graphic 45
Tag Mini Album
Tradition Collection


 The Enhancements cut-apart sheets always come in handy when it's time to add a journaling area or photo mat. And try cutting some of the shapes apart to make a nice background for a sticker or two.


 As the pages increased in size I was able to incorporate the larger journal cards.


 Another cute foam embellishment by Petaloo! I dressed him up with a button and one of the small tag stickers.
After adding the rings, I tied on some pretty sheer ribbon by May Arts.
I hope that you've enjoyed my little mini...thanks for stopping by!
Authentique Products Used: Tradition Collection- Ornament Paper; Tinsel Paper; Chimney Paper; Rudolph Paper; Peace Paper; Iconic Paper; Enhancements Paper; Elements Sticker Sheet
Other Products Used: May Arts- Ribbon and Ric Rac Trim; Queen & Co- Twine and Goosebumps rhinestones; Petaloo- Foam Embellishments
Tag Tradition Mini Album
Happy Monday!
I have a quick and easy tag mini album using the new "Tradition Collection"
by Authentique Paper and a set of 3X8 Kraft tags by Graphic 45 that were
easily altered for a waterfall style album.
I have a quick and easy tag mini album using the new "Tradition Collection"
by Authentique Paper and a set of 3X8 Kraft tags by Graphic 45 that were
easily altered for a waterfall style album.
As you can see, I made the cover into a pocket by folding the tag in half and gluing around the
edges (except for top opening). I like the way the tag peeking out adds graphic detail and interest.
The edges of these particular tags were rounded, so I used that as a guide for matching up the ends on the cover. The consecutive tags were cut an inch larger than the previous to create a waterfall effect. For the spine I punched two holes and then used two 1" rings to hold all of the pages together. I also corner rounded the cut ends with a punch to keep the design uniform.
The Tradition Collection hosts both a dark red and a lighter red, so it's easy to match up embellishments like these pretty felt poinsettias that I found in the craft aisle at Hobby Lobby.
As with the reds, you will also see beautiful shades of evergreen and teal mixed in. This adorable layered Santa can be found at Petaloo.
After adding the rings, I tied on some pretty sheer ribbon by May Arts.
I hope that you've enjoyed my little mini...thanks for stopping by!
Authentique Products Used: Tradition Collection- Ornament Paper; Tinsel Paper; Chimney Paper; Rudolph Paper; Peace Paper; Iconic Paper; Enhancements Paper; Elements Sticker Sheet
Other Products Used: May Arts- Ribbon and Ric Rac Trim; Queen & Co- Twine and Goosebumps rhinestones; Petaloo- Foam Embellishments
Graphic 45
Guest Designer
patriotic
petaloo
Wreath


Guesting at Petaloo!
I am delighted to be the June Guest Designer with Petaloo!
I've had several team-up opportunities between Petaloo and other companies and each experience
reminded me how much I truly love working with Petaloo products. I was equally excited to
learn that Petaloo would be teaming up with Graphic 45 this month in celebrating all things
Summer, patriotic and beach! For my project today I'm sharing a grapevine wreath that I
dressed up for the season...it contains stars, red, white & blue and a beach theme...
it just says "Welcome, Summer!"

I started off with two pre-cut stars that I had on hand. I used the backs of the Graphic 45
"Place in Time" papers to cover the stars. After machine-stitching around the perimeter,
I spritzed each with a little walnut spray and distressed the edges.

After deciding on the focal piece to cut out from the "July" portion of the collection, I used the
remainder of the patterned paper as the backdrop for two smaller stars and the postcard print.
I backed it with a thin chipboard and then stitched in place.

Now for the embellishments! Before attaching the postcard to the base, I added one of the
metal brackets to the bottom. A beautiful swag of Darjeeling Flowers makes a nice border,
followed by a paper pennant "held up" by two of the sweet sea shell pins.
I edged the bottom in three rows of the Paprika Crochet Trim.
Next, I punched two small holes at the ends of each large star and attached to the grapevine wreath
with a thick gauged wire. A large burlap bow to the side and my wreath is ready for
hanging and welcoming Summer guests!
See even more Petaloo and Graphic 45 goodness at www.petaloo.typepad.com
12x12 Layout
Crate Paper
Graphic 45
Halloween
Vintage Street Market
.jpg)
.jpg) I used a couple of different sizes from the Lifestyle Crafts Lace Nesting Dies
I used a couple of different sizes from the Lifestyle Crafts Lace Nesting Dies
to give the layout more interest, texture…and plus I just think they’re fun!
A couple of old buttons, chip letters and some twine from my stash completes the page.
Halloween fun ALERT!
Let me say that I have had sooo much fun crafting with the assortment
of vintagey Halloween goodies from Vintage Street!
I adore anything that replicates the Halloweens of yesteryear…
the Happy Haunting- Halloween Greetings from Graphic 45?
Just perfect for making-up cool little wall-hangings or tree ornaments
or gift tags…lots of possibilities!
.jpg) For the base, I used a chipboard page from a Maya Road album,
For the base, I used a chipboard page from a Maya Road album,
painted it black and then glittered. I added the cut-out with foam tape
and then trimmed it with aqua tinsel.
I found a few fabric flowers in my stash and added those to the bottom,
along with a couple of vintage tickets hosting “Happy Halloween” using
Making Memories Alpha Stickers. For the hanger, just string through a bit
of black twill and you’re set!
I have a few more close-up photos up at the
Vintage Street Market Blog.
If you love vintage, then you'll love Vintage Street!
Glad you stopped by ♥
Sunday Swing & Halloween Bling
Yesterday was my turn at the blog of
VINTAGE STREET MARKET
I love the new papers that can be found under the “Garden” section
of the Vintage Street Market Shop.
I paired up the pretty print, Engraved Garden by K&CO with the
Farmhouse-Sunday Dinner and Pretty Party-Planner by Crate Paper
…I think it coordinates beautifully!
.jpg)
I also used an Olive Paper Bloom by Kaisercraft, as well as a couple of paper
blooms from my stash. I slipped in a scrap of paper behind two of the
Metal Label Holders and used the Making Memories Alpha Stickers to play out my description.
The sweet vintage-inspired cut-out cherubs sheet can also be found HERE at VSM!
.jpg)
to give the layout more interest, texture…and plus I just think they’re fun!
A couple of old buttons, chip letters and some twine from my stash completes the page.
Halloween fun ALERT!
Let me say that I have had sooo much fun crafting with the assortment
of vintagey Halloween goodies from Vintage Street!
I adore anything that replicates the Halloweens of yesteryear…
the Happy Haunting- Halloween Greetings from Graphic 45?
Just perfect for making-up cool little wall-hangings or tree ornaments
or gift tags…lots of possibilities!
.jpg)
painted it black and then glittered. I added the cut-out with foam tape
and then trimmed it with aqua tinsel.
I found a few fabric flowers in my stash and added those to the bottom,
along with a couple of vintage tickets hosting “Happy Halloween” using
Making Memories Alpha Stickers. For the hanger, just string through a bit
of black twill and you’re set!
I have a few more close-up photos up at the
Vintage Street Market Blog.
If you love vintage, then you'll love Vintage Street!
Glad you stopped by ♥
Echo Park
Graphic 45
Halloween Mini
Vintage Street Market



A Halloween Mini
Greetings, weekend blog-goers!
I have a little Halloween mini to share with you today
that I created for
VINTAGE STREET MARKET
I must say that I absolutely cannot wait until September 1st:
yes, I will have my Halloween decorations out and about.
And since I decorate early for Christmas, I get a good 2 and a half months
out of my Fall decorations  I’m in love with all of the replicated vintage
I’m in love with all of the replicated vintage wares such as black cats, owls and jack ‘o lanterns
…black cats are at the top of my list though!
Vintage Street Market has a new assortment of beautiful
Halloween-themed papers by Graphic 45, Echo Park and Making Memories.
These papers were the base for the pages of the album that I created:

I cut one of the little card motifs from the Happy Haunting paper
and attached it to the front with foam dots.
I then outlined it with Aqua Twirly Twine. For the embellishments
I used the Sky Blue Paper Flowers (glittered in aqua), vintage buttons
and a bit of yummy Black Crepe Paper Fringe.
Onto the rings (holding the pages together) I tied on a few different ribbons,
Trick or Treat Seam Binding and Aqua Tinsel (which I adore).
And don’t throw out those cute cupcake picks…save them for your paper projects
as I did with the handsome bat peeking from beyond the fringe :)

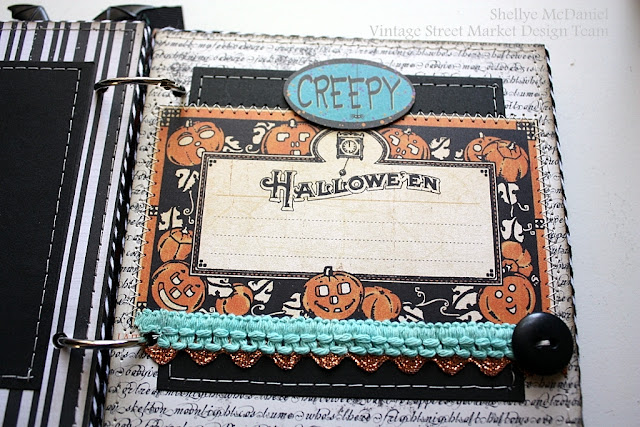
Below is a look at the inner pages of the album…
I will point out all of the lovely things that you can purchase
directly from Vintage Street Market!

I hand-cut the little trick-or-treaters from one of the vintage Treat Bags
offered by VSM and attached it to the paper with a glue pen.
I also embellished with Vintage Tickets, a bit of aqua crepe that I cut into fringe.

An old playing card and bingo piece seemed the
perfect match for this cute little black cat sticker from Martha Stewart.

Jenni Bowlin has always carried a great selection of
vintage inspired goods...these chipboard buttons are among some of
my all-time favorites!

Again, I cut one of the cards from the Happy Haunting paper
and used it as a journal spot. A bit of glittery orange Ric Rac
peeks out from under the aqua trim.

I love little alpha stickers…they come in so handy!
Here I’ve used them on both pages, along with another cut-out from the vintage treat sack.
And there’s another cupcake pick (the ghost...handily applied with a glue dot).
After completing the pages to my albums (most especially those with chipboard bases),
I like to trim the edges with twine, in this case Black Twirly Twine.
I have found that the best way to attach the twine to the often
thin chipboard edge is to use a Ballpoint-Tip Glue Pen.
With all of that, we have a sweet mini to display a few memories from
Halloween 2012 in...I can't wait!
Thanks for stopping by!


