12x12 Layout
Cap and Gown
Doodlebug Design


Cap & Gown
Graduation time is here!
Doodlebug Design has a new collection to help capture & celebrate the occasion:
CAP & GOWN
CAP & GOWN
With basic black, grey, silver and white, it's easy to accessorize the collection
with your own school's colors by adding colored cardstock, buttons, brads and twine!
In the collection you will also find the 4X6 Simply Put Journal Cards, which I used for the
center of my layout. I added some dimension by layering the small star stickers on with foam dots.
The Doodle-Pop Cap came with a silver brad; I carefully removed it and then replaced it
with a Tangerine Mini Brad so that it would blend in with my page.
In keeping with the 'star' theme, I traced and cut out two large stars and layered them behind
the photos...I love how they look like a continuation of the Simply Put card!
Come on over to the Doodlebug Design's Blog where you'll see gift ideas,
cards and card-holders and even more fun layouts
12x12 Layout
Curtsey Boutique
October Afternoon Woodland Park
pink paislee
Queen and Co.


Chalkboard Hearts
I have my most recent project to share that I made for
I created this 12x12 layout with Curtsey's chalkboard hearts, canvas butterflies and baker's twine!
I've had this design in my head for awhile, so I was anxious to finally transfer it onto paper.
I've used the "Woodland Park" Collection by October Afternoon, which has just
a touch of black in some of the design.
After spritzing the canvas butterflies with Mustard ColorShine, I layered on stickers and
Goosebumps by Queen & Co.
Each heart has been dressed up and given its own personality!
You can also write or doodle on the chalkboard die-cuts (there are several shapes available)
with a white marker or chalk.
Lots of new things coming to the Curtsey Boutique Shop at Etsy:
Berry baskets, wooden forks and spoons, colors of baker's twine and more!
Thanks for stopping by...have a wonderful week ahead :)
bella blvd
Cards
ColorBox
Hampton Art
Stamps


Bella Blvd & Hampton Art Stamps
Bella Blvd. is introducing their brand new line of
cling-style stamps by Hampton Art this week on the blog!
www.bellablvd.typepad.com
www.bellablvd.typepad.com
The design team has created some really cute, cute samples of using these on cards...
there are several ideas that I'd like to try myself :)
Here are the two cards that I made for this week's Hampton Art reveal:
After I completed this card, the idea came to me to use the dress stamp for bridesmaid's
Thank You cards. That's the beauty of stamps. That you can modify the colors to suit!
I stamped the dress, first, onto the patterned paper. Next, I stamped the image again onto a canvas cardstock with Staz-On ink. I used a grey watercolor pencil to shadow in the left side of the dress.
I also colored in a couple of the ruffles and then trimmed out the image and attached over the first
stamped image. I just got this new embossing folder that has an inset in the center.
I cut the patterned paper to that size and machine-stitched in place.
Supplies: Love And Marriage: May Eighteenth, Smokeys In Love, Cute Cuts; Engaged At Last: Miniatures Stickers; Button Market: Aqua Flowers; Hampton Art Stamps: Love and Marriage
The inspiration for this card was brought about from looking out my kitchen window.
I love to see the blue sky, bright green grass and wildflowers dotting the landscape.
To create my vision, I used designer tape as a pretty outline for my window; framing the blue sky.
Next, I stamped two of the flower motifs from the "Sand & Surf" stamps onto a white cardstock.
I used Colorbox's Very Berry and Squash and then colored in the petals and centers with
watercolor pencils and then cut out. When using a clear stamp, I like to place a thin foam mat
under the paper that I'm stamping on. This really does help to ensure a nice, crisp image.
Supplies: Love And Marriage: May Eighteenth; Sand & Surf: Paradise; Designer Tape: Combo; Hampton Art Stamps: Sand & Surf
All of the newest Bella Blvd Collections have a matching set of Hampton Art Stamps:
Sand & Surf, Love & Marriage and Kiss Me!
Cards
Lifestyle Crafts
Martha Stewart
Unity Inspiration Hop


Unity {Inspiration}
Welcome to this Thursday's
UNITY {INSPIRATION}
and the release of several new Phyllis Harris stamps!

You will see a lot of sweet examples today with the new images...I had to work ahead
early so I went with the April Kit-of-the-Month for my two cards :)
First order of business though:
**You should be arriving here from Renee Aslette's Blog**
**You should be arriving here from Renee Aslette's Blog**
A $20 Unity Gift Certificate will be awarded to THREE lucky commentors, so be sure
to say "hello" before you leave each blog!
I was so excited to try out my brand new polka dot embossing folder from Lifestyle Crafts!
And I just happened to have the exact size circle punch for the touch of black.
For those gorgeous red lips, I stamped the image with Martha Stewart's Glue Pad
and then glittered with red. I hand-cut the lips from the red cardstock and then attached it
to the white paper with foam dots.
I love these wedding bells...they're so nostalgic and remind me of a 1950's wedding.
I stamped the bells onto a white and light blue textured cardstock by American Crafts.
After cutting the bells from the blue paper, I glittered the one side by using a fine-point glue pen
(Martha Stewart) and then sprinkled with silver glitter. By using the fine-point pen I was able
to dot a couple of the areas with glitter on the other bell.
Embossing folder by EK Success and Scalloped Dies by Lifestyle Crafts
**Let's take a trip over to Shilo Mile's Blog now**
Enjoy all of the Unity goodness and great deals today!
Thanks for stopping in!
card
craft storage ideas
little yellow bicycle
stamping


Stamp Yourself Silly!
We're stamping ourselves silly at
LITTLE YELLOW BICYCLE
Did you know that Little Yellow Bicycle carries a wide variety of clear stamps?
Love large scripted words or typewriter font?
Then these are a must-have for your stash :)
For the assignment I chose to focus on stamping onto one of the new
Naturals elements from LYB...burlap!
Whenever using new clear stamps I like to practice a few times before stamping onto the
desired surface. Another tip is that I do not wipe off the ink before reinking to stamp the final image.
I find that a little ink 'build-up' gives a darker and more filled-in look.
desired surface. Another tip is that I do not wipe off the ink before reinking to stamp the final image.
I find that a little ink 'build-up' gives a darker and more filled-in look.
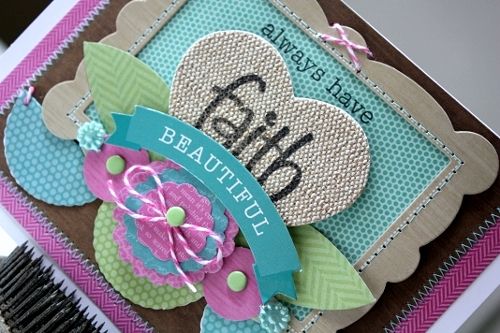
For this card, I used black Staz-On ink to stamp both the paper and the burlap heart. Staz-On ink
is perfect for mediums such as canvas, cork, metal, etc. because it doesn't bleed.
is perfect for mediums such as canvas, cork, metal, etc. because it doesn't bleed.
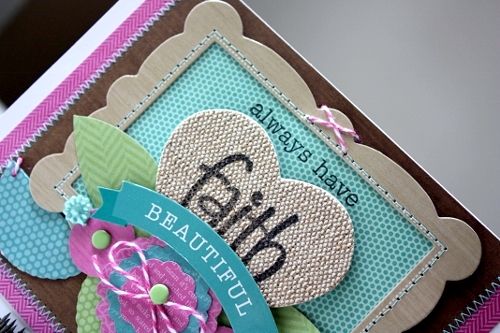
It may be necessary to stamp twice on the burlap, but the great thing about a clear stamp
is that you can see where you're stamping!
You can also take a marker (of the same color) and fill-in any uninked areas if desired...
often times it looks great with a little of the background showing through though.
After stamping, I clean the stamp(s) with a cleaning solution.
LYB Products:
FNG-304 6x6 Paper Pack
FNG-305 Paper Crafting Kit
FNG-279 Chipboard Shapes
NA-BSH30 Burlap Shapes - Hearts
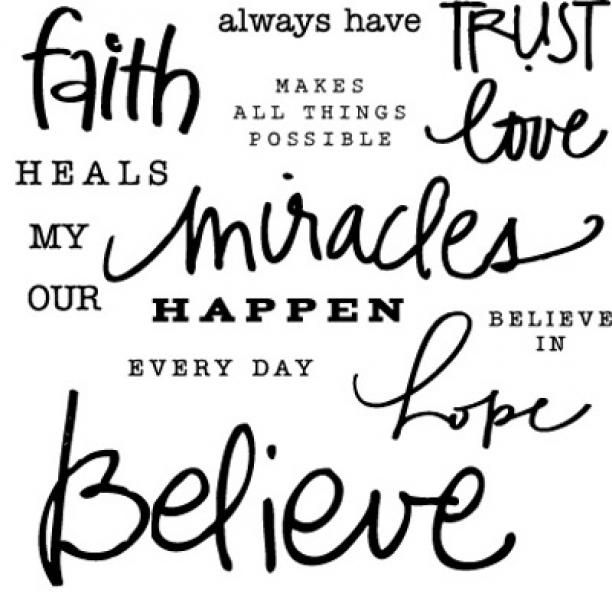
CSS-104 Cling Word Stamps - Faith
FNG-304 6x6 Paper Pack
FNG-305 Paper Crafting Kit
FNG-279 Chipboard Shapes
NA-BSH30 Burlap Shapes - Hearts
CSS-104 Cling Word Stamps - Faith
------------------------------------------------------------------------------
On another note! I was invited a couple of months ago to share my craft space and
organization with Craft Storage Ideas Blog!
You've been invited into my laundry room...ummm crafty space :)
Hey, I can work on a project, swivel in my chair and fold towels without having to get up.
Works for me LOL!
Back tomorrow with some Bella Blvd ;)
Altered Wall Art
Authentique Paper
Seasons Summer
Therm O Web


 I like using a thin ZOTS for things like ribbon, bows and buttons...it sticks!

Simple Pleasures
are teaming up over the next couple of days to bring you tons of inspiration!
Both companies are offering a sweet prize, so be sure to stop by and say "hi!"
Oh boy do I love making some 3D projects!
I am definitely not a flat crafter so Therm O Web's 3D Foam Squares are a favorite friend of mine.
I was also very pleased with the outcome of their Gold Glitter Dust,
which adds just the finest sprinkling of shimmer.
For my project today I've combined pieces from the new Seasons: Summer collection, to create a little hanging for the door or wall. Seasons: Summer is a petite collection and follow-up to Seasons: Winter and Spring.
To get started, I took a scallop chipboard sheet (from a Maya Road chipboard album set) and painted it in a warm yellow acrylic paint. Next, I distressed the edges by dipping a sponge with ColorBox Mudslide ink and then wiping it across the edge.
Shake the can of Glitter Dust well and then lightly spritz the chipboard. I love that the sprinkles are random and not overly heavy...it's just right for a project such as this.
I used the larger 3D Foam Squares on the paper piecing, the round sticker, and the sentiment. For the leaves and the small hexagon pieces, I used the small 3D Foam Squares. Yes, I believe in using a lot of foam!
Although you can't see it very well in the photos, I did lightly spray the hexagon cut-out shapes with the Glitter Dust before adhering them to the paper.
Now it's all done and ready for hanging or gift-giving!
I also love to attach hangers like this to a plain grapevine wreath and hang on a door (covered and safe from the elements). You will love Seasons: Summer...I can't wait for you to see it all!
Authentique Products: Seasons: Summer Collection- Summer One Paper; Summer Three Paper; 6x6 Paper Bundle; Enhancements Paper and Components Stickers
Therm O Web Products: Gold Glitter Dust; 3D Foam Squares and Medium ZOTS Singles
Other: Branchy Leaf Die- Taylored Expressions; Scallop Die- Lifestyle Crafts; Ribbon- May Arts-----------------------------------------------------------------------------
Have a beautiful day!
24/7
Cards
Simple Stories
SNAP
Vintage Bliss


SN@P, Crackle, Bliss!
A happy weekend to all of you! I'm up today at
SIMPLE STORIES BLOG
with a trio of fun cards using SN@P, Vintage Bliss and 24/Seven :)
First we'll start with a "HELLO"
And who wouldn't smile after seeing a bright and cheery Hello from SN@P!
I was so happy that I got to use some of the new Flair Buttons and Chipboard pieces. Simple Stories has hit it out of the park with the addition of these new embellishments!
I love using the Pockets even if there isn't anything 'in' the pocket :) The decorative edge and the pattern lends so much to the design...for this card I simply attached one of the SN@P Label Stickers into the pocket and then added some hand-stitching to the top.
And how about a "Dream Big" for one of the guys (or girl...but this just looks masculine to me!)
let elements such as 3x4 Journaling Cards do the work for you :)
Once I've selected the perfect Journaling Card for my card then I move on to pick out stickers, chipboard, etc., that will complete the sentiment that I'm wanting to achieve.
And if you haven't tried it, implement a bit of hand-stitching to soften and add texture.
There are many times that I don't use my sewing machine, but I still must stitch LOL!
Finally, ahhhh....some "Sweet Bliss"
I absolutely (seriously) had a blast making this card! After texturing the cardfront with an embossing folder (Lifestyle Crafts), I decided to keep the design cropped to just a circle of beauty. I used two different sizes of scalloped dies (Lifestyle Crafts) and then matted the centers of each with a circle that was machine stitched in place. A couple of Chipboard Embellishments and 3-D Layered Stickers and my card is complete!
Simple Stories Products:
Hello Card- SN@P!- Hello Chipboard Stickers; Life Decorative Brads; Flair Icons; Color Fusion Assorted Pockets; Labels Stickers; Typeset Stickers; Life 6x6 Paper Pad
Dream Big Card: 24/7- Fundamentals Cardstock Stickers; Expressions Cardstock Stickers; 6x6 Paper Pad; Chipboard Stickers; Decorative Brads; Layered Stickers; 3x4 Journaling Card Elements
So Very Sweet Card: Vintage Bliss- 6x6 Paper Pad; Chipboard Stickers; Layered Stickers; SN@P!- Typeset Stickers
Next week a few of the Simple Stories ladies are teaming up with Petaloo, so be sure to stop by!
Hoping you have a fabulous weekend!
card
Curtsey Boutique


Glittery Wishes
My latest card for
CURTSEY BOUTIQUE
Yummm, I'm really diggin' the turquoise and black and silver!
After embossing a piece of grey cardstock and sewing on a little mat to the center,
I embellished with several goodies from the Curtsey Boutique Etsy Shop.
I arranged the banners with foam dots and then added the glittered butterflies.
To the chalkboard heart I attached glitter alphas and then a heart stick pin through the top
(having a foam dot behind the heart made a nice place for the pin to stick into!)
Such a quick card! Curtsey Boutique carries an assortment of glittered embellishments,
chalkboard shapes, baker's twine and stick pins...you'll love their store:
and visit the blog for more ideas:
I'll be back on Saturday with a trio of sweet cards for Simple Stories :)
See you then!
Craft N Connect
mini album
pink paislee
tutorial


.jpg)


Be Inspired: A Mixed Media Mini
For the month of April, Pink Paislee is hosting a
CRAFT-N-CONNECT EVENT
where fans can get involved with the Color Crush Challenge
and a chance to win a $100 Prize Pack!
--Check out the details here--
The Design Team has been given a 'free-for-all' theme for the month;
you'll be delighted to see all types of projects made with all sorts of Pink Paislee goodies!
In conjunction with the projects, you will also learn some fun facts about the team members.
The Design Team has been given a 'free-for-all' theme for the month;
you'll be delighted to see all types of projects made with all sorts of Pink Paislee goodies!
In conjunction with the projects, you will also learn some fun facts about the team members.

I wanted to share the kind words that Rebecca Cross posted with my project today:
“Today we get to introduce you to Shellye McDaniel who is also another new member of our team for 2013. We were totally wowed last year when we saw Shellye’s City Sidewalks Canvas project and she immediately got our attention! Her style is colorful, whimsical and she has a way of making every project look absolutely perfect. I am also seriously impressed with her paper sewing skills and the way she makes everything look 3-D. I love admiring all of her dimension and well….perfection! Shellye represents several other manufactures like us but we always get the feeling she only works with us which is a talent in and of itself! We don’t mind sharing her talents and we are just so thankful to have her creative and colorful style on the team. Thank you Shellye for always being so cheerful, enthusiastic and eager to show us new ways to use Pink Paislee products. If you ever want to show me how to sew on paper my door is open! – Rebecca”
With each Design Team's posting day, Rebecca has written something special about
each person. I can truly say that reading it made me teary eyed :)
I love the special touch that this gave to every individual and I've learned quite a bit about
my fellow team members along the way!
For my Craft-N-Create project, I chose a paper bag album. But this is a little different than the paper bag albums that I did years ago...this one adds just a little something extra to make it even more fun.
While away at a scrap retreat I was introduced to a very fun and unusual style of mini album.
I thought to myself “I could do that by mixing this with that and that with that.” In the end I brought together flat brown paper sacks (5×8) (from Curtsey Boutique @ Etsy) and manila coin envelopes (3.25 x 6).
I layered the two together and alternated the pieces so that the album would have an open end, closed end, open end, etc.; fold each piece in half and group together. Next I wrapped a 6″ doily around the spine so that it would show on both front and back covers; add a bit of adhesive to hold in place. Finally, I machine-stitched down the center. I spritzed a little of the Chartreuse Color Shine over the front cover and then began to decorate with all sorts of elements from the Cottage Farms and She-Art Collections.
The glittered butterfly from the Hope Chest Collection made such a nice addition too!
When designing a mini album, I always start with the focal point of the cover…something that will make a nice statement and pull the viewer in. Once I have decided on that, I begin layering and clustering small embellishments, tags and tabs that can be tucked in, as well as raised up on foam dots. I really enjoyed using several dies and punches to create unique flowers and vines from the Cottage Farms papers.
And they say that good design includes a pop of black, so I rubbed on a couple of borders from
Christy Tomlinson’s She-Art rub-ons.
For the coin envelope pockets, I tucked in a standard shipping tag that I had stamped and distressed.
I just love the staggered look that this creates, plus it’s functional. The 6×6 paper pack came in so handy when I set out to prepare the inner-pages of the album.
For each page, I used a journal card for the small photo mat or as a spot for journaling.
The beautiful butterfly motif on each card really does the work for you…just add a button,
a sticker or some rub-ons and you’re done.
And don’t forget all of those fun Artisan pieces that can be colored to match your theme! The Chartreuse Color Shine brought life to the chipboard arrow…the green matches perfectly.
In the end, this little mini makes a big statement! It may look hard to make, but it’s quite easy. Let pre-cut pieces and journal cards do the work. And keep in mind that you will want just a few chunky embellishments so that the album will close easily and lay as flat as possible. Make it shabby or keep it clean-and-simple…the possibilities are limitless!
So, don't forget...the Color Crush Challenge ends April 30th...I hope that you can play along :)


