kraft journal
Kraft Outlet
october afternoon sasparilla
western flair


A Big HOWDY-Do!
Today is my last day to be Guest Designing over at
I've had such a terrific time and have enjoyed meeting so
many new crafty friends :)
This week's challenge is:
WESTERN FLAIR
and I crafted this quick and easy
"HOWDY FRIENDS" Banner!

To begin, I took five sheets of the #32 Small Precut Chipboard and embossed them
with a swiss dot embossing folder. Next, I distressed the edges and raised embossings
with a Walnut Distress Ink . I then machine stitched around the perimeter of each chipboard sheet.
Using a personal cutter, 3"x4" letters were cut from October Afternoon's Sassafrass patterned papers, then lightly distressed with Walnut Distress Ink and a spritzing of walnut ink.
A couple of the stars were punched from a yellow library card.
Stars were also cut using the personal cutter or collected from the
October Afternoon Flower Sack assortment.
Letters were then applied to the chipboard panels with foam tape
and then embellished with wooden buttons stitched on
and red checkered ribbon. A sticker strip from Jenni Bowlin's Brown Apothecary labels
was used on the letter "D".
I wanted to add the word "friends" somewhere along the banner,
so I used the mini type letters from October Afternoon and applied them with mini foam dots.
In finishing, a small hole was punched at each top corner of the banners and looped together with 1"
album rings clad in ribbon and jute.
Here are a few close-up pictures:


The precut chipboard sheets really do make this project a snap to put together.
I have a few other ideas in store for even more banners :)
------------------------------------------------------------
Looking forward to tomorrow...if the rain holds off, I'm going to wash
the outside windows and pot some geraniums in my new (but old) washtubs!
See ya'll later
Shellye
cards challenge
my minds eye All Dolled Up
my scrapbook nook
paper crafters corner
sketch


SVG + MME
As my final CARDS Challenge this month at
I combined a scalloped Easter egg, welded phrase
(both SVGs that I cut with my brand new eCraft)
and of course the sweetest March Nook Kit
featuring All Dolled Up by My Mind's Eye!
I managed to eek out a pretty pitiful card sketch, but I think it works :)

and here's my card:

Would love to have you play along! Just click the link above to take you to the MSN Forum :)
-------------------------------------------------
I got an email from Michelle, owner of Vintage Street Market.
My banner birthday card was featured in an article, "Layering is HOT"
over at Paper Crafter's Corner!

Ummm, my little card pales in comparison to the gorgeous layouts showcased there, but
I'm pretty stoked none-the-less!
Check out their super-informative site if you haven't...tons of information and inspiration :)
----------------------------------------------
All-righty...off to hang with the family for the night.
See you all tomorrow!
Shellye
EAD Designs
Monday Blog Hop and Giveaway
my scrapbook nook
my scrapbook nook blog hop


Monday Give-A-Way & Blog Hop
Monday, Monday!
and that means it's time for our weekly
EAD Design Team Blog Hop & Give-A-Way
Be sure to start with the EAD Blog first...get a looky at what's up for grabs this week :)
Otherwise, you should be here from the wonderful Roses's Blog
**NOTE: If you are here for the My Scrapbook Nook Blog Hop, please click here**
Thank you!
Here is a peek at my sweet card for this week's hop

I used my brand new eCraft to cut out the
welded words "happy b-day", as well as the heart (which I later embossed).
The bee of cuteness and flowers are part of the BEE MINE Stickerz Sheet

I applied the Stickerz to a scratch piece of patterned paper and then carefully
hand-cut around each image.
Just as easy as you please!
Now it's time to stroll on over to the ever-talented Amy's Blog
Thanks for stopping by...I love your visits ♥
Shellye
crate paper story teller
my scrapbook nook blog hop

For my blog hopping project, I created this quick 'n easy card using the
And here are a couple of more reminders:
Don't forget that the Nook April special is that new 12-month subscribers get the April kit for FREE
Nook Blog Hop!

Welcome to the My Scrapbook Nook Spring Blog Hop
Thanks for stopping by and hopping with us :)
Hiding among the blogs (from the list below) are 5 prizes and one HUGE Grand Prize!
We're giving away FIVE $10 prize packs and ONE prize pack valued at $150!
Be sure to leave a comment on EACH blog's post, because you never know which blogs
have these prizes hidden.
To qualify for a prize, comments are due by
Midnight PST on Wednesday, March 28th
and all winners will be announced on the My Scrapbook Nook blog on Friday, March 30th.
BLOG HOP LIST
The Nook blog http://www.myscrapbooknookkits.blogspot.com
Katarina http://krumeluran.wordpress.com/
Carol http://carolmonson.blogspot.com/
Pam http://happytobecreating.blogspot.com/
Lilith http://lilithandscrap.blogspot.com/
Shellye http://www.paperedcottage.blogspot.com/ <-----YOU ARE HERE :)
Nicole http://www.justnicks.blogspot.com/
Hilde http://www.scoobieslilleblog.blogspot.com/
Marinette http://www.scraptherapie.com/
Deanna http://www.deannamisner.blogspot.com/
Gina http://gingerbread.typepad.com/
Danni http://www.dannireid.blogspot.com/
Jessy http://www.teacherjessy.blogspot.com/
LG http://scrappinworld.blogspot.com/
Anna http://annasigga.typepad.com/
Stacey http://staceymichaud.blogspot.com/
Leah http://www.leahkillian.com/
For my blog hopping project, I created this quick 'n easy card using the
April Nook Kit
Storyteller by Crate Paper
The only thing not from the kit are the punched butterflies and burlap twine...this kit is jammed packed with yummy goodies!

And here are a couple of more reminders:
Don't forget that the Nook April special is that new 12-month subscribers get the April kit for FREE
and then after their subscription is over they receive ANOTHER kit for FREE!
**This month's April Grab Bag is valued at over $55, but only $10 for kit subscribers**
Guess what ELSE is happening at the Nook right now?
**This month's April Grab Bag is valued at over $55, but only $10 for kit subscribers**
Guess what ELSE is happening at the Nook right now?
We're having a DT CALL!
Be sure to check out our message board to find out more info.
Your next stop is...the fabulous Nicole http://www.justnicks.blogspot.com/
Your next stop is...the fabulous Nicole http://www.justnicks.blogspot.com/
Thanks for hopping with us!
Shellye
Shellye
I Heart Ippity
imagicut
imaginisce
Kraft Outlet
totally terrific thursday


Totally Terrific (and Busy) Thursday!
Whew! It's a busy Thursday for
The Papered Cottage.
Hang on...here we go :)
IMAGINISCE
First, let me share the layout that I created for
First, let me share the layout that I created for
Imagi-Cut Week at Imaginisce!


What is Imagi-Cut?

It's the coolest new ribbon cutting tool from Imaginisce.
But it's way more than a cutting tool. When you cut ribbon (grosgrain, satin, taffeta, etc)
the Imagi-Cut seals as it cuts! No more frayed ribbon ends!
All week, video tutorials, as well as the Design Team's Imagi-Cut creations have been showcased on the blog. If YOU would love the chance to win one of these, then stop by and leave a comment on each day's blog posts :) You will love seeing the many ways to incorporate the Imagi-Cut into your crafting.
THE KRAFT OUTLET
Next stop...The Kraft Outlet
This week's Challenge was "Anything Goes"
I wanted to dress up the Small Kraft Journal and have it on hand to keep notes in:
upcoming projects, wish lists, things-to-do, etc.

In preparing, I took a Small Kraft Tag and glued it behind the front cover,
leaving the top portion of the tag showing.
Next, I took a Vintage Black Journaling Tag and distressed it with a spritz of walnut ink.
After the ink dried, I added a strip of Headings Rubons along the left hand side of the tag and then embellished with an Office Chipboard Button and letter stickers to spell out NOTES.
Wanting to add a little color, I watercolored and hand-cut the bird with flowers motif from the Vintage Black Journaling Tag and attached to the journal with foam dots.
Digging way back in my stash, a few cute pink Prima flowers
were brought out and a pearl accent added to the center of each.
I also hand-cut a trio of leaves from a scratch piece of patterned paper.
Using Martha Stewart Glue Pen,
a border of baker's twine was added around the perimeter of the Journaling Tag.
As a finishing touch, a bit of shabby seam binding was looped into a bow
(you could also use Nottinghill Seam Binding),
along with a Natural Hemp bow through the hole of the Kraft Tag.
A Tiny Wooden Clothespin clipped to the seam binding completes the project!

I HEART IPPITY
The final stop...I Heart Ippity for Totally Terrific Thursday!
I adore the hand-drawn look of the
Counts as a Fruit
stamp set by Tracey Malnofski
(IPPITY-IB-013)
It makes me wish more than ever that I could draw!
It has that Parisian flair...I love it!
Of course, cupcakes remind me of bright and fun colors, so I paired up the stamp
with the Sidewalks papers by October Afternoon.

Looks good enough to eat, right?
I layered the cupcake with the two different patterns of paper on foam dots.
I then added just a bit of flair with red glitter for the cherry on top!
----------------------------------------------------
That's all for today, folks!
It will probably be a quiet weekend.
I did get my new cutting system (the eCraft), so I'll be tinkering with it.
Spring is in full swing and I need to get over to the nursery and pick up a few
pretties like geraniums, a couple of ferns, verbena and lavender :)
Thanks for stopping by!
Shellye
Shellye
my minds eye All Dolled Up
my scrapbook nook
Here is the inspiration layout:

Layout Lift Cards Challenge!
Wednesday is here, so I'm up with a CARDS Challenge
over at My Scrapbook Nook Forum!
When I ran across this cool and creative layout by Nook Member, Scrappin_in_AK
I thought that it would be the perfect inspiration for a card.
With this challenge, you can use the banner, circles, dots and/or word strips...I love that
it has many great elements to choose from.
Here is the inspiration layout:

And here is the card that I created. It's pretty easy to tell, but I used the bottom circles and word strips as my inspirational aspect. Also, the March Nook Kit!

Speaking of My Scrapbook Nook, join us this Friday through next Wednesday for a
Design Team Blog Hop!
There will be grab bags to give away AND a couple of Design Team spots to fill!
I will fill you in on all of the details as they're made available!
-----------------------------------------------------------------
Tomorrow:
I'll be sharing my Imaginisce Imagi-Cut Project
and
Totally Terrific Thursday at I Heart Ippity!
See you then
Shellye
EAD Designs
Monday Blog Hop and Giveaway
owl


Monday Blog Hop & Give-A-Way
Hello, Monday Crafters!
It's time for the latest installment of the
EAD Monday Blog Hop & Give-A-Way
You should be here from Ms. Rose's Blog
Check out the EAD Designs Blog first (click photo above)
and take a gander at what is up for grabs this week.
My mom and dad dropped by Friday afternoon as I had just
finished up with this week's project for EAD.
As I've previously stated before, my dad is my biggest fan...he is the glowing father
and quite literally thinks I'm a genius (he-he-he) and of course I let him 'go-on'
whilst trying to tamp down his accolades just a bit (I'm not one to be bragged on...I do not like the attention!)
Of course they both crooned over the entire concept of
designing with vinyl and how cute the EAD Designs are :)
Emily, you have some new fans out there LOL
Here is a peek at the suh-weet binder that I created to hold my Design Team stuff in:


I used the Silly Owls Rub-Ons (which ship FREE from EAD!)

and applied them to the front cover of a standard 3-ring binder.
Next, I cut a piece of scrapbook paper to size and layered it with an inset of coordinating
paper that I printed onto (from my home computer).
Oh, all of the wonderful possibilities that I could think of with
these fab-o Rub-Ons!
Hope you will give this idea a try...you will love the outcome :)
Now...
onto Amy's wonderful blog.
Enjoy the hop!
Shellye
Shellye
birthday bash
Easter
Vintage Street Market


--------------------------------------------------------------------------
Happy St. Patty's!
We finally made it...
HAPPY ST PATRICK'S DAY

I haven't reminded my kids of it yet...I'm waiting until I go and put
something green on LOL
I'm working tonight, so I thought I'd stop by the bakery and get
some sweet green treats to share with my co-workers...it'll be Saturday night after-all
and we need some reason to celebrate since we're working (that's how we see it anyway)
VINTAGE STREET MARKET
It's my day to share at Vintage Street!
This month I did a couple of cards with two totally different looks
...I'm showing my bright side and my softer, more shabby side.
First, nothing says Happy Birthday like a big ‘ole bright card!
I adore the nostalgic motifs of the Party Games Collection…it harkens me back to a time when pin-the-tail-on-the-donkey was the thing to do at parties.


I used the cute tag and hand-cut the banner from the Party Games Collection. I machine stitched the Red Bingo Card onto a piece of Maggie Jane Family Fun paper. I attached the ‘banner’ to the card front with foam dots, then strung a piece of Red Twirly Twine across the top. Three dotted buttons give it just the right amount of dimension and personality.
Next up...I love all things vintage Easter…or as I’ve had to settle for: replica vintage Easter! I have several glittered yellow chicks sitting around the house and even an old bunny cake mold on display in my kitchen. When I spotted these printable ‘post card’ prints at Etsy, I just had to have them! I thought that they’d be so cute paired up with the lovelies from Vintage Street Market

After cutting out the selected ‘postcard’, I wrapped a piece of Linen Tinted Tape around the edges (as if the postcard had been removed from an old scrapbook and the tape dog-eared). I then layered it with a scrap piece of scrapbook paper, a light blue Bingo Card, the top part of a Dimestore Vogue Tag and a strip of yellow ruffled crepe from the Party Games Collection. Next, I added dots of Rose German Glass Glitter to the patterned paper. I embellished the front of the ‘postcard’ with pearls, paper flowers and leaves (from my stash) and a Pink Twirly Twine bow. I also added a border of Pink Twirly Twine around the perimeter of the card. I have it displayed in my kitchen hutch...it looks so cute nestled among my other vintage goodies.
--------------------------------------------------------------------------
That's all for today!
I hope you find something fun to do this St. Patrick's Day...the gateway to Spring!
Shellye
I Heart Ippity
Kraft Outlet
st patricks day
totally terrific thursday


Top 'O The Lolli To Ya
I have a couple of new things to share today and they have to do with
St. Patrick's Day and Lollipops...what a combination!
First, I'm up again at The Kraft Outlet today.
The Theme: Luck 'O The Irish Challenge

Have a Kraft Coffee Bag (or two, or three) on hand and load with your gifting treats.
For the tag, I downloaded the FREE clipart from waltzingmouse.com. Print onto Lunch Bag Kraft Cardstock and trim with a pair of detail scissors. Print the same image again onto a green cardstock, enlarging the image just a bit (I changed the page margins on her paper, which created a smaller and larger image). Trim the image again and also cut out the small oval image in the center. Layer the Lunch Bag Kraft image over the green with foam dots.
Next, attach the green oval image onto the Lunch Kraft Bag image with foam dots and then trim with Dark Green Baker's Twine (I use a Glue Writing Pen by Martha Stewart...perfect for adding twine to any project). I added a bit of green glitter to the shamrocks and two brown pearl embellishments to the image as well.
I took a Jenni Bowlin Vintage Black Journaling Card and distressed the front with a little spritz of Eucalyptus Walnut Ink. I then machine stitched it onto a patterned paper, leaving a 1/2" border on each side. Distress the edges of the patterned paper with brown ink. Punch hole at the top of the tag and insert about 10" of Natural Brown Hemp Cording. Tie into a loop and attach to the Kraft Coffee Bag with a Tiny Wooden Clothespin.

Next stop...I Heart Ippity.
The blog has been totally revamped...you must see it!
Today is Thursday and that means a
Totally Terrific Thursday
I Heart Ippity project.
Time to fire up the Zig Markers and dust off that jar of glitter!
I love lollipops...they're whimsical and remind me of an old-fashioned game of Candy Land :)
My daughter gets invited to a lot of birthday parties...and I'm usually the last to know. It's great to have handmade cards, gift wrap, bags and boxes on hand at all times. So, I decided to create a little gifting box that's the perfect size for those 'best friends' necklaces, which my daughter loves to give.
I used the
sucks to get old
Itty Bitty Stamp Set IPPITY-IB-010
For my gifting box, I used a premade container by Martha Stewart (got them on clearance at Wal-Mart).

I stamped the lollipop image with Staz-On Black ink onto a scrap of October Afternoon (Modern Homemaker) patterned paper. I then colored in the dotted portion of the image with a Basic Red ZIG marker. For the non-dotted portion, I glittered with a bit of iridescent glitter. I trimmed the lolli part of the pop out and glued on a plastic candy stick (but you could use the paper sticks from actual lolli pops). I then glued on a cute ribbon bow and pearl for the center of the lolli! Wrap a strip of patterned paper trimmed in ric-rac around the box and wallah...you're done!

Thanks for dropping in!
Shellye
cards challenge
my minds eye All Dolled Up
my scrapbook nook
Simple Stories


Enjoying the SIMPLE Life...
...with Simple Stories!
My (somewhat cheesy) About-Me/Bio is up at Simple Stories

I love the format and how they took part of our application comments and added them to the bio :) Cool!
And speaking of Simple Stories, Crafty Steals has THREE collection kits up today...THREE for under $30!
MY SCRAPBOOK NOOK
It's Wednesday, so time again for my CARDS Challenge at The 'Nook.
This week, I went with a sweet collage from Pinterest to use as an inspiration.
The colors go along perfectly with the March Nook Kit. Players are encouraged to use the colors, as well as a segment of the collage as their card inspiration :)
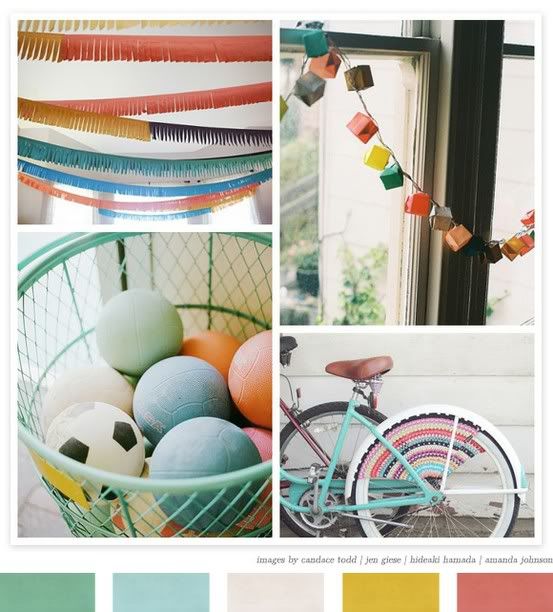

I used the balls in the basket as my inspo for this card.
And boy, have I really gone through the 'wooden' buttons from the February Nook Kit...must. get. more.
And don't forget:
**GRAB BAG SPECIAL**
For new subscribers to the Nook Monthly Kit! Supplies are limited, so get on over there and sign-up today...you won't be disappointed. A *hint* for April...something NEW from Crate Paper :)
-------------------------------------------------------------------
I'll be back tomorrow with Ippity.
Have a Wonderful Wednesday, friends!
Shellye
miss arts papercrafting school
paper issues code


Have a happy Tuesday! I'll be back tomorrow with my next CARDS Challenge for
20% Off
Each and every day when you shop at
Just use my handy little code and you'll save 20% OFF
your entire purchase!
Twine, kits, paper collections from October Afternoon, embellishments...you name it, Cassie has it!
When you check out, be sure to enter my name in all caps: SHELLYE
And speaking off Paper Issues, we're still hosting our
Go Green, or Go Home
Linky Party!
Come on over and link up...creates great traffic for your blog :)
-------------------------------------------------------------------
MISS ART'S PAPERCRAFTING
It's not too late to take my little class over at
THE RULE OF THREE'S

Here are a couple of sweet comments:
"Thank you so much for the tutorial on the triangle and grid I thoroughly enjoyed it and learned alot!!!"
"I am so glad you explained that-I had heard about the grid and something about putting your photos where the lines intersect but I did not understand it. I guess I am a visual person but now I get it!!! Thank you so much!!! "
There are some other really great classes going on, like FUNdamentally Felt, Stamp-bellishments and lots more for the advanced crafter :)
--------------------------------------------------------------
Have a happy Tuesday! I'll be back tomorrow with my next CARDS Challenge for
My Scrapbook Nook!
Shellye
Shellye
imaginisce
makin waves release party


I'm Makin' Waves!
It's Release Party Week at Imaginisce!
If you love bright, candy-colored fun, then you will love the brand new
Makin' Waves Collection
for all of your summery and sunny photos.

Makin' Waves Collection
for all of your summery and sunny photos.
I had a blast crafting with this adorable collection...so many textures, dimension and cute motifs.
First up, a Flip Flop Mini Album


First up, a Flip Flop Mini Album


I used a pair of size 5-6 ladies flip flops. For the FRONT pages, trace and trim out each flip flop separately. For the BACK page, place the flip flops side-by-side onto a chipboard sheet, trace and cut out as one piece. Dress chipboard pieces with desired Makin' Waves patterned papers, carefully trim to size.
For the inner pages, I used a trapezoid shape (7" wide at the top and 5" wide at the bottom...this will depend up on the size flip flops used). You could use a variety of shapes such as stars, circles, hearts, squares, etc.
Punch holes at each side of the front flip flops; stagger inner pages so that one attaches to flip flop A and the next to flip flop B, etc.
Finally, lay front flip flops over the back flip flop piece; match up as best as you can. Mark holes and punch into the back flip flop piece. Use large rings to hold your album together.
Next up, a layout...Sun Kissed Girl


And finally, some really cool Swim Party Invitations!


And a Release Party wouldn't be a Release Party without a fun giveaway!
So here's what you need to do.
Leave us a comment on each post this week and you will be entered into a random draw.
Today we'd like to hear what your favorite summer-time activity is.
Giveaway:
Makin' Waves Collection Pack
(winner will be announced Fri., March 16th)
at
at
----------------------------------------
Thanks for dropping by!
Shellye
Thanks for dropping by!
Shellye


