Showing posts with label summer. Show all posts
Showing posts with label summer. Show all posts
Bar-B-Cute Collection
Doodlebug Design
hostess gift
picnic basket
summer


Bar-B-Cute Hostess Gift
Summertime and Bar-B-Qs...what is better!
Today I'm sharing a fun hostess gift or picnic basket that was crafted from a recycled box and the adorable new "Bar-B-Cute" Collection.

The box measures 10"X7"X5.5" and I did remove the flaps on the top. Next, I covered the sides and back of the box with Bonbon cardstock and lined the inside of the box with the gingham print paper found in the collection.

For the front of the box I cut 1" strips of paper from two different patterns and then wove them into a basketweave design. To embellish I simply layered a journal card with a larger swatch of paper and then added a couple of buttons.


For the handles: I cut a sheet of the Bonbon cardstock into fourths and then folded each section to measure 1.5" wide. Two strips were attached together at the ends to form a long strip. The handles seem to curve better when they've been machine stitched, so I did that as well. Finally, they were attached to the inside of the box with hot glue.


I made a trip to my local Dollar General and picked up a few things to tuck into the basket!
Of course, I made tags for the ketchup and mustard bottles and added the cute matching stickers to the fronts.
The set of plastic bowls' lids were embellished with a disc of layered papers, a die-cut and stickers!
I also found the wooden sign holders for $1 each! I covered them with paper and a Doodle Pop.


Also from my trip to the store, I found...lemon napkins and plates!
I crafted a little box for the napkins from a sheet of patterned paper...it can stand on the table and provide protection for the napkins too. Finally, I tied the plates and napkins together with some chunky twine and topped off with a simple journal card :)
Enjoy a Happy Summer!
Doodlebug Design Product:
Bar-B-Cute Collection
Bonbon Cardstock
Ladybug Chunky Twine
Large Tags Doodle Cuts
Mini Clothespins
Boutique Buttons
card
Fuse tool
summer
We R Memory Keepers
WeR

Sun & Real Sand
Happy Hump-Day!
I'm sharing a fun summer card over at
WE R MEMORY KEEPERS
I've used some actual sand from our last trip to the beaches of Alabama and the
super-cool Fuse tool. Come by the WRMK blog and see how I put it together :)
Hope you're enjoying some Summer sun where you are!
Cards
Echo Park Paper
summer
washi
washi tape


Washi Tape Cards
Recently I shared two cards focusing on washi tape at
ECHO PARK PAPER
Washi tape brings a fun, slick texture and can add a quick pop of pattern and color
to a plain cardstock. For today’s cards I’m sharing a couple of my favorite ways to
use these tapes on cards!
As shown with the first card, I love to use dies along with the washi tape to
create a one-of-a-kind embellishment.
To start, I cut a scrap piece of white cardstock just a bit larger than the die shape.
Pieces of tape were adhered to the paper and then die-cut.
The other umbrella components were die-cut from various 6X6 “I Love Sunshine”
papers. Strips of decorative border sticker were added to the top and bottom
of the card and the design left fairly clean-and-simple.
For the second card I implemented a brick-laying pattern using two different
washi tape designs and a 3.5”X4.75” cardstock paper.
Start at any area at the top of the paper and place a small strip of tape at a
diagonal angle. Place the second strip of tape so that the end matches up with
the end of the first strip.
Continue with the pattern until the desired look has been achieved.
A matching set of flip flops (chipboard sticker) was placed at the bottom, along
with a sentiment sticker and a couple of flowers. Again, a quick and simple
card to brighten someone’s day!
Products:
I Love Sunshine
ILS86003 Pinwheel Afternoon
ILS86005 Sandy Toes
ILS86008 Sun Beams
ILS86014 Element Sticker Sheet
ILS86015 Alpha Sticker Sheet
ILS86022 6x12 Chipboard
ILS86023 6x6 Paper Pad
ILS86026 Decorative Tape - Flip Flops
ILS86027 Decorative Tape – Dots
ILS86032 Summer Days Die Set
I Love Sunshine
ILS86003 Pinwheel Afternoon
ILS86005 Sandy Toes
ILS86008 Sun Beams
ILS86014 Element Sticker Sheet
ILS86015 Alpha Sticker Sheet
ILS86022 6x12 Chipboard
ILS86023 6x6 Paper Pad
ILS86026 Decorative Tape - Flip Flops
ILS86027 Decorative Tape – Dots
ILS86032 Summer Days Die Set
Jack and Jill Girl:
JJG81028 Enamel Dots
JJG81028 Enamel Dots
Door Hanger
Echo Park Paper
Home Decor
silhouette
summer
Wall Hanging


Birdie Welcome Hanger
Summer is just around the corner and now is a great time to begin those
home décor projects to help ring in the sunny days ahead. So grab the new
“I Love Sunshine” Collection and let’s get started!
First, I selected the Bird cutting file from the Silhouette Design Store.
The design coordinates with the “I Love Sunshine” Collection. I cut the bird’s body
(cut twice for a front and back) to measure approximately 10”W X 8”H, while
keeping the remaining components to scale. These pieces were cut from
various 6X6 “I Love Sunshine” papers.
This next step is optional, but I wanted the hanger to be as sturdy as possible.
Cut a piece of poly batting (thick felt or chipboard can be used also) just a bit
smaller than the body. The back piece of the body was coated with adhesive
and then the batting was pressed into place.
The outer edge of the bird, the wings, tail feather pieces and belly were all
inked with Versa Magic “Turquoise Gem”. All of the pieces were glued into place,
with the exception of the left wing, sticker banner and chipboard stickers.
The bird front was attached to the top of the batting with a dab of fabric glue
and then machine-stitched around the edge with a straight stitching.
The center of the eyes, banner sticker, beak and left wing were attached with
foam adhesive. The banner sticker’s end was tucked under the wing and
draped across the chest. The chipboard stickers were clustered together
and the centers of the pinwheels were embellished with enamel dots.
A large bow was made from a piece of 1.5” grosgrain ribbon and attached to the top.
One of the chipboard buttons was used as an embellishment for the center of the bow.
Two small holes were punched at the top left and right of the bird’s head.
A piece of heavy gauged wire was strung through to create the hanger.
Add the bird to a wreath or hang alone to great your Summer guests!
If you love this project, be sure to PIN it!!
PRODUCTS:
Bird Cutting File
ILS86008 Sun Beams PaperILS86009 Summer Memories PaperILS86014 Element Sticker SheetILS86022 6x12 ChipboardILS86023 6x6 Paper Pad
Bird Cutting File
ILS86008 Sun Beams PaperILS86009 Summer Memories PaperILS86014 Element Sticker SheetILS86022 6x12 ChipboardILS86023 6x6 Paper Pad
Jack and Jill-
JJG81028 Enamel Dots
JJG81028 Enamel Dots
Echo Park
Echo Park Paper
Home Decor
summer
Wreath


Hello Summer Wreath
My patio door will be all decked out with this colorful Summer
wreath that I made with the "Beach Party" Mini Collection by
ECHO PARK PAPER
Paper wreaths come in all shapes and styles and today I’m sharing my version
of a fun “Hello Summer” wreath that will brighten an entry way or covered door
during the Summer months! I started with a 7” wire wreath base and twelve 12”
strips cut from two patterned papers (total of 24 strips) from the “Beach Party”
Mini Collection. The strips were cut 1” wide.
The strips were folded in half with the center of the fold placed over the inner ring
of the wreath. The top flap of the strip was inserted back through the outer ring
and glued in place to the back flap.
A circle of chipboard and solid red paper were cut to be a bit larger than the center
opening of the wreath. The two pieces were glued together and then attached to
the back of the wreath. A journal card was cut-out and attached to the center
of the circle with foam adhesive.
To add even more fun (and to hide the bottom metal ring), strips of 5/8” grosgrain
ribbon were knotted or tied into bows around the perimeter. Approximately 4 yards
of the navy ribbon was used to make the bows and 2 yards each of the red and
orange ribbon were used to make the knotted pieces.
A large eyelet was set into the top paper strip and a piece of white string was
knotted through for a hanger. Now it's all ready for displaying and greeting guests!
See more project ideas on the Echo Park Paper Blog!
Beach
faber castell
interactive card
Karen Burniston
Newton's Nook Designs
stamping
summer


And don't miss the "Inky Paws Challenge" that's happening now!
 The challenge winner will receive $10 in store credit...
so get ready, get set and GO to Newton's Nook Blog to find out more :)
Newton Has Popped Up
Newton is popping up everywhere these days!
I'm sharing this fun, inter-active card over at
NEWTON'S NOOK DESIGNS
So, looking at the front you're thinking "sweet little clean-and-simple card"
Until you open it up and........
...Hellooooo...there's Newton all popped up on the inside!
The interactive die is by Karen Burniston with Elizabeth Craft Designs.
After die-cutting the paper and layering on the label pieces, I stamped
Newton onto white textured cardstock and then colored him in with
Aquarelle watercolor pencils by Faber Castell.
I trimmed Newton and his beach paraphernalia out and added him
to the fold with foam adhesive. Next, the sentiment was stamped and then
die-cut with the speech bubble found in the die-set.
For the sun, I punched a layer with an I Top Punch from Imaginisce
and a 1" circle punch. I shaded around the edges of both pieces with
one of the Faber Castell Aquarelles.
You can find this version of Newton and many more designs in the
Newton's Summer Vacation stamp set.
And don't miss the "Inky Paws Challenge" that's happening now!
so get ready, get set and GO to Newton's Nook Blog to find out more :)
Thanks for visiting today!
12x12 Layout
pink paislee
Solstice Collection
summer


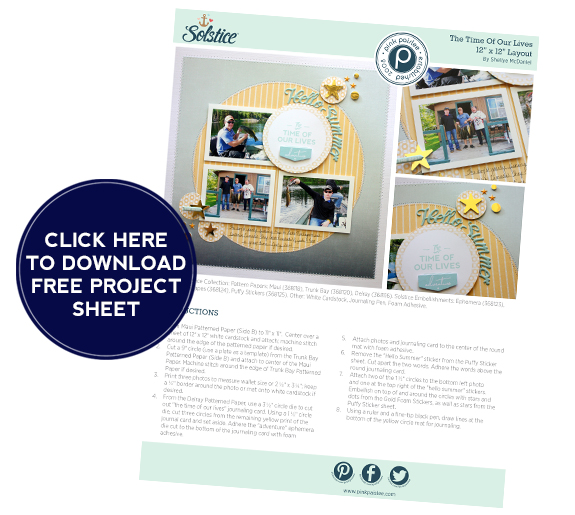
Solstice Summer: Time of Our Lives
My husband and boys recently returned from their annual fishing trip to Canada;
quite the jaunt for some guys from Texas, but they literally catch hundreds
of fish and look forward to the trip months in advance. I sent my old point & shoot
camera with them as was thrilled at some of the
scrapbook-page-worthy photos that they captured!
While thumbing through the 12 x 12 papers, the ombre side B of the
Maui Patterned Paper caught my eye and reminded me of water as it gets deeper.
I cut the paper down to 11 x 11 and centered it onto a sheet of white cardstock
before machine stitching around the edge. Next, I decided on the journal card,
“The time of our lives”, and used a 3.5″ circle die to cut it out.
I stayed with the circle theme and proceeded to cut a large, yellow mat from the
Trunk Bay Patterned Paper; I used a 9″ plate as the template. Next,
I used the remainder of the journal card pattern to cut out smaller 1.5″ circles.
For the title, I cut apart the “Hello Summer” Puffy Sticker and attached
it around the contour of the round journal card.
I placed the smaller circles in a fashion to resemble bubbles and accented
with several shapes from the Gold Foam Shapes. Finally, I used a ruler and
thin-tipped black pen to draw on lines for journaling at the bottom. I love the
versatility of the “Solstice” Collection and how you can fashion it around any
Summer activities whether it be a trip to the beach, camping or a fishing trip to Canada :)
To download the complete step by step instruction sheet, click the image below!
chickaniddy crafts
summer
Top Dog Dies
treat bags


Swimming Party Treats
Happy Summertime!
I have a sweet treat idea for your little pool goers this Summer.
It all starts with a simple bag die (I've used this Box W/ Handle Die by Top Dog Dies)
and a collection of assorted "Date Night" Papers and "Twirly Girl" Stickers from
CHICKANIDDY CRAFTS
The little bags can be filled with goldfish crackers or other small treats!
See how I put it all together on today's blog post at
And be sure to take a look at the upcoming collections for Fall & Winter:
One of my favorite pieces...the 12X12 Sticker Sheet:
Click on the link above to see the entire collection!
One of my favorite papers from the collection:
Click on the link above to see the entire collection!
And while we're talking about all-things Chickaniddy...
don't forget about their Craft Team Call!
It's happening between now and August 17th.
Good luck if you apply...it's a wonderful team to be on
and I'll really miss my time with Chickaniddy!


