Cards
Iron Orchid
SOTW
unity hip hop


Unity Hip Hop
Welcome to this Thursday's
UNITY STAMP CO. HIP HOP
**You should be arriving here from Renee Aslette's Blog**
As with each week's Hip Hop, there are THREE $20 Unity Gift Certificates!
TIME TOGETHER Card
This card didn't quite come together as I had envisioned it in my head,
but it will do! If I had planned a little better, I could have included one of the
two sweet sentiments also found in the stamp set.
TIME TOGETHER Card
This card didn't quite come together as I had envisioned it in my head,
but it will do! If I had planned a little better, I could have included one of the
two sweet sentiments also found in the stamp set.
I LOVE this stamp by Iron Orchid, Time Well Spent.
I stamped the clock onto the yellow patterned paper, trimmed it out and then
machine stitched it over the same image that I had stamped onto the blue paper.
I used watercolor pencils to color in the birds.
I can't wait to try it out again in another fashion...and it has the sweetest sentiment
stamps that goes along with it!
stamps that goes along with it!
Journal Stickers by Authentique Paper
Patterned Papers by Christy Tomlinson/Pink Paislee
And I missed out on getting in my card in time for this week's
STAMP OF THE WEEK
so here it is...
I had so much fun with this! As you can see, I stamped the image three different
times and then trimmed out and layered the various pieces. I kept the design
clean-and-simple with the addition of a neat red bow at the top :)
Red Swiss Dot Paper by Simple Stories
**Let's head over to Shilo Miles' Blog now and see what she has for us**
Thanks for joining us!
Cards
pink paislee
Secret Crush
Valentine's Day


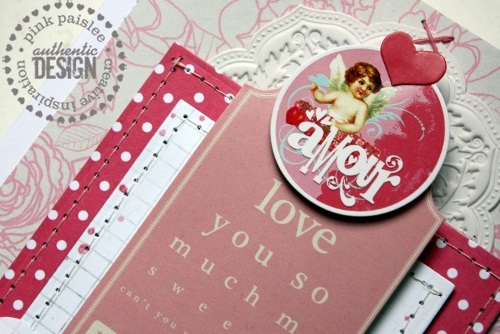


I Amour You, Truly
It's almost "LOVE" Month and I'm up today at
Pink Paislee Blog with two sugary sweet cards :)
Secret Crush brings you into a world of cupids, arrows and of course, hearts
…perfect for those extra special Valentine Cards that you have in mind to make this year.
I love seeing that the tradition of ‘giving’ Valentines is making a come-back, greatly
due to the hobby that we call cardmaking.
I have a couple of cards to share that will hopefully give you a few ideas for creating
your own cards of amour! I wanted grand, stately cards that would really showcase
Secret Crush to its fullest, so I went with a 5″x6.5″ blank white card for both.
"I Amour You" Card
I love layers, layers and more layers! The market supplies us with all sorts of fun dies that make it more interesting and fun to layer. For this card I started with a print of Polka Dance paper as the backdrop and then layered with two nested banners cut from the front and back of Endless Love.
To the top banner, I flecked on just a bit of Primrose Color Shine Spritz by Heidi Swapp.
Keep that bottle handy! See the little X stitching at the top of the Artisan doily?
I dyed a piece of white thread Primrose before stitching! I spritzed a small amount into
a disposable cup and then dipped the thread into it before threading my needle.
I also used it to stitch an X at the bottom of the card as well. And speaking of the doily from the Artisan Circles, I cut just what I needed and added it to the top of the banner,
saving the other half for another project!
After centering the cute card from the Paper Goods collection,
I added a row of hearts that I fussy cut from the Heartbeat paper.
A straight stitch gave a little texture to the pink arrow and a trio of
shiny heart buttons from my stash added some extra pop!
Part of my theory on design is that “what goes up, must come down”…and that has
nothing to do with gravity hehehe! Because I stitched the X at the top, then it’s a must
that I incorporate it somewhere else on the card, which in this case is
at the bottom of the beautiful Artisan embellishment. Voila!
"Love You, Truly" Card
Ah yes, this card had me singing… “I love you truly, truly dear…life with its sorrow, life with its tears…” If you’ve watched “It’s A Wonderful Life” then you’re familiar with the tune crooned by the duet, Bert and Ernie (why do those names sound familiar?)
I’m super picky about dots, so yes, I cut the Polka Dance paper so that the dots would
be centered as the backdrop for this next card :) After selecting the bright red I LOVE YOU Photogram, I cut a mat from the back of the First Kiss paper and layered the two
pieces together with foam dots. Before attaching it to the background paper,
I machine stitched the cute “u rock” photo tab to the top.
Doesn’t the large die-cut heart make a statement. To it I added the Portfolio Puffy Alpha Stickers,
which I zig-zagged across with my sewing machine…easy peasy!
Next, some more fussy-cutting came into play as I selected several clusters of the
hand-drawn blooms from the Polka Dance paper. Before attaching them, I colored
in the leaves with a watercolor pencil…just to give a little pop of extra color. I also lightly spritzed the flower clusters with a dusting of Color Shine Tinsel Spritz by Heidi Swapp.
Wanting to create even more dimension, I popped a large Artisan flower to the center of
the bouquet and then sprinkled a few of the smaller flowers from the Butterfly Wings packet
around as well. A little piece of the gray doily (First Kiss paper) peeks out from it all
and lends a nice border effect. Carrying through with the pop of red from the top of the card,
a small piece of a red ticket stub was also added. And finally, a scalloped edging from the
Artisan borders is stitched onto the bottom… I love the way the sewing machine
just glided right over it with no fuss at all!
Shop for Secret Crush online at:
Have a fabulous Wednesday!
12x12 Layout
Authentique Paper
Blog Hop
Lovely Collection
petaloo


She's So Lovely
A good Tuesday to you!
Today is the second installment of the
AUTHENTIQUE + PETALOO BLOG HOP
I love pairing up Authentique papers with Petaloo anything...they were made for each other,
which makes any project using the two fun! Today I'm sharing a layout of my daughter with photos
that I took after her last dancing show.
I started with a background from one of the Lovely papers, "Crush" and a little bit of misting
in black velvet by Heidi Swapp. The next step was pretty cool...I actually embossed
a small piece of the "Dearest" paper in a rose pattern and used it as the mat for my photos.
The shabby chic look of the Pink Dahlias mix perfectly with the cute whimsy of the Mini Florettes
with their blinged centers. I placed a small round foam dot on the backs of the Florettes
so that they would really pop up from the embellishment they were added to.
In keeping with the 'round' embellishment theme, I used the three round seals from the
"cards repeats" stickers, along with a doily die and round punch. It's fun to experiment
with the different punch-outs and stickers to see what will look best and where...Authentique
gives you so many possibilities in all of their collections!
Be sure to stop by each company's blog to see the
inspiration and leave a comment so that you'll be in the running for
this terrific prize pack

Authentique will give you an extra chance to WIN if you follow them on
Instagram...check out the details on the blog :)
GOOD LUCK and thanks for dropping by!
GOOD LUCK and thanks for dropping by!
bella blvd
Love and Marriage
mini album
.jpg)
.jpg)
.jpg)
.jpg)
I Do...A Mini Album
I have a happy little mini album to share created with
Bella Blvd's new "Love & Marriage" Collection.
A mini album is the perfect palette for small, favorite photos.
But don't forget the journaling!
Just Write Journaling Stickers aren't just for scrapbook pages, so think
of them when preparing your album pages, even if you need to trim them down a bit.
For this album I used a very inexpensive chipboard 'flower' shaped album found at Michael's.
After tracing and trimming out the papers to fit the flower shape,
I then reached for the perfect sized jar lid for the inset of each page.
If you have a large enough template or circle cutter, you may wish to use that instead.
Because this is a flip-up style album, I had to plan carefully of how to arrange each page's embellishments. Too many thick areas can cause the pages not to lay right.
.jpg)
.jpg)
.jpg) Finally, I added a large ring to the top and tied on a simple satin ribbon.
Finally, I added a large ring to the top and tied on a simple satin ribbon.
.jpg)

 Supplies:
Love And Marriage: Vows, Smokeys In Love, Cake Tasting, May Eighteenth,
Cute Cuts, Turner Ballroom, Esther Fleming Floral, Alpha+Bits Stickers,
Just Write Journaling Stickers, Chipboard Icons;
Engaged At Last: Engagement Chipboard Icons; Designer Tape: Yellow Chevron,
Gray Chevron; Crochet Hearts: Pickle Juice, Punch; Flags: Engagement;
Button Market: Hot Pink Flowers, Pink Flowers; Crochet Flowers: Poppy, Dahlia
See more projects on the blog!
bellablvd.typepad.com
Have a great week ahead!
After dressing each page I went back and added a border of baker's twine around
the edge of each page. I love the way it hides the uneveness of the cuts made to the paper,
as well as the plain, grey chipboard. For this, I've found that a ballpoint tip glue pen works best!
Love And Marriage: Vows, Smokeys In Love, Cake Tasting, May Eighteenth,
Cute Cuts, Turner Ballroom, Esther Fleming Floral, Alpha+Bits Stickers,
Just Write Journaling Stickers, Chipboard Icons;
Engaged At Last: Engagement Chipboard Icons; Designer Tape: Yellow Chevron,
Gray Chevron; Crochet Hearts: Pickle Juice, Punch; Flags: Engagement;
Button Market: Hot Pink Flowers, Pink Flowers; Crochet Flowers: Poppy, Dahlia
See more projects on the blog!
bellablvd.typepad.com
Have a great week ahead!
Authentique Paper
Brooch
card
Curtsey Boutique
.jpg)
.jpg)
.jpg)
.jpg)
.jpg)
.jpg)
.jpg)
2-N-1 Thank You Gift & Card
For my project this week at
I designed a card to act as a Thank You, as well as a
little gift for the recipient!
This is the perfect idea when you're wanting to thank a hostess,
bride's maids, your mom, or anyone who has done something special for you.
Adding a beautiful fabric flower takes a lot of the guess-work out of this sweet
card and also makes it very quick and easy to put together...here's how it goes:
First, you will need one of the beautiful Fabric Flowers from the Curtsey Boutique
at Etsy, a flat-back brooch pin and a small piece of felt.
Sew (or glue) the pin to the piece of felt and then attach the felt directly to the back
of the Fabric Flower using a high-tack fabric glue (such as Fabri-Tac by Beacon)
Next, create a background paper to attach your pin to.
For my card, I used a banner die, which measured approximately 3"W X 4"H.
Punch two small holes into the background paper
(measure across the width of the pin to determine how far apart holes should be placed)
Pin your Fabric Flower through.
In finishing, stamp a "thank you" or other desired sentiment to a tag or tab
and add to the front of the card. I also used a bit of Ecru Paper Doily to add some
interest and beauty to the top of the banner paper.
Patterned papers by Authentique Paper; stamp by Fancy Pants; and
ivory card by Paper Studio.
Visit the Curtsey Boutique today!
Thanks for stopping by :)
bella blvd
Dress Form
Engaged at Last Collection
Plaque
Treat Containers
.jpg)
.jpg)
.jpg)
.jpg)
.jpg)
.jpg)
.jpg)
.jpg)
.jpg)
.jpg)
.jpg)
.jpg)
.jpg)
.jpg)
.jpg)
Engaged At Last!
Yay! It's finally time to share all of the
ENGAGED AT LAST
projects that I made for the Bella Blvd. booth at CHA.
Couldn't you picture this all set up for a bridal shower or bachelorette party?
"Let's Party" Altered Dress Form
All shapes and sizes of metal dress-forms are readily available and fun to transform.
For the skirt, I started with a sheet of 12x12 "He Proposed" paper that I cut in
half to measure 6x12. I then scored each piece (lengthwise) at 1/2" increments.
Fan fold both 6x12 pieces and attach together at one end. At the bottom,
use a corner-rounding punch on every-other fold (if desired).
Next, use a 1/8" hole punch to create holes at the top folds.
Thread a piece of baker's twine or crochet thread through the holes and then
tie around the base of the dress-form.
Pull the tension until the desired 'gathering' of the skirt is formed.
For the top, I simply criss-crossed two 1" wide strips of paper and tucked them
behind the 'waistband' of the dress. I thought that a banner would be fitting for a bridal
shower, so I created one that announces "Bachelorette Party Girls Only"
I used a rolled flower die for the lei of flowers around the bodice.
In finishing, I added a couple of the fun Feathers to the front and back,
as well as a cute stick pin and satin bow.
Supplies:
Engaged At Last: He Proposed, Bridal Shower, Bachelorette Extras;
Engaged At Last: He Proposed, Bridal Shower, Bachelorette Extras;
Feathers: Punch; Flags: Bachelorette
Basket Full 'O Treat Containers
These little treat containers have the WOW factor, without all of the fuss!
AND you can make them as large or as small as you'd like.
For this lot of favors, I began with a 6x6 square of paper for each.
Using a quick-drying glue or heavy adhesive, glue two ends together; allow to dry.
Next, machine stitch, glue, or staple the bottom end together.
After filling the inside you will want to close the top so that it is creased opposite of the bottom
(I machine stitched these, but a hole punch with ribbon tied through also works beautifully).
There are so many cute way to decorate the fronts of these!
I cut strips of papers and sentiments from the Bachelorette Extras Paper
and layered them with a punched heart and doily die-cut.
For the front of the wire basket, I hand-cut a heart and then backed it with a
medium-weight chipboard. After embellishing, I tied it onto the basket with satin ribbons.
Add matching shredded paper to the bottom and then arrange the favors inside!
Supplies:
Engaged At Last: He Proposed, Bridal Shower, Bachelorette Party, Bachelorette Extras,
Engaged At Last: He Proposed, Bridal Shower, Bachelorette Party, Bachelorette Extras,
Alpha+Bits Stickers; Crochet Flowers: Juniper; Crochet Hearts: Pickle Juice
S&S Altered Plaque
A sweet display that doubles as a gift for the bride-to-be!
I found this gorgeous, curvy wooden plaque at Michaels.
It was already painted white, which made decorating that much easier.
I started by tracing the shape onto the Bachelorette Party Paper.
In doing so, I wanted to keep the chevron pattern centered,
so I made sure that it was lined-up accordingly before I began to trace.
For the top, I had an extra piece of chipboard from a mini album that I
used to create the bright background. Again, I fashioned a heart by folding a piece
of paper in half and cutting freehand. I cut the same sized heart from a piece of
chipboard and machine-stitched the two together. After adding the heart to the center,
I embellished the top with the initials of the couple, as well as some other fun items!
Supplies:
Engaged At Last: Bridal Shower, Bachelorette Party, He Proposed, Alpha+Bits Stickers,
Engaged At Last: Bridal Shower, Bachelorette Party, He Proposed, Alpha+Bits Stickers,
Just Write Journaling Stickers, Engagement Icons; Sienna Chipboard Alphas: Frosting;
Love & Marriage: Chipboard Icons; Crochet Hearts: Saltwater,
Pickle Juice; Button Market: Blues
---------------------------------------------------------------------------------------
More NEW RELEASE projects will be shown throughout the week
at Bella Blvd, so come visit and enjoy!
Altered Canvas
Authentique Paper
Seasons Spring


The Spring Season
Okay y'all...seriously, if I could paper my entire
craft room in the new Spring Petite Collection by Authentique,
trust me: I WOULD.
The color combo is every vintage/shabby chic lover's dream!
SEASONS: "SPRING"

It truly pained me to cut into the papers, but well, I had an assignment due
so it couldn't be avoided. I came up with this sweet altered
canvas that I can hang up all throughout the year!
I layered cardstock with smaller mats of patterned paper from the collection.
To each piece's edge I distressed with a bit of walnut ink and then machine
stitched in assorted stitches just to keep things fun.
Fun trims added to the whimsical charm and I found myself singing
"Easter Parade" by Bing Crosby...I mean, in a few shakes this thing could surely
be turned into a wild Easter bonnet of days gone by :)
I used various dies by mftstamps.com and Lifestyle Crafts, as
well as acrylic birds from Basically Bare.
I.love.it.
Head on over to the Authentique Blog and take a closer look at
all of those beautiful papers...you will fall in love!
-----------------------------------------------------
Tomorrow I'm back with the altered projects that I created for the
Engaged at Last Collection by Bella Blvd.
Have a wonderful Wednesday!


