12x12 Layout
Altered Box
Handmade Holiday
Simple Stories
Take a Hike
.jpg)
.jpg)
.jpg)
.jpg)
.jpg)
.jpg)
.jpg)
Cocoa & The Outdoors
Good Saturday Afternoon!
I've been trying to get over here all day, but other
things have been getting in my way...
you know: laundry, making deviled eggs for my dad's
birthday party tomorrow and cleaning the bathrooms.
No matter how hard I try, I simply cannot get around this
house-cleaning thing LOL
house-cleaning thing LOL
I just couldn't wait to share my newest projects for
SIMPLE STORIES!
I'm up on the blog today
I snapped several photos of the family having fun out-of-doors last November.
The {Take A Hike} Collection not only brings out the colors in the photo perfectly,
but captures the warm and rustic feel that nature evokes.
.jpg)
For the 'mat' I used a sheet from the 6x6 paper pad, along with several basic patterns.
.jpg)
Part of my love for Simple Stories is the plethora of cardstock stickers that
are offered with each collection. I paired up the two different sticker letters to create
the title for my page. I did add a thin foam dot to the backs of the square letters.
.jpg)
In keeping with the outdoor theme, I added embellishments of rusty metal stars,
wooden buttons and jute twine. I picked up the stars from the
Christmas aisle at Hobby Lobby!
We shop a lot at a wholesale food club
. Whether it's my mom who goes or myself, we tend to split up our goods
between the two households. During a particular trip my mom just couldn't
pass up an extra big box of colorfully packaged cocoa mixes :)
I like to sit mine out on the counter when the cooler months arrive,
so I derived this helpful cocoa bin from an empty Keuring coffee box
and the {Handmade Holiday} assortment!
.jpg)
Two sheets of 12x12 paper cover the larger-sized box perfectly.
I simply used the contur of the box as the template, trimmed the excess and then glued into place.
.jpg)
In wanting to hide the opening of the box and its rather tattered edges,
I glued on a bit of pretty trim. And of course I just had to top it off with a gingham bow!
.jpg)
I had the most fun creating the inviting little embellishment for the front of the bin.
I love layering journal cards with various cardstock stickers, buttons and other textured accents.
.jpg)
And here's a peek at how the sides of the box look.
For the top, I just creased the paper neatly before gluing down...much like wrapping a present!
This would make such a sweet little gift for anyone on your list this Christmas Season :)
-------------------------------------------
Don't forget to check out the inaugural edition of
Winners from the blog hop will be announced tomorrow...see you then!
Ippity
tags
unity hip hop


This {ippity} stamp set is loaded! You can achieve so many different


Tag It!
Welcome to the Thursday
UNITY STAMP HIP HOP
where we're celebrating everything {ippity} today!
You should be ->here<- from Robyn's Blog!
In case something goes awry, just head over to the Unity Blog
to get back on track :)
For today's hop I went with tags...I love making tags.


This {ippity} stamp set is loaded! You can achieve so many different
looks by mixing 'n matching and turning to-and-fro.

And what's not to love about a 'lil Halloween witch?
With dressed up tags you can decorate treat bags, tree branches,
packages, cards or hang from a hook or knob.


I first embossed the tag with a cool spiderweb embossing folder
that I found at Hobby Lobby...it's by Paper Studio. If you wanted to make
up inexpensive treat bags, think of embossing plain brown or white kraft sacks
before filling with treats!
- - - - - - - - - - - - - - - - - - - - - - -
SPECIAL SPECIAL SPECIAL SPECIAL

 As you can see it's a great time to shop Unity!
www.unitystampco.com
SPECIAL SPECIAL SPECIAL SPECIAL


www.unitystampco.com
Now it's time to hop over to Shemaine's Blog...
Enjoy and thanks for stopping by!
EAD Designs
Jillibean Soup
Monday Blog Hop and Giveaway
Snowflakes

You should be arriving here from Rose's Blog, but don't miss

Dreaming of Snow in Summer
and I'm celebrating this
EAD BLOG HOP & GIVEAWAY
with a little bit of snow!
You should be arriving here from Rose's Blog, but don't miss
stopping by the EAD Blog to see what's up for grabs prize-wise today!
I just love this picture of Zach and Syd posing under the
Christmas tree on Christmas morning 2011.
There are no forced smiles, but true happiness
that only this special season can bring.


I've used various patterned papers by Jillibean Soup and loads of
these fun Snowflake Rub-ons by EAD. I chose white for my snowflakes,
but you can pick from a wide variety of colors...I think light blue and a pale
pink would look so pretty too!
**STICKERZ and RUB-ONS SHIP FREE WITH EAD**
Now it's time to hop on over to the EAD Guest Designer, Angela's Blog
for even more fun inspiration :)
Have a wonderful week!
October Afternoon Woodland Park
stamp of the week
Unity Stamp Company


Doin' It With Style
**If you are here for the Paper Haus Hop, click here**
Calling all of you June Cleavers out there!
This week's Unity Stamp of the Week is just a doll.

All that's missing is the strand of pearls :)


The image was stamped onto white cardstock, as well as a beautiful
piece of patterned paper from October Afternoon's Woodland Park.
I used micro-tip scissors to carefully cut out the portions from the patterned paper
that I wanted to use on the main image. I also accented the little details
in the apron with Zig Markers.
Patterned Papers and Washi Tape by OA Woodland Park.
-------------------------------------------------------------
Would you ♥ to receive a little bit of goodness in the mail
each and every week? Do you ♥ stamping? If so, the
Unity Stamp of the Week Club
is just right for you!
$5.79 per week for US & Canadian orders
and that includes shipping!
Find out more details at Unity SOTW
Hope you're having a beautiful Sunday! Be back tomorrow!
each and every week? Do you ♥ stamping? If so, the
Unity Stamp of the Week Club
is just right for you!
$5.79 per week for US & Canadian orders
and that includes shipping!
Find out more details at Unity SOTW
Hope you're having a beautiful Sunday! Be back tomorrow!
Hip Hop Thursday
Jillibean Soup
Unity Stamp Company


Love & Blessings
WELCOME
Unity Stamp Blog Hoppers
You should be arriving here from the blog of the talented and sweet Renee Aslette.
Should something go awry during the hop, just head back over to the
For this hop I've broken out some brand new stamps
that I haven't had a chance to work with yet.
They've been eyeing me and I've been eyeing them right back ;)

I love any round stamp that can be punched out with one of my circle punches!
The "Count Your Blessings" image is from the
Country Pumpkin Chowder by Jillibean Soup
I coupled it with different papers and journal spots from Jillibean :)

I've loved this next stamp, "Sending My Love" for quite some time.
I made this next card with a very special friend in mind ♥


I used a combination of colored pencils, water-color pencils and Zig Markers.
After shading with the colored pencils I went back over with a coordinating
water-color pencil and then blended with water. I was also able to obtain
some shadows and shading with this method as well.

After stamping the main image, I went back and added some red ink
to the 'flag' on the stamp and then stamped the image and cut out. I love the
3-D effect that it gives along with the silver brad.
♥ ♥ ♥ ♥ ♥ ♥ ♥ ♥ ♥ ♥ ♥ ♥ ♥ ♥ ♥ ♥ ♥
That wraps it up for me on this hop...now it's time to have a
visit with the stamping sensation, Shilo Miles!
Thanks for dropping by!
Altered Art Frame
imaginisce
Layout
Monster Mash


A Graveyard Smash...
...the MONSTER MASH...
creeeeek
(creepy door opening)
.
.
.
.
It's Monster Mash Release Week at Imaginisce

and I'm super excited to be sharing the projects that I
crafted with it. If you haven't seen the full collection of Monster Mash,
just stroll on over to Imaginsice! I love that they've stuck with the traditional
Halloween colors and added in a bit of dusty teal blue and green.
As with all Imaginisce collections, cuteness abounds :)
BOO WALL HANGING
For this I started with a plain 'ole inexpensive 3-paned wooden plaque.
After painting the wood black, I added a square of patterned paper in
place of a photograph and began embellishing.

Imaginisce Die Cuts are so generous in size and can easily be layered
with other matching elements such as pieces from the Sticker Stackers or
Canvas Stickers. Don't be afraid to remove (gently) the witch's shoes from the
sticker and try it out somewhere else...I just add a little dab of glue to the
foam dot and you're good to go!

And you know how much I love my leaf punch...I used it here along with
a few Brad Daddies and die-cuts.

I glittered BOO chipboard letters in a purple/silver mixture.
Wanting a soft touch, I tied on chevron ribbon bows to the eye-hooks between
each panel and also at the top for the hanger.

This HUGE bat die-cut is all you need at the top!
He's utter perfection...who couldn't LOVE a face like that?
FACE PAINTING LAYOUT
For my layout I followed the gallon-quart-ounce theory.
In design it it good to remember to keep things in proportion, whether it's color,
photos or embellishments. The dominate color is purple (gallon), followed by
the blue (quart) and then the green (ounce).

The main focus of embellishments is in the bottom 1/3 of the page,
as well as at the right vertical 1/3 of the page.
Proportion helps the flow of a layout, gives rest to the eye and
keeps things pleasing to the viewer :)

Aren't they the cutest parade of characters?
With the exception of the sticker letters and Thickers, everything that
I've used can be found at Imaginisce!
So glad you've stopped by to see my contribution to
MONSTER MASH...
I'm sure that there will be many other projects to follow as I
won't be getting enough of this collection any time soon :)
HAVE A WONDERFUL WEEK!
EAD Designs
Halloween
Monday Blog Hop and Giveaway
Spiders


Spooky Spider Invasion
Glad you're here for the
MONDAY EAD BLOG HOP & GIVEAWAY
You should be here from Rose's Blog!
The EAD Blog will showcase the lovely loot up for grabs today,
so don't forget to stop by and say hello.
Autumn decorating is just around the corner at the
McDaniel house and I love nothing more than my
Harry Slatkin Fall candle scents wafting through the air.
I ordered these adorable (yes, I just called spiders adorable)
Rub-Ons with this in mind:


With EAD Rub-Ons, you can decorate plain candle jars for
any occasion or holiday!
Products used:
You can order either item in just about any color imaginable.
Time now to visit the August Guest Designer, Angela's Blog.
Happy week to you all!
Echo Park
Graphic 45
Halloween Mini
Vintage Street Market


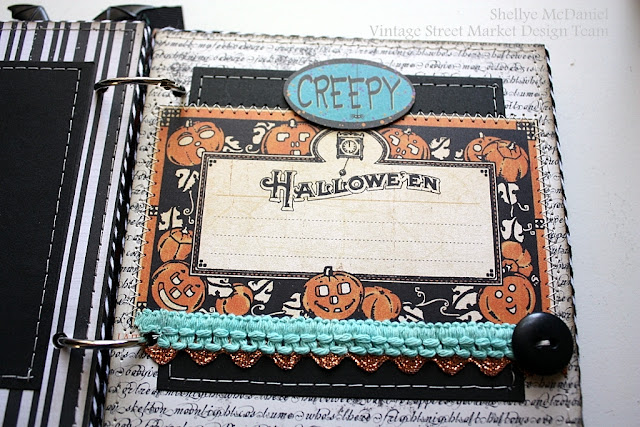

A Halloween Mini
Greetings, weekend blog-goers!
I have a little Halloween mini to share with you today
that I created for
VINTAGE STREET MARKET
I must say that I absolutely cannot wait until September 1st:
yes, I will have my Halloween decorations out and about.
And since I decorate early for Christmas, I get a good 2 and a half months
out of my Fall decorations  I’m in love with all of the replicated vintage
I’m in love with all of the replicated vintage wares such as black cats, owls and jack ‘o lanterns
…black cats are at the top of my list though!
Vintage Street Market has a new assortment of beautiful
Halloween-themed papers by Graphic 45, Echo Park and Making Memories.
These papers were the base for the pages of the album that I created:

I cut one of the little card motifs from the Happy Haunting paper
and attached it to the front with foam dots.
I then outlined it with Aqua Twirly Twine. For the embellishments
I used the Sky Blue Paper Flowers (glittered in aqua), vintage buttons
and a bit of yummy Black Crepe Paper Fringe.
Onto the rings (holding the pages together) I tied on a few different ribbons,
Trick or Treat Seam Binding and Aqua Tinsel (which I adore).
And don’t throw out those cute cupcake picks…save them for your paper projects
as I did with the handsome bat peeking from beyond the fringe :)

Below is a look at the inner pages of the album…
I will point out all of the lovely things that you can purchase
directly from Vintage Street Market!

I hand-cut the little trick-or-treaters from one of the vintage Treat Bags
offered by VSM and attached it to the paper with a glue pen.
I also embellished with Vintage Tickets, a bit of aqua crepe that I cut into fringe.

An old playing card and bingo piece seemed the
perfect match for this cute little black cat sticker from Martha Stewart.

Jenni Bowlin has always carried a great selection of
vintage inspired goods...these chipboard buttons are among some of
my all-time favorites!

Again, I cut one of the cards from the Happy Haunting paper
and used it as a journal spot. A bit of glittery orange Ric Rac
peeks out from under the aqua trim.

I love little alpha stickers…they come in so handy!
Here I’ve used them on both pages, along with another cut-out from the vintage treat sack.
And there’s another cupcake pick (the ghost...handily applied with a glue dot).
After completing the pages to my albums (most especially those with chipboard bases),
I like to trim the edges with twine, in this case Black Twirly Twine.
I have found that the best way to attach the twine to the often
thin chipboard edge is to use a Ballpoint-Tip Glue Pen.
With all of that, we have a sweet mini to display a few memories from
Halloween 2012 in...I can't wait!
Thanks for stopping by!
Back to School
imaginisce
Layout
Pro 31 Designs
Treat Cards


One + Two= Three
Time for a little
BACK TO SCHOOL FUN
As you can see by the title of my post, I
easily passed the first grade by accomplishing that one LOL
They do so much more these days...now kids are learning
things we did in the 4th grade in the 1st grade!
It's astounding.
First up, is a treat pocket tutorial that I created for
IMAGINISCE BACK TO SCHOOL WEEK
This is very similar to the one that I created for Authentique just
a few days ago, but this one is smaller and of course shows a
different way to go about decorating. The same design
principal still applies though :)

For SIX Pockets: You will need a 12x12 sheet of paper; cut paper into 2x12" strips.
Next, cut 1.75" x 11.75" strips from a patterned paper (I used Chit Chat); center and attach
to the 2x12 strips of paper. Score the 12" strip at 4.5"; fold in half. Machine stitch
(or glue) the folded area to create a pocket.
Corner round the top edges if desired.


For the apple: punch a 1" circle from red dot paper. Cut a small stem
from any brown paper and attach to the center of the apple. I freehand-cut
the leaf, but a punch or all-ready-made leaf could be used. Tie a little ribbon to
the top and your done!
Supply List:
Sole Sisters Chit Chat 12x12 Paper and Scallop Frame Snag 'em Stamp;
Hello Cupcake Wish Big 12x12 Paper and Celebrate You 12x2 Paper.
Tools: CutBright LED Rotary Cutter, CutRight Acrylic Ruler and i-mat 14x14
Misc: Core'dinations Double-Sided Cardstock, Ribbon, computer generated
journal strips, 1" circle punch and corner rounder punch.
-----------------------------------------------------------
Next up, I have a couple of layouts. One that I created for
PRO 31 DESIGNS
and another that my daughter, Sydnee made!
I promised her that I would share it with you all.
For 10 years old, she does a pretty good job at scrapbooking :)


As you can see, I used rows of beautiful trims, all from PRO 31 Designs!
The little turquoise flowers are also from their online shop :)
I took three die-cut mats from K&CO and layered them together
to form a nice background for my photo and embellishments.
And here it is...Miss Syd's Layout

She's heard me talk about having 'vertical and horizontal' elements
and she pointed out to me that her page included both LOL
That's all I have to share today!
We're having our first football scrimmage tomorrow.
I honestly can't believe that it's all ready that time of year...but I'm happy :)
See y'all soon!
See y'all soon!


